Homemade Bread Recipe

Homemade Bread Recipe

I love homemade bread.

The smell of the yeast, the feel of the dough in my hands, the baking aroma that floats out of the oven and through the entire house…

Dreamy.  Delicious.  Why don’t I do this more often?

Anyway, I finally decided it had been too long since I’d made bread from scratch, but this time, I made a few changes.

This is based off of a basic Amish recipe for bread that’s slightly sweet and a little dense, but this time I made it with coconut oil.  The end result in appearance, texture, and taste was the same as if I’d made it with vegetable oil, so I’m thrilled.

However, extra virgin coconut oil may add a coconut taste to the bread – but I’ve never used extra virgin for baking, so I’m not really sure.

I also used Organic Natural Cane Sugar, but one with the texture of regular granulated sugar, unlike the consistency of Demerara or Sucanat, which I sometimes put in my coffee.  This way, the weight of the sugar didn’t need to be adjusted for the recipe.  Makes my life easier.  :) 

Homemade Bread Recipe

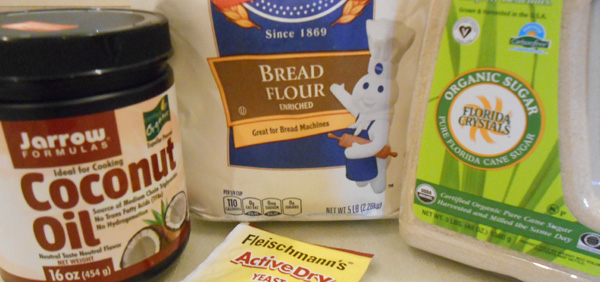
Anywho, you can see some of the products I mentioned in this photo.  And the only yeast I had on hand was those little packets, instead of the larger jar, so I had to use about one and a half of them, which irked me a little.  The jar is back on my shopping list.

Homemade Bread Recipe

Yeast is one of my favorite smells in the whole world.  I love proofing it.

Here are some tips I’ve picked up over time:  get warm water from the sink because the microwave is tricky and water that’s too hot will kill your yeast, and add sugar to the warm water first, to give the yeast something to get really excited about.

In other words, the first thing you’ll do in this recipe (or any yeast dough) is add some warm water to a measuring cup.  (Forgive me for not photographing this step.)  Run the water from your sink until it is just barely painful to touch, then fill your measuring cup to whatever your recipe calls for.  You can test it with a candy thermometer.  It should be between 100 and 110 degrees Fahrenheit.

Put this pre-measured water into the large bowl in which you will create your dough.  Stir in a tablespoon or two of the total amount of sugar from the recipe – don’t add sugar to what’s called for, just use part or all of what you already would to make your dough.  Then add the yeast, sprinkling it over the top of the warm sugar water.  You don’t need to stir it in, but sometimes I do.  Leave it alone for 5 to 10 minutes and you’ll know it’s ready when the top is nicely covered in a frothy, foamy layer of soft, strong-scented yeastiness.  (That’s a word, right??  It should be.)

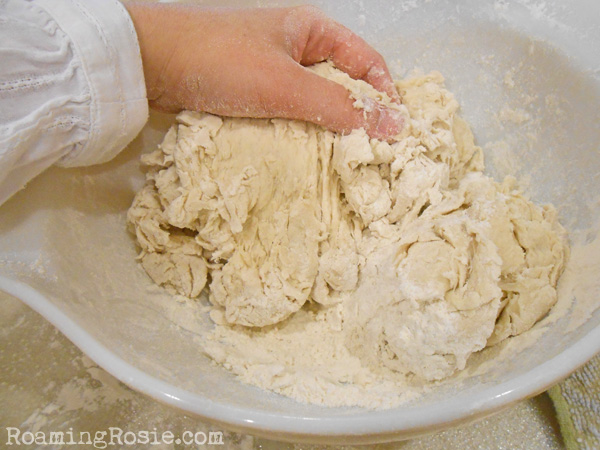
At this point, you’re ready to make the dough.  For this particular recipe, this would be when you add in the salt and coconut oil.  You need a liquid coconut oil for this, so I find it easiest to stick the solid oil in the microwave for 30 seconds to melt it.  Then you’ll mix in the flour.  I start this with a spoon, but usually end of finishing it with my hands (above photo), and then knead it on a floured surface.

Homemade Bread Recipe

Grease your bowl by rubbing a bit of the coconut oil inside of it, and put your kneaded dough back into the bowl.  Cover lightly with a kitchen towel and let it rise for an hour.

It will double in size.  Punch (yes, punch) it down, knead it for a minute again, and then separate it into two halves.  Coat two bread loaf pans with the coconut oil and place loaf-shaped dough into the pans.  I formed the loaf by tucking the dough under itself to create a smooth top.

Homemade Bread Recipe

Let the dough rise one more time, until approximately doubled in size or risen to about an inch over the top of the pan.  This will take between 30 to 60 minutes.

Bake until browned on top.  I prefer mine lightly browned, but you could bake it an extra few minutes for a darker brown – just watch the bread so it doesn’t burn.

Allow the bread to cool in the pans on a cooling rack for awhile.  About a half hour.  Then remove the bread from the pans and allow it to finish cooling on the rack. Keep your bread wrapped in a bread bag or tin foil.

Whatever you’re not planning to eat in the next 2 or 3 days can be easily frozen.  You can slice the bread and freeze it that way, too.

Cinnamon Toast made with Homemade Bread Recipe

I also enjoy making cinnamon toast with the bread (pictured above).  My mom often made this for me when I was growing up, and it’s still one of my favorite dishes.  To make it:  slice a piece of bread that will fit in your toaster.  Toast to a light brown and spread with butter immediately so the butter will be very soft and mostly melted.  Sprinkle with a cinnamon and sugar mixture immediately so that the sugar will absorb into the butter.  Enjoy!

Okay, here’s the good stuff:

Homemade Bread Recipe

Ingredients:

2 cups warm water (110 F or 45 C)
1/4 cup granulated sugar
1 1/2 tsp active dry yeast
1 1/2 tsp salt
1/4 liquid coconut oil (or vegetable oil)
6 cups bread flour

In a large bowl, stir the sugar into the warm water.  Pour the yeast over the water and mix it in, if desired.  Let sit for 10 minutes until yeast develops a thick foam.

Add the salt and oil to the yeast.  Mix in the flour one cup at a time.  Knead the dough on a lightly floured surface for a few minutes, until smooth.  Place dough in a bowl coated with oil, cover with a towel, and allow to rise for one hour.

Punch dough down, then knead for a few minutes.  Divide dough in half.  Form dough into loaf shapes and place in two oiled loaf pans, about 9 by 5 inches each.  Let the dough rise for 30 minutes or until about an inch over the tops of the pans.

Bake at 350 F or 175 C for 30 minutes.

(Note:  I used solid coconut oil to grease the bowl and loaf pans by rubbing on a couple tablespoons with my fingers.)

*****

And now for the FREE printable PDF:  Homemade Bread

Next up will be the awesome Tropical Almond French Toast that I made with my homemade bread:  yum!  :)

Roaming Rosie Signature

How to Make Cinnamon Sugar

How to Make Cinnamon Sugar

I recently realized that I use a lot of cinnamon sugar.

It’s something I’ve used forever.  My mom often made me Cinnamon Toast (buttered toast sprinkled with cinnamon sugar) when I was a kid, and I still make it today, both for my daughters and for myself.

And I’ve been using it with various recipes quite a bit, so I decided to go ahead and dedicate a blog post to it.

How to Make Cinnamon Sugar

You can buy ready-made cinnamon sugar in the spice aisle at the supermarket, but I just can’t see the sense in that because it’s so overpriced and so easy to make.

In the above photo you see my tools:  cinnamon, sugar, and a container to hold it.  I also use the knife to mix it, but my mom just shakes the bottle.  Either way works.

But, to make things official, here’s a recipe:

Cinnamon Sugar

Ingredients:

1/2 cup sugar
1 Tbs ground cinnamon

Pour ingredients into a jar.  Mix with a knife until well combined, or, if your jar has a lid that seals, you can shake to combine.

How to Make Cinnamon Sugar

As I’ve mentioned, I use this on toast.  I also add it to French Toast.  And apples to make cinnamon apples.  And buttered bagels.  And snickerdoodle cookies.  And baked sweet potatoes.

This list could go on for awhile…

And the stuff stays good pretty much forever.

It’s best to store it in a container that has holes on top, where you can shake it onto the food, but also one that has a cover to keep out dust.  Kinda like this.  Or a regular sugar dispenser, if that’s all you have, but those pour too quickly for my needs.

How to Make Cinnamon Sugar

Here’s a pin-worthy pic to help you remember the recipe:

Homemade Cinnamon Sugar Recipe

Enjoy!

And please let me know what kinds of foods you’ve tried with it!

Here are some dishes I’ve used it with:

Honey Cinnamon Apple Pie a la Mode

Homemade Bread (for Cinnamon Toast)

Cinnamon Sweet Potato Slices

Honey and Cinnamon Vanilla Ice Cream

Roaming Rosie Signature

15 Minutes to Chocolate Pudding

Chocolate Pudding

It was late.  I found myself in the mood for chocolate, but not wanting candy or ice cream or, even, (heaven forbid) cookies.

But I needed chocolate.

What could I make?  What would satisfy my craving?  What could be done quickly since it was already nine at night?

I couldn’t decide, so I explored Pinterest.  There were so many, many amazing foods, but nothing quite what I needed… until I came across The Best Chocolate Pudding You’ll Ever Have (in 15 minutes!).

Fifteen minutes?  That’s worth a try for silky smooth dark chocolatey goodness.

Unfortunately, I didn’t have any dark chocolate cocoa on hand, so mine was more semi-sweet.  Still awesome, tho.

Chocolate Pudding

It was definitely simple.  Whisk together a few ingredients.

Chocolate Pudding

Boil some milk.  Whisk the rest of the ingredients.  Eat.

Chocolate Pudding

I was pleasantly surprised by how simple and quick the whole process was.  The thing that took the longest was stirring in the chocolate chips (above) and waiting for them to melt.  If I’d had chocolate shavings instead, it would have been even faster.

And there were a few chips that didn’t melt completely, but that didn’t really bother me.

Chocolate Pudding

The problem with taking photos was that I was in a rush to eat it, and my powdered sugar kept melting as soon as I sprinkled it on.  The thick, gooey chocolate was calling my name.

It’s awesome when it’s well-chilled, too.  Of course.  Which I know because I couldn’t eat it all in one sitting.  Which was lucky for my girls.  They got to enjoy it the next day.  :)

So be sure to check out the recipe at A Cup of Jo – and the photos, too, they’re much better than mine!

And then be sure to enjoy some homemade chocolate pudding.  :)

Roaming Rosie Signature

Cotton Candy Champagne or Sparkling Juice

Cotton Candy Champagne or Sparkling Juice

I gotta be honest here:  I’m not a fan of sparkling grape juice.

But a shot of whiskey was not going to be how my girls were going to ring in the new year.  Not for another 18 or 20 years, anyway.

So sparkling grape juice it is.

I wanted to do something a little different, tho, and so I picked up some cotton candy at the dollar store, since I’ve read that people sometimes add it to champagne.

The result?

I loved it!

And so did my girls, which is the important part.

Cotton Candy Champagne or Sparkling Juice

It’s such a simple concept, too:  put a little cotton candy in your glass and pour the champagne / sparkling grape juice over it.  Watch it fizz, and enjoy!

The fizzing happens quite quickly, but it’s still fun to watch.  And listen to.  But the best part?  Your sparkling grape juice now tastes like cotton candy.  Yum!

Cotton Candy Champagne or Sparkling Juice

As you can see in the above photo, the cotton candy disappeared almost the instant the sparkling juice hit it, so it was hard for me to capture the actual process on film.  Although the “after” is kinda pretty.

I used pink cotton candy above, and then I tossed some blue cotton candy into it, which you can see below.  The result was a somewhat murky purple, but delicious.

Cotton Candy Champagne or Sparkling Juice

And, I served it in aperitif glasses, so that my preschooler could feel like a grownup with her own kid-sized wine glass.

This will definitely be served for many New Year’s to come!

Roaming Rosie Signature

Spiral Cut “Confetti” Hot Dogs

Spiral Cut Confetti Hot Dogs

To add a little extra pizazz to a regular lunch around New Years, I made my kids’ hot dogs into confetti ribbons.

This is kind of the same concept as spiral potatoes, and it only takes a couple of minutes.

You’ll need:

hot dogs
skewers
knife

Insert the skewer into the hot dog, keeping it as close to the center as possible all the way through.  I found it easiest to put the hot dog on it’s end and push the skewer down through it.

Then lay the hot dog on it’s side and angle your knife a little.  Begin cutting through the hot dog at the very top, cutting into it until your knife hits the skewer.  Then turn the knife, cutting around and around the hot dog while making sure to continue cutting into it as deep as the skewer while moving in a pattern much like when you peel an apple in one piece.  Do this until you reach the other end, then gently push the hot dog off of the skewer.

Spiral Cut Confetti Hot Dogs

The best way to cook these is to boil them.  Microwaving can cause it to cook unevenly and baking would crisp it up too much.

So bring a pot of water to a boil, throw in the hot dogs, and gently simmer them for 4 or 5 minutes.

Then serve up the edible confetti!  Great for New Years and birthdays, or just adding some surprise to an otherwise ordinary day.

Roaming Rosie Signature

New Year’s Eve Cookie Clock

New Year's Eve Cookie Clock

Cookies are always a good idea.

Seriously.

So why not bake a giant cookie to help you ring in the New Year?

New Year's Eve Cookie Clock

Since I wanted our giant cookie to look like a clock, I used melted chocolate to make some numbers.  I used dark cocoa chocolate melts, but you could also use regular chocolate chips for this, too.

I melted them at 50% power in a baggy, then cut off a small corner to squeeze out the chocolate onto some parchment paper.  I let these harden while we made the cookie.

New Year's Eve Cookie Clock

And the easiest way to shape your cookie into a circle is by using a circular pan.  I don’t have any fancy “giant cookie pans” or anything, so we smushed our cookie dough into a regular cake pan.  On top of a piece of parchment paper, though, that I had cut into a circle just smaller than the pan.  The paper keeps the cookie from sticking.

Use your favorite cookie dough here.  I went with chocolate chip, and I even used a box mix since we had some of those BOGO deals from Publix taking up room in the pantry, but you could use any recipe you like.

You need to watch it as it’s cooking.  Since it will be thicker than a regular cookie, the middle will still be a little soft when the edges are done.  You just kind of have to judge.  Usually the middle will feel a little underdone to some people (unless you overcook it), but that’s what I love about them.  It’s kind of like a cookie-brownie.

New Year's Eve Cookie Clock

When you take the baked cookie out of the oven, let it sit for a minute or two, and then lay the chocolate numbers on top of the cookie, very gently pressing to make sure it stays in place.

The heat from the cookie will melt the bottom of the chocolate numbers and as the cookie cools the numbers will harden again.

To make the pattern easier, put the 12, 3, 6, and 9 on first, and arrange the other numbers in between them.

I drew on the hands of the clock afterwards, since I wasn’t really sure what size I’d need.  You could draw the hands ahead of time when you make the numbers, though.  And if you really want to make them ahead of time but you’re really worried about the size, make a few and choose the best when the cookie is done.

New Year's Eve Cookie Clock

Once the cookie and numbers had finished cooled, I stuck some candles in it and we sang Happy Birthday to Mother Earth in celebration of the New Year.  My girls loved blowing out the candles at the end of the song.

Oh, and I did actually remove the cookie from the pan after we took out the candles and before we cut it.  It only cracked a little on the edge when I stuck a cake server under it to transfer it to a plate, but I didn’t take any photos after that.  Was too busy eating.  :)

Do you have any special New Year’s Eve or New Year’s Day foods?  Let me know!

Roaming Rosie Signature

Ultimate Norwegian Spice Cookies

Norwegian Spice Cookies

These Norwegian Spice Cookies are my mom’s favorite Christmas cookie.

I know that, originally, we had copied the recipe from a magazine.  Many years ago I typed it up and put it in my recipe binder.  Unfortunately, I don’t know the original source.  But I’ve made a few changes over the years anyway (to turn them into the proclaimed “ultimate” spice cookie), and so my own version of the recipe is featured here, along with a printable version.

But first, all the yumminess my camera could capture:

Norwegian Spice Cookies

I just love how the shadow of the mixer in the mixing bowl looks like a Christmas tree.  :)

This is the butter and sugar about to be creamed together, with the eggs and vanilla waiting patiently nearby.

Norwegian Spice Cookies

When you blend together the dry ingredients (flour and spices) be sure to thoroughly sift them together.  I use a fork for this. You want the spices to be evenly distributed.

I know it looks like a lot of spice when you’re measuring it out, but don’t worry, it won’t look like that much once it’s all mixed – and the flavor is fantastic!

Norwegian Spice Cookies

The gooey, spicy, luscious dough…

Once it’s blended, it’s pretty soft.  At this point you need to divide the dough in half, shape each half into a disc, wrap the discs in plastic wrap, and refrigerate them for an hour.

I’ve found that the easiest way to do this is to lay out a sheet of plastic wrap on the counter and scoop the dough into the center of it.  Fold the plastic wrap over the small mountain of dough and shape generally into a flattened circle as you pull the wrap over and around the dough.

It’s sticky, so using the plastic wrap to shape it instead of your hands saves you some time and aggravation.

Norwegian Spice Cookies

After you’ve had an hour to clean the mixer, sort through your cookie cutters, place some parchment paper on your baking sheets, and dance to a few Christmas songs, then the dough will be ready to be rolled out.

You could actually leave it in the refrigerator for a couple of hours, but I don’t think I’ve ever left it overnight.  After a few hours the butter in it gets too hard to roll out and then it needs to sit at room temperature for awhile, but if you leave it too long then it gets too soft, and that just makes my life complicated… so, really, between 1 to 2 hours is best.

Usually, in the midst of Christmas cookie baking marathons, I’ll make this dough, put it in the fridge, make and bake another cookie (like chocolate chip, for example), and then cut out and bake these.  Works out pretty well that way.

Norwegian Spice Cookies

And look at the spices in those snowflakes:  you can SEE the cinnamon, the cloves… *mouth waters*  …mmm, you should smell the magnificence.

Norwegian Spice Cookies

And these reindeer cookies are a great way to illustrate that flour helps you cut out the cookies.  The dough is soft and will stick to the cutters, but dipping the cutter in a dish of flour before stamping out a couple of cookies will help the dough to fall right out of the cutter.

Also, peeling away some of the dough surrounding the cookies before trying to lift them will help.  As will using a spatula like the one pictured below, or like this.

Norwegian Spice Cookies

But, sometimes I peel away the extra dough, and sometimes I don’t bother.  I certainly don’t pull away ALL of the dough… except for in the above photo because I thought it would make a neat picture.  :)

But you really only need to do a little at a time to help with transferring the cookies to the baking sheets.

If you’ve rolled out the dough without enough flour under it, the cookies will stick to the counter.  Just dip your spatula in flour before sliding it under the dough to loosen them.

And remember, with soft cookie dough like this, flour is your friend:

Norwegian Spice Cookies

You should put flour under the dough, on top of the dough, on the rolling pin, on the cookie cutters, and on the spatula.  I mean it:  flour party.

If there is too much on the finished cookie, just blow off the excess before baking.  Any extra at that point will be absorbed by the egg wash that you put on the cookies just before baking.

Although, I have to admit, I sometimes forget to add the egg wash.  But that’s okay.  It’s not essential to the cookie, but it does add a nice shine and a silky smoothness to them.

Norwegian Spice Cookies

The above picture is what was left of my dough after I collected all the scraps, rerolled them, cut out more cookies, and did it all again.  I got two small stars out of the last roll.

But we don’t waste food in our family.

Especially cookies.

So, I rolled up these scraps into a circle, flattened it into an oval, and placed it on my last sheet of cookies to bake.  After all, sometimes these last-of-the-scraps creations are the best part of making cookies.  :)

Norwegian Spice Cookies

And really, these cookies are great two ways:  thick and soft or thin and crunchy.  My mom likes them crunchy, I prefer them soft.  Luckily, that’s an easy problem to solve when baking multiple trays:  just cook some longer.

So, even tho the directions call for 10 to 12 minutes, I’ve cooked some larger ones up to 14 or 15 minutes.  Just keep an eye on them, to prevent burning.

Once the cookies were fully cooled, I sprinkled them with powdered sugar.  This step is not necessary, and I wouldn’t suggest doing it until you are ready to eat/serve them, but it is a nice touch.

Oh, and I didn’t bake them in that little metal pan – it was just to keep the sugar contained.  :)  The cookies need to cool on racks before you add the powdered sugar.

Norwegian Spice Cookies

These ultimate spice cookies go great with coffee:

Norwegian Spice Cookies

And with Christmas trees:

Norwegian Spice Cookies

Ultimate Norwegian Spice Cookies

Ingredients:
3 cups all-purpose flour
4 teaspoons ground cinnamon
4 teaspoons ground ginger
2 teaspoons ground cloves
1 teaspoon ground nutmeg
1 teaspoon ground cardamom
1/2 teaspoon salt
1 cup (2 sticks) unsalted butter, room temp
1 1/2 cups sugar
2 large eggs
2 teaspoons vanilla
1 egg white mixed with 1 teaspoon water
Powdered sugar (optional)

Combine flour, cinnamon, ginger, cloves, nutmeg, cardamom, and salt in a bowl until well blended.

Beat butter and sugar in a bowl until creamy.  Mix in eggs and vanilla.  Gradually add flour mixture.

Divide dough in half, flattening each piece into a disc.  Wrap in plastic wrap and refrigerate for one hour.

Preheat oven to 350F.

Roll dough about 1/8 to 1/4 inch thickness on a well-floured surface.  Cut out cookies with cookie cutters that have been dipped in flour.  Place cookies on ungreased baking sheet, preferably covered with parchment paper, and brush with the eggs white mixture.

Reroll scraps and repeat with remaining dough.

Bake cookies for 10 to 12 minutes or until just browning on edges.  Cool on wire racks.  Store covered.

Before serving, as an optional step, you can sprinkle them with powdered sugar.

*****

Click for the FREE printable PDF:  Norwegian Spice Cookies

Merry Christmas!

And Happy Baking!  :)

Chocolate Christmas Tree Brownies

Chocolate Christmas Tree Brownies

December can be dangerous.

Especially when I find myself inspired to make things like chocolate Christmas trees that perch on sprinkle-coated brownies.

And it all started because I was hungry when I walked past the candy melts in the grocery store.  Never shop hungry.

Anyway, the result was these adorable chocolate Christmas trees, which I placed on top of little, square brownies that represent crunchy Christmas presents.  :)

Making Chocolate Christmas Trees

Before baking the brownies, I coated the top with nonpareils.  While the brownies were baking, I melted the green candy in a baggy in the microwave (at 50% power).

Once the chocolate was melted, I snipped off a very small point on the corner of the baggy, and squeezed out the chocolate onto waxed paper in the pattern of a Christmas tree.

To make the trees, I went back and forth, tracing out a triangle shape.  Make sure the lines are thick enough and enough of them are touching each other.  If the lines are too thin and too far apart, the trees will probably break.  Also, be sure to draw a “trunk” at the bottom of the tree, so that you can stick it into the brownies.

As soon as you draw a tree, stick a flower or star-shaped large sprinkle at the top, preferably in yellow to represent the tree star, and sprinkle nonpareils over the rest of the tree, to represent the ornaments.

I used Christmas colored nonpareils, but you could also use the normal multicolored ones.  I used the same nonpareils for the brownies and trees.  And for the tree star, I used flower sprinkles that are available year round.  Those are easy to reuse for other holidays, since all I needed were a handful of the yellow ones.

Chocolate Christmas Trees

Let the trees completely cool and harden.  A couple hours is best.  You could also draw them on a cookie sheet that you place in the fridge if you’re in a hurry.

Once the brownies and trees are both completely cooled, cut the brownies into squares.  In the center of each brownie, use your knife or a toothpick to break through the shell of sprinkles and make a little hole for the trees.

The chocolate trees are fragile, so you don’t want to have to put much pressure on them to get them into the brownie.  Gently, but securely, insert the trunk of the tree into the hole in the brownie while holding the tree as close to the bottom of the “branches” as possible, instead of pushing it from the top.

Chocolate Christmas Tree Brownies

You don’t need a whole bag of candy melts to make trees for one tray of brownies.  About half should do it.

But I made extras because these chocolate trees will keep fresh in a container for, well, at least the rest of the season.  I’m saving my extras for the cookie trays.  :)

Honey Granola with Quinoa

Honey Granola with Quinoa

I know many people eat granola all by its lonesome, just in a bowl with milk, but I prefer it with yogurt.

The first time I saw someone eat it this way was when I was at a hotel breakfast buffet in Germany.  Someone spooned yogurt into a dish and sprinkled granola over the top.

I was intrigued.

And then I was addicted.

The silky smooth, fruity yogurt intensified the sweet and crunchy granola.  It seemed an ideal breakfast, indeed.

But I hadn’t made my own from scratch yet.  That needed to change.

Honey Granola with Quinoa

I began with a recipe by David Lebovitz that was based off a recipe by Nigella Lawson.  Then I made some changes.

I knew I wanted to increase the amount of honey, and I wanted to incorporate quinoa.  Plus, I love walnuts, so I swapped out the almonds for them.

You can see these changes in the photo above, which shows the dry ingredients, minus the spices and sugar.  Incidentally, I used dark brown sugar, although light brown sugar would work as well.  I prefer the stronger flavor.  And I used honey-roasted sunflower seeds instead of plain sunflower seeds – again, to increase the honey-ness of the granola.

Honey Granola with Quinoa

The long list of ingredients can appear a little intimidating at first, but the process is incredibly simple.

You mix the dry ingredients in a large bowl and the wet ingredients in a small saucepan.  Heat the wet ingredients, then pour them over the dry ingredients, and mix well.

Honey Granola with Quinoa

Spread the granola over two cookie sheets lined with parchment paper, and bake for an hour, stirring occasionally.

That’s it:  you’ve got homemade granola!

Honey Granola with Quinoa

And, of course, I suggest serving it over yogurt for breakfast.  Strawberry yogurt, specifically.  But feel free to play with it.  Perhaps you’d prefer it over vanilla ice cream?  Leave a comment to let me know how you enjoy it best!

Honey Granola with Quinoa

Here’s the recipe, and scroll down for the printable version:

Honey Granola with Quinoa

5 cups old-fashioned rolled oats
3 cups chopped walnuts
1 cup honey roasted sunflower seeds
1 cup quinoa
1/2 cup brown sugar
1 tablespoon ground cinnamon
1 teaspoon salt

3/4 cup unsweetened applesauce
1/2 cup honey
2 tablespoons vegetable oil

Preheat oven to 300ºF (150ºC).

In a large bowl, mix the dry ingredients:  oats, walnuts, sunflower seeds, quinoa, brown sugar, cinnamon, and salt.

In a small saucepan, mix the applesauce, honey, and oil.  Stir over low heat until just warmed and combined.

Pour the applesauce mixture over the dry ingredients and stir until well combined and all the dry ingredients are coated.

Pour granola evenly over two cookie sheets.  Bake for one hour, stirring every 10-15 minutes.

Cool completely.  Store covered for up to one month.

**********

Get the free printable PDF of the recipe:

Honey Granola with Quinoa

Enjoy!

Roaming Rosie Signature

Honey Cinnamon Apple Pie a la Mode

Honey Cinnamon Apple Pie a la Mode

So there was store bought apple pie at my house.  I love apple pie.  But I wanted to spruce it up a little bit, and ice cream alone just wasn’t going to cut it.

I’d been eating a lot of honey lately, to help soothe my much abused throat which has been enduring endless coughing.  I hate being sick.  But I love honey.  So, what else could I add it to … well, why not pie??

I was NOT disappointed.

And, it was a super simple dessert to put together.

I took a slice of apple pie, cut it in half and put it in a bowl.  Microwaved the bowl.  Scooped some vanilla ice cream on top.  Then came the real awesomeness:  a drizzle of honey and a sprinkle of cinnamon and sugar.

I just squeezed the honey over the ice cream and pie, and then shook my pre-made cinnamon and sugar mixture over the top of it all.  The mix is about 4 parts white sugar and 1 part cinnamon.  I don’t measure it.  Just mix (or shake) until it’s the color I want.  But you can also buy cinnamon sugar at the store, if you prefer.

Either way, sweet, spicy, juicy deliciousness.