April Showers *Sprinkle Surprise* “Raining” Cupcakes

April Showers Sprinkle Surprise Raining Cupcakes from Roaming Rosie

I know:  it’s a mouthful.

Both the cupcake and the name.  But so much fun!

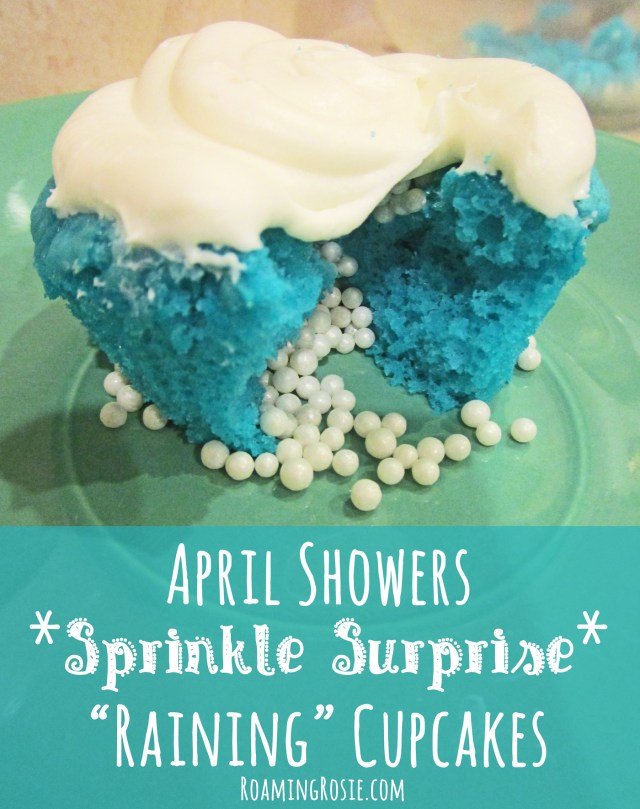
I love the idea of food with hidden surprises inside, and with spring coming at us full force, I wanted to do something in that vein.

Thus was born the April Showers *Sprinkle Surprise* “Raining” Cupcakes!

April Showers for the fact that it’s now April and raining.  A lot.  The day we made the cupcakes, in fact, was hounded by heavy thunderstorms.  Sprinkle Surprise because of the sprinkles hidden inside.  And Raining because the cupcakes “rain” out sprinkles like raindrops when they’re opened or bit into.

April Showers Sprinkle Surprise Raining Cupcakes from Roaming Rosie

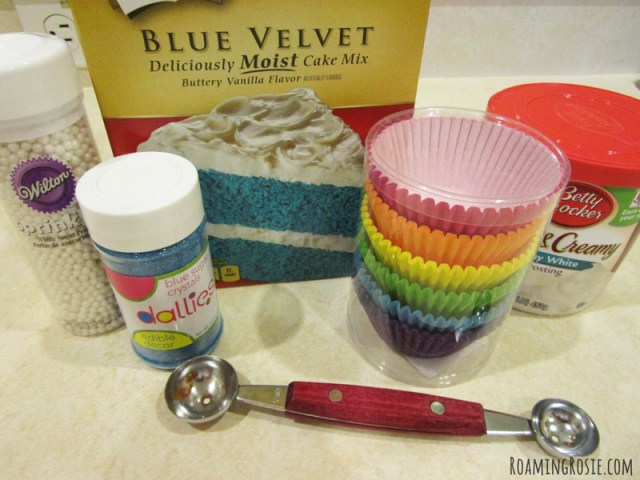
Here are all the supplies I used.  I did use blue sugar crystal sprinkles to top some of the cupcakes, which you can see in one of the photos, just not on all of them.  In the end, I decided I preferred the way it looked without the sprinkles on top – when the icing looked like just a white fluffy cloud on top of the blue “sky” cupcakes.

The sprinkles we used to fill the cupcakes were the Wilton White Sugar Pearls.  You could use just about any kind of sprinkle here, except maybe sugar crystals, but I liked how these represented raindrops so well.  They’re one of the pricier sprinkles, too, but we didn’t use the whole container, so there’s still some left for future projects.

Oh, and to make life much easier, we used store bought cake mix and icing.  I got the Blue Velvet cake mix because it’s in stock around here during springtime, but you could always add blue food coloring to any plain cake mix to achieve the same result.

April Showers Sprinkle Surprise Raining Cupcakes from Roaming Rosie

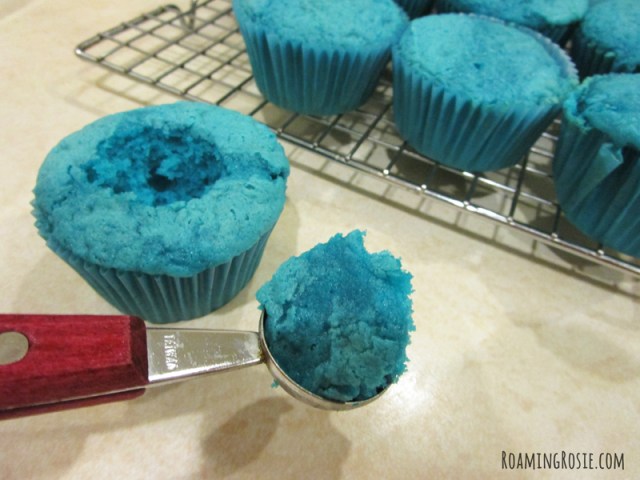
The steps to create the hidden surprise of the raindrops/sprinkles inside the cupcakes is done after the cupcakes are baked.

Once the cupcakes are fully cooled, scoop out the center with a melon baller, but hang onto that little piece you remove.

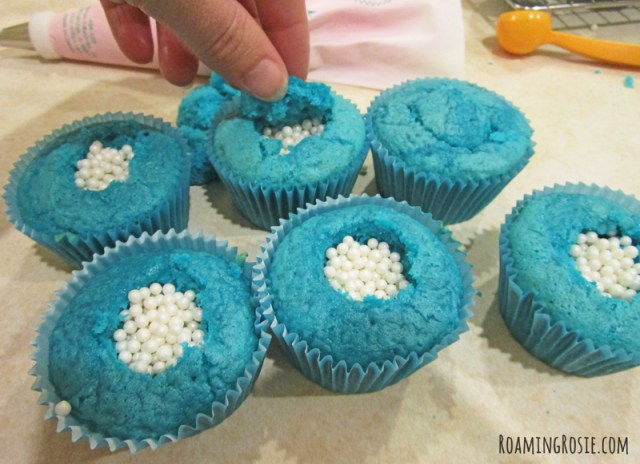
Fill the hole in the center with your sprinkles.  Be generous here.  Add as many as will fit, because if you only put a few, then they won’t really “spill” out when you split open or bite into the cupcake.

April Showers Sprinkle Surprise Raining Cupcakes from Roaming Rosie

Take that little piece of cake you’ve removed with the melon baller and pick off some of the fluffy interior of the cake from the flatter top portion of it, to make it more of a smooth and flat piece instead of a ball.

Then put that flat piece back on top of the hole that’s filled with sprinkles.  And put aside (to discard or eat or whatever) those extra fluffy interior pieces that were removed to make room for the sprinkles.

It doesn’t have to fit perfectly – I didn’t exactly keep track of which piece went with which cupcake.  Just put a little piece on top of the sprinkles just to hold them in a little better.

April Showers Sprinkle Surprise Raining Cupcakes from Roaming Rosie

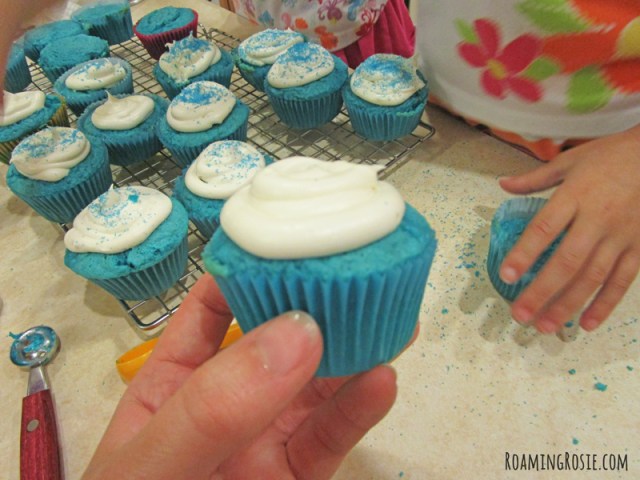
Then top the cupcakes with icing.

I put the icing into a bag with a large round icing tip to make this process quicker and easier.  If you try to spread on the icing with a knife, things could get a little messy because the icing is what holds down the piece that you cut out, trimmed, and replaced on top of the sprinkles.

At this point we added the blue sugar sprinkles to the tops of about half of the cupcakes.  Like I said, this part is up to you.

April Showers Sprinkle Suprise Raining Cupcakes 6

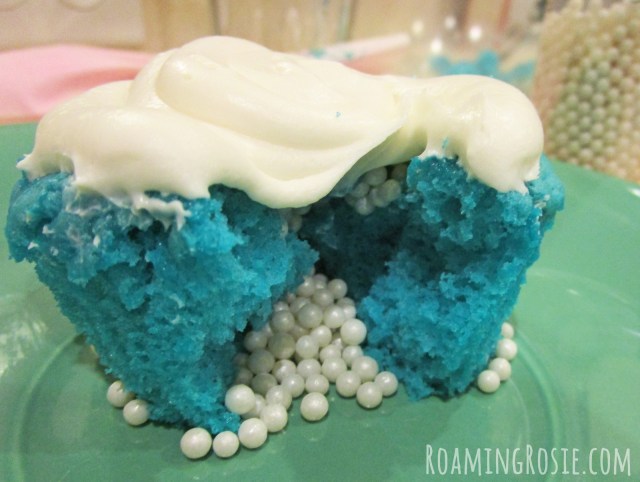
Just make sure to remind people to eat these over a plate, since once you bite into them they will “rain” sprinkles!

Enjoy!

Please share your own baked goodies with me on my Facebook page and follow me on Pinterest for more ideas!

Happy Baking!

Roaming Rosie Signature

Birthday Candle Pancake Breakfast … with Sprinkles!

Birthday Candle Pancake Breakfast with Sprinkles!

You wanna know what we love in our house?

Sprinkles.

Sprinkles are the bomb.

Tiny, sugary confetti bursts of celebratory color.  Perfect for just about anything.  Including pancakes.

For my girls’ birthday breakfasts this year, they got homemade pancakes.  With SPRINKLES!

Because… why not?

It looked awfully impressive, but was such a simple way to add joy to a special day.  Such a fun way to start out a birthday!

Anyway, I used some overnight pancake batter (I’ll get around to posting that recipe… someday) to make the pancakes, threw a couple on their “Frozen” plates, drizzled some syrup, and scooped on the cake sprinkles!

You could also add sprinkles to the batter, but I stuck to using the pop of color just as a topping.

I also stuck in a few candles and lit them just before placing them in front of the girls (whose birthdays are one day apart, so candles for both of them at the same time totally works).

Birthday Candle Pancake Breakfast with Sprinkles!

And if you love sprinkles as much as we do, check out:

Milk Sprinkles   Vanilla Fairy Fudge Recipe  Elf Sized Chocolate Chip Confetti Cookies   Sprinkle Cookies

Enjoy!  And please share your sprinkle pics with me on Facebook!

Roaming Rosie Signature

Vanilla Fairy Fudge

Vanilla Fairy Fudge

I am a BIG fan of fudge.

But I stopped making fudge for a long time.  I got tired of trying out recipe after recipe and never having an end result that resembled what you’d find in candy stores or ice cream shops.

This was mostly because every recipe that I tried called for condensed milk.  And each and every one of those recipes left me with a fudge that was mushy and half-melted at room temperature.  Which – to me – isn’t really fudge.

Recently I decided to tackle this particular dessert again.  I tried some different combinations of ingredients and some different methods of cooking.  There were successes.  And there were failures.  What I’m posting today was not only a success but a hit.

And I’ll be sharing more fudge recipes soon, but today, let’s just start with this Vanilla Fairy Fudge.

Why “fairy?”

Well, when I was doing Letter F Day with my girls, I wanted to make a snack that started with the letter F.  I was enchanted by the pictures of Fairy Bread that I found on the internet (it’s an Australian treat – not something we see over here in the U.S.), but I decided to go one step further and add another “F” to make it better fit my alphabet theme.  Thus, Fairy Fudge.

The fudge I made that day, however, was a bit of a failure.  Not completely – I mean, we did eat it…..

But it was yet another condensed milk recipe.

Turns out you can use regular milk (and some cream, too) and come up with something even better.  Which is what we have here.  And it’s surprisingly easy, too, once you know the steps to take.

Originally this was just Vanilla Fudge, which was – don’t get me wrong – great, but I just couldn’t stop thinking about my Letter F recipe.  So I added some sprinkles to the next batch.  Great became awesome.

Because sprinkles just make life better.

Vanilla Fairy Fudge

The ingredients are pretty basic:  butter, milk, sugar, etc.

Heavy whipping cream is pretty much the only think here that I’d have to remember to actually pick up at the store ahead of time.

Vanilla Fairy Fudge

Everything except the vanilla and sprinkles gets mixed together and brought to a boil.

Once you reach a boil, you turn it down and simmer it for 15 minutes or so.

There is NO stirring.  You just watch to make sure it’s still bubbling, but that it never boils over.  Especially on stoves like mine.  My stove seems to change its temperature when it feels like it.

Vanilla Fairy Fudge

The important thing is that your fudge reach a temperature of 235 degrees Fahrenheit.

Even if it takes more that 15 minutes.  This step is important.

Vanilla Fairy Fudge

Then you mix in the vanilla and stir it over a bowl of ice to cool it down quickly.

Vanilla Fairy Fudge

When stirring it over the ice, it’ll thicken noticeably.

Then it’s ready to go into your prepared pan.  I like to coat the pan with foil first, to make it easier to remove the fudge once it’s set, but you also need something to grease it with.

Butter works well as long as you don’t overdo it.  I sometimes use nonstick cooking spray.  My favorite is coconut oil spray.

Vanilla Fairy Fudge

Cover the top with sprinkles (all the way to the edges) right away.

It’s better to put too much than too little.  After it’s set, just tilt it to allow the extras to fall away.

The fudge should set quickly.  I might let it sit for an hour just to be extra certain, but it usually sets in just a few minutes.

Vanilla Fairy Fudge

Then you take it out of the pan and turn it over VERY gently onto a large plate (retro plate optional).

But even if you’re like me and you sometimes stop paying attention to what you’re doing and you manage to break the fudge into two or three chunks, that’s okay.  You can always cut the pieces diagonally.

And this recipe is meant to produce small pieces.  Not gigantic thick hunks of candy.  If you want it thicker, though, it’s easy enough to double the recipe or just put it in a smaller pan to set.  Your choice.

I then leave those little pieces out overnight, or for a few hours, to make extra, extra certain that they’re fully set all the way around.  I don’t like mushy edges.

Because the best part is biting into the crisp edges of the fudge piece and discovering the smooth, soft melt-in-your mouth center.

Mmmmmmm…… I think I need to go make some more fudge…….

Vanilla Fairy Fudge

Above is a photo of what the fudge looks like without the sprinkles.

Still delicious.  Just not as colorful.

And, honestly, I love the texture that the sprinkles add to it.  But it’s a choice that’s up to you.  I promise I won’t judge your fudge.  (As long as you don’t judge my rhymes.)

Vanilla Fairy Fudge

Vanilla Fairy Fudge

Ingredients:

1/2 cup whole milk
1/2 cup heavy whipping cream
1 ½ cups sugar
6 tablespoons butter, softened
1 tablespoon vanilla extract
Nonpareil sprinkles

Prepare an 8×8-inch baking dish with foil and a light coating of butter or cooking spray.

Whisk together the milk, cream, butter, and sugar in a saucepan. Bring the mixture to a boil.

Reduce the heat and simmer it without stirring. This is important: do NOT stir the mixture! After 15 minutes, test the temperature with a thermometer. Once it reaches 235°F or soft ball stage, remove from heat. Do NOT stop simmering until it reaches this temperature, or it will not set. It will be noticeably thicker at this point, but still slightly runny.

Let it sit for a minute and then stir in the vanilla extract.

Fill a large bowl with ice and place the saucepan into the bowl on top of the ice. Stir the fudge for a few minutes until it is very thick. Then (making sure not to let any of the melted ice get into your fudge) pour it into the prepared baking dish, spreading it smooth. Immediately cover the top with nonpareil sprinkles. This is an optional step, but it adds a nice texture.

Place baking dish on a wire rack and allow to completely set. This may take a half hour or a little longer, depending on the temperature and humidity of your home. Then carefully remove the fudge from the dish by pulling out the foil. Carefully invert it on a flat plate or platter and allow the bottom to dry. Again, this may only take a few minutes.

Cut into squares or rectangles with a sharp knife and allow the pieces to sit for a while without touching. I usually leave them out overnight to make sure each piece is fully set and has a nice solidity all the way around the smooth interior. Makes about 4 dozen very small pieces, depending on how you cut it.

[Note: the recipe can be doubled or put in a smaller pan if you like thicker pieces.]

**********

Click for the free printable PDF of the recipe:

Vanilla Fairy Fudge

And if you love fudge, then you absolutely HAVE to check out my Chocolate Fudge recipe:

Chocolate Fudge Recipe

Happy Baking!

Roaming Rosie Signature

Flower Shaped Cinnamon Buns

Flower Shaped Cinnamon Buns at RoamingRosie.com

These flower shaped cinnamon buns make breakfast a little extra special.  :)

And it’s pretty quick to do with the help of store bought cinnamon rolls.

I popped those babies out of the can, formed a flower near the top of the pan {one roll in the center and 5 around it to act as petals} and then cut the remaining 2 rolls in half to use for the stem and leaf.

I was pretty happy about how much it actually resembled a flower even before I added the colored sprinkles.

Once you pull the buns out of the oven, add some colored sugar sprinkles right after spreading on the icing – otherwise the icing will start to harden just enough for the sprinkles to not stick.  You have to be kind of quick about this step, so pick out your colors ahead of time.

Now, I made these for my mom on her birthday because she is a gardener and she likes flowers…. but while I was sprinkling on the bright colors, I realized it would also make an impressive centerpiece for any springtime or Easter breakfast or brunch.

Well, that is, it would make an impressive centerpiece if you transferred the buns to a platter instead of being all lazy like me and serving it right on the cookie sheet…..

Either way:  enjoy!

And if you’re a big fan of sprinkles, check these out:

Jack O' Lantern Cinnamon Buns

Jack O’ Lantern Cinnamon Buns

Milk Sprinkles

Milk Sprinkles

Sprinkle Cookies

Sprinkles Cookies

Roaming Rosie Signature

Mini Soft Iced Gingerbread Cookies

Mini Iced Gingerbread Cookies

So my daughter came home from school with one of those individually wrapped, soft, iced gingerbread men cookies that had red and green sprinkles on it.

I love those things.

And I suddenly realized I hadn’t made gingerbread cookies in years.  Seriously:  years.

So I tweaked an old recipe, rolled out the dough thickly, and dipped them in some royal icing that got a touch of sugar sprinkles.

Uh… YUM.

And I made them miniature.  I did this mostly because I was looking for an excuse to use the miniature cookie cutters I bought on clearance last year, but it turned out to be a wonderful idea.

Bite-sized deliciousness.

Mini Iced Gingerbread Cookies

Look at all the spices and all that sweetness!

You can just tell they’re going to be awesome.

Mini Iced Gingerbread Cookies

It’s a soft dough.

This means it needs to go in the fridge for at least 2 hours before you roll it out.

And you’ll need to sprinkle lots of flour over the counter before you roll it out, and flour the rolling pin, and probably add a little more as you’re rolling.

But that’s okay:  there isn’t that much flour in the recipe itself, so using the extra flour to roll it all out without sticking makes it just the right consistency.

Mini Iced Gingerbread Cookies

And you really need to roll them out quite thickly to get that pillowy softness in the finished cookie.

Nearly a half-inch.  At least a quarter inch.  At minimum.

Mini Iced Gingerbread Cookies

Once the cookies are cooled, just dip them in the royal icing.

Use a fork to stir the icing in between dipping the cookies, and also to scrape excess icing off of the cookies just after dipping them.  You don’t need to scrape the fork directly across the surface of the cookie – just close to it.  If there’s too much icing, it’ll ooze all of the edges and make a mess.

A thin coating is really all you need.  And it spreads as it sits.

Mini Iced Gingerbread Cookies

Be sure to add the sprinkles before the icing starts to harden.

I usually dip about 3 or 4 cookies before sprinkling them.

To make my red and green sprinkles, I simply mixed some red and some green sugar sprinkles together in a small bowl ahead of time.

Mini Iced Gingerbread Cookies

Don’t they look yummy?

I could seriously have eaten all of the cookies by myself.

Luckily, I had help.  :)

But the recipe makes a ton.  Like 12 dozen miniature {1-inch} cookies.  Enough to feed an army.  Or 2 or 3 over-stressed moms.

Either way – seriously worth a try.

Mini Iced Gingerbread Cookies

Mini Iced Gingerbread Cookies

Ingredients:
2 1/2 cups all-purpose flour
1 1/2 teaspoons baking powder
1/2 teaspoon baking soda
1/4 teaspoon salt
1 tablespoon ground ginger
1 tablespoon ground cinnamon
1/2 teaspoon ground cloves
1/2 cup (1 stick) butter, softened
3/4 cup dark brown sugar
1 large egg
1/2 cup molasses
2 teaspoons vanilla extract

Icing:
2 cups confectionery sugar
1 1/2 tablespoons meringue powder
1 teaspoon vanilla extract
3 to 4 tablespoons water
Red and green sugar sprinkles

Whisk together the flour, baking powder, baking soda, salt, ginger, cinnamon, and cloves until well combined. In a large bowl, beat butter, brown sugar, and egg with a mixer until creamy. Add the molasses and vanilla and mix until well blended. Gradually add the flour mixture, switching to mixing by hand. Divide dough in half, wrap each half in plastic wrap, and refrigerate for at least 2 hours.

Preheat oven to 350°F (180°C). Line baking sheets with parchment paper. Generously sprinkle flour over prep space, including the rolling pin. Remove one portion of dough from refrigerator and roll it out to about 1/2-inch thickness, using extra flour if necessary to avoid sticking.

Use mini cookie cutters (or regular sized cutters, if desired) to cut shapes from dough. Place on cookie sheets and bake for 8 to 10 minutes. Let cookies sit on baking sheets for 2 minutes, then remove to wire racks to cool completely.

Mix together the powdered sugar, meringue powder, and vanilla extract. Add water, one tablespoon at a time, until you reach a consistency where a thick line of icing slowly and smoothly drips off of the fork when lifted from the bowl. Dip cookies into icing, wiping off excess with fork while cookie is still upside down over bowl. Immediately sprinkle with a mixture of red and green sugar sprinkles.

**********

For the free printable PDF version of the recipe, click here:  Mini Iced Gingerbread Cookies

Enjoy!

Roaming Rosie Signature

White Chocolate Confetti Blondies

White Chocolate Confetti Blondies

These White Chocolate Confetti Blondies are a fun way to add some color to a sweet treat!

Plus, sprinkles are always a hit in our house.

I have to make sure my girls don’t eat all the sprinkles before we can stir them into the batter.  :)

White Chocolate Confetti Blondies

It’s a simple recipe, and easy to make by hand.  {I’m always happy when I don’t have to wash a mixer.}

I always have colorful cake sprinkles on hand, and the ones you see here are this kind.

White Chocolate Confetti Blondies

The end result is pretty sweet.

Not overly-sweet, but more of a party food than a eat-every-day snack.

White Chocolate Confetti Blondies

It’s quick, too – just stir everything together, smush it into a pan, and bake!

And don’t they look just full of gooey gorgeousness???

White Chocolate Confetti Blondies

White Chocolate Confetti Blondies

Ingredients:

1 cup flour
1 teaspoon baking powder
1/4 teaspoon salt
1/3 cup butter, softened
3/4 cup packed light brown sugar
1 large egg
1 teaspoon vanilla extract
1 cup white chocolate chips
1/2 cup colorful sprinkles

Preheat oven to 350°F (180°C). Grease a 9 inch square baking dish.

In a small bowl, combine the flour, baking powder, and salt. In a medium bowl, beat the sugar, butter, and vanilla extract with a mixer until creamy. Beat in the egg. Stir in the chocolate chips and sprinkles.

Press mixture into baking pan. Bake for 20 minutes or until golden brown. Cool completely in pan before cutting into squares.

**********

To print the free PDF copy of this recipe, click here:  White Chocolate Confetti Blondies

Enjoy!

Roaming Rosie Signature

Red, White, and Blue July 4th Cookies

Red White and Blue July 4th Cookies

Happy July 4th!

Made these festive cookies today.

I dyed some sugar cookie dough red (with Wilton Christmas Red gel), rolled the balls of dough in red sugar sprinkles, and baked.

Just after pulling them out of the oven, I gently pressed on a chocolate star that I made from blue candy melts the night before.  I put a white chocolate dot in the center of the star, but, honestly, they wound up looking a little bit more like fireworks than stars.

Still tasted awesome, tho.

Enjoy your weekend!

Roaming Rosie Signature

Spinkle Cookies

Sprinkle Cookies

Don’t those look deliciously fun?

Seriously, these sprinkle cookies were a super easy way to give my girls a fun project in the kitchen.

First of all, they love sprinkles.  LOVE.  Them.

So when I put tiny paper plates full of colorful sprinkles in front of them, there were many squeals of joy.

Making Sprinkle Cookies With The Kids!

We used a box cookie mix for this {thanks to Publix BOGO}.

So it was just a basic sugar cookie and piles of whatever sprinkles we had in the pantry.

The girls rolled the cookies in the sprinkles, creating wonderfully colorful cookies, and we baked them according to the package directions.

Sprinkle Cookies

Look at how pretty they were even before baking:  like little sparkly jewels!

They certainly made movie night even more exciting.  :)

Roaming Rosie Signature

Milk Sprinkles

Milk Sprinkles

Looking for a fun way to add some color to your kid’s celebrations?

I found a picture of this somewhere on Pinterest forever ago, but apparently I didn’t pin it at the time.  Anyway, the image stuck with me, so I decided to try it for my girls’ birthday.

I used their little cups, dipping the rims in some honey I’d poured into a dish (see photo below).  Make sure the entire rim is covered in honey – but only just covered, not dripping gooey clumps of the stuff.  Too much and it will drip down the sides of the cup.

Right after dipping the cups in honey, dip them in nonpareil sprinkles.  I used a Spring mix here (orange, yellow, and white), but use whatever colors you prefer.

Milk Sprinkles

My girls love sprinkles, so this was fun for them.

I wouldn’t do this everyday, but I’m thinking about using color-coordinated sprinkles for different holidays, like red and green for Christmas and orange and purple for Halloween.  And maybe trying chocolate syrup instead of honey next time.

I served this with their pancake breakfast, where I’d made pancakes in the shape of their initials, and later we had some layer cake with chocolate chip filling.

A whole day of fun food is a great way to celebrate birthdays, in my humble opinion.  :)

Roaming Rosie Signature

Elf-Sized Chocolate Chip Confetti Cookies

Elf Sized Chocolate Chip Confetti Cookies

Actually, all I had intended to do was make mini chocolate chip cookies… until my daughter said, “I want to put sprinkles on them!”

Whoa.

How did I ever come up with creative ideas before I had a 3-year-old to guide me???

Seriously.

Elf Sized Chocolate Chip Confetti Cookies

Anyway, as you can see from the batter, we actually poured the sprinkles right into the mix so they would be spread throughout the miniature cookies.

Elf Sized Chocolate Chip Confetti Cookies

And when we scooped them onto the cookie trays to bake, we made them smaller than normal, about a half of a teaspoon each.

Perfect for elf-sized hands.  :)

Elf Sized Chocolate Chip Confetti Cookies

Elf-Sized Chocolate Chip Confetti Cookies

Ingredients:
1 1/8 cup all purpose flour
1/2 tsp. baking soda
1/2 tsp. salt
1/2 cup (1 stick) butter, softened
1/2 cup granulated sugar
1/2 cup brown sugar
1 tsp. vanilla extract
1 large egg
1 cup mini semi-sweet chocolate morsels
1 cup rainbow sprinkles

Preheat oven to 375F.  Combine flour, baking soda and salt in a small bowl.

Beat butter, granulated sugar, brown sugar, and vanilla extract in a large bowl, with a mixer or by hand.  Add egg.

Gradually blend in flour mixture.  Stir in chocolate chips and sprinkles.

Drop a half teaspoon of batter onto baking sheets.  Bake for 8 to 10 minutes, or until lightly browned.

Cool on wire racks.  Store covered.

*****

Click to PRINT the free PDF of the recipe:  Elf Sized Chocolate Chip Confetti Cookies

And, of course, don’t forget to share some cookies with your elf.

Merry Christmas!  :)