The Epic Poop Cake

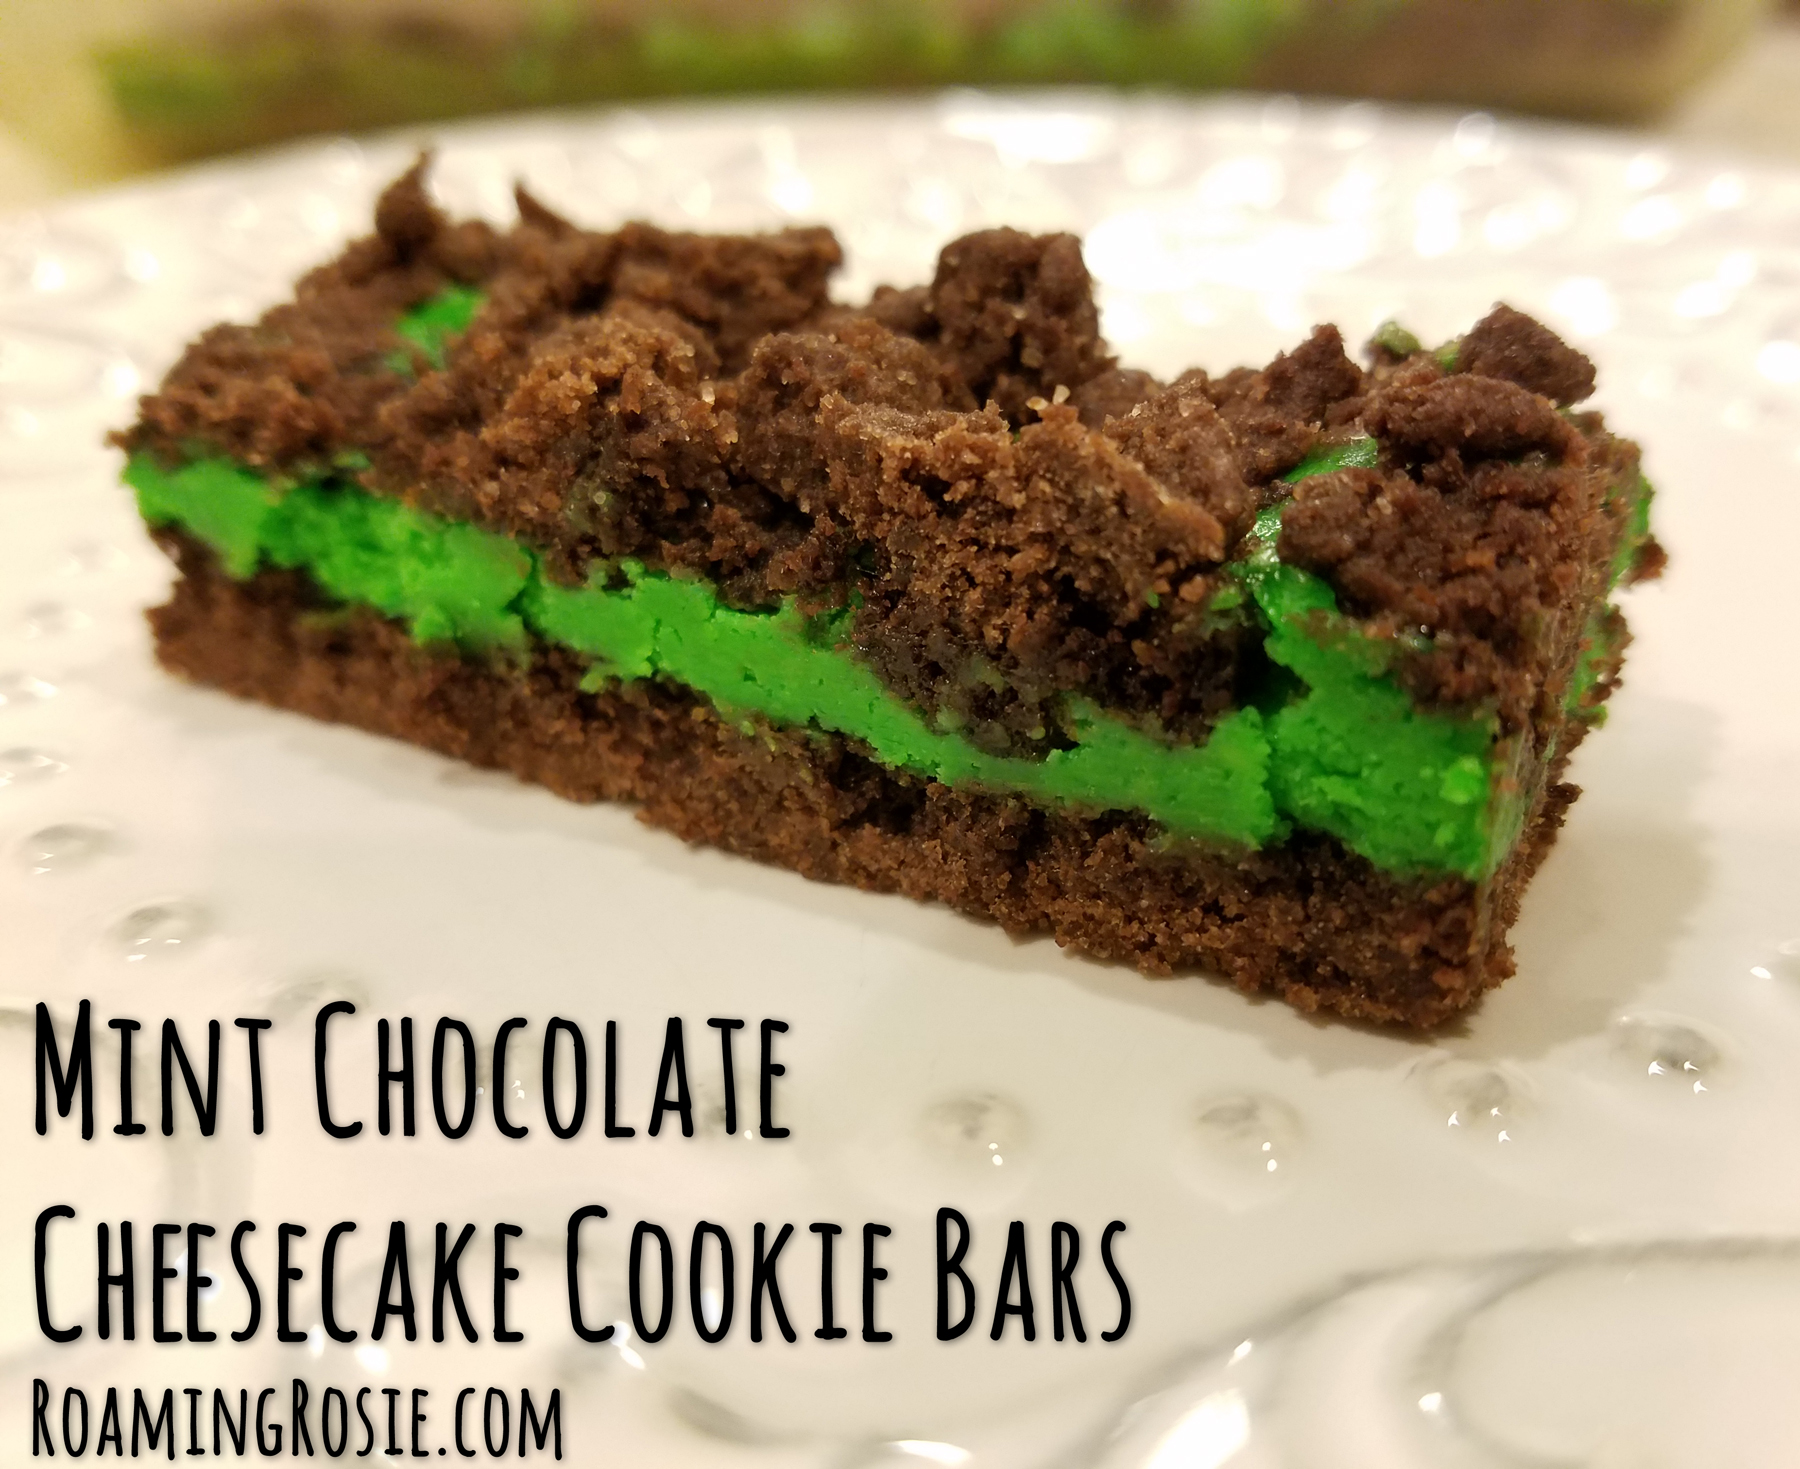
[Many of these links on this page are affiliate links. If you click on them and purchase something I may earn a commission - thank you! - but it won't change the price you pay.]
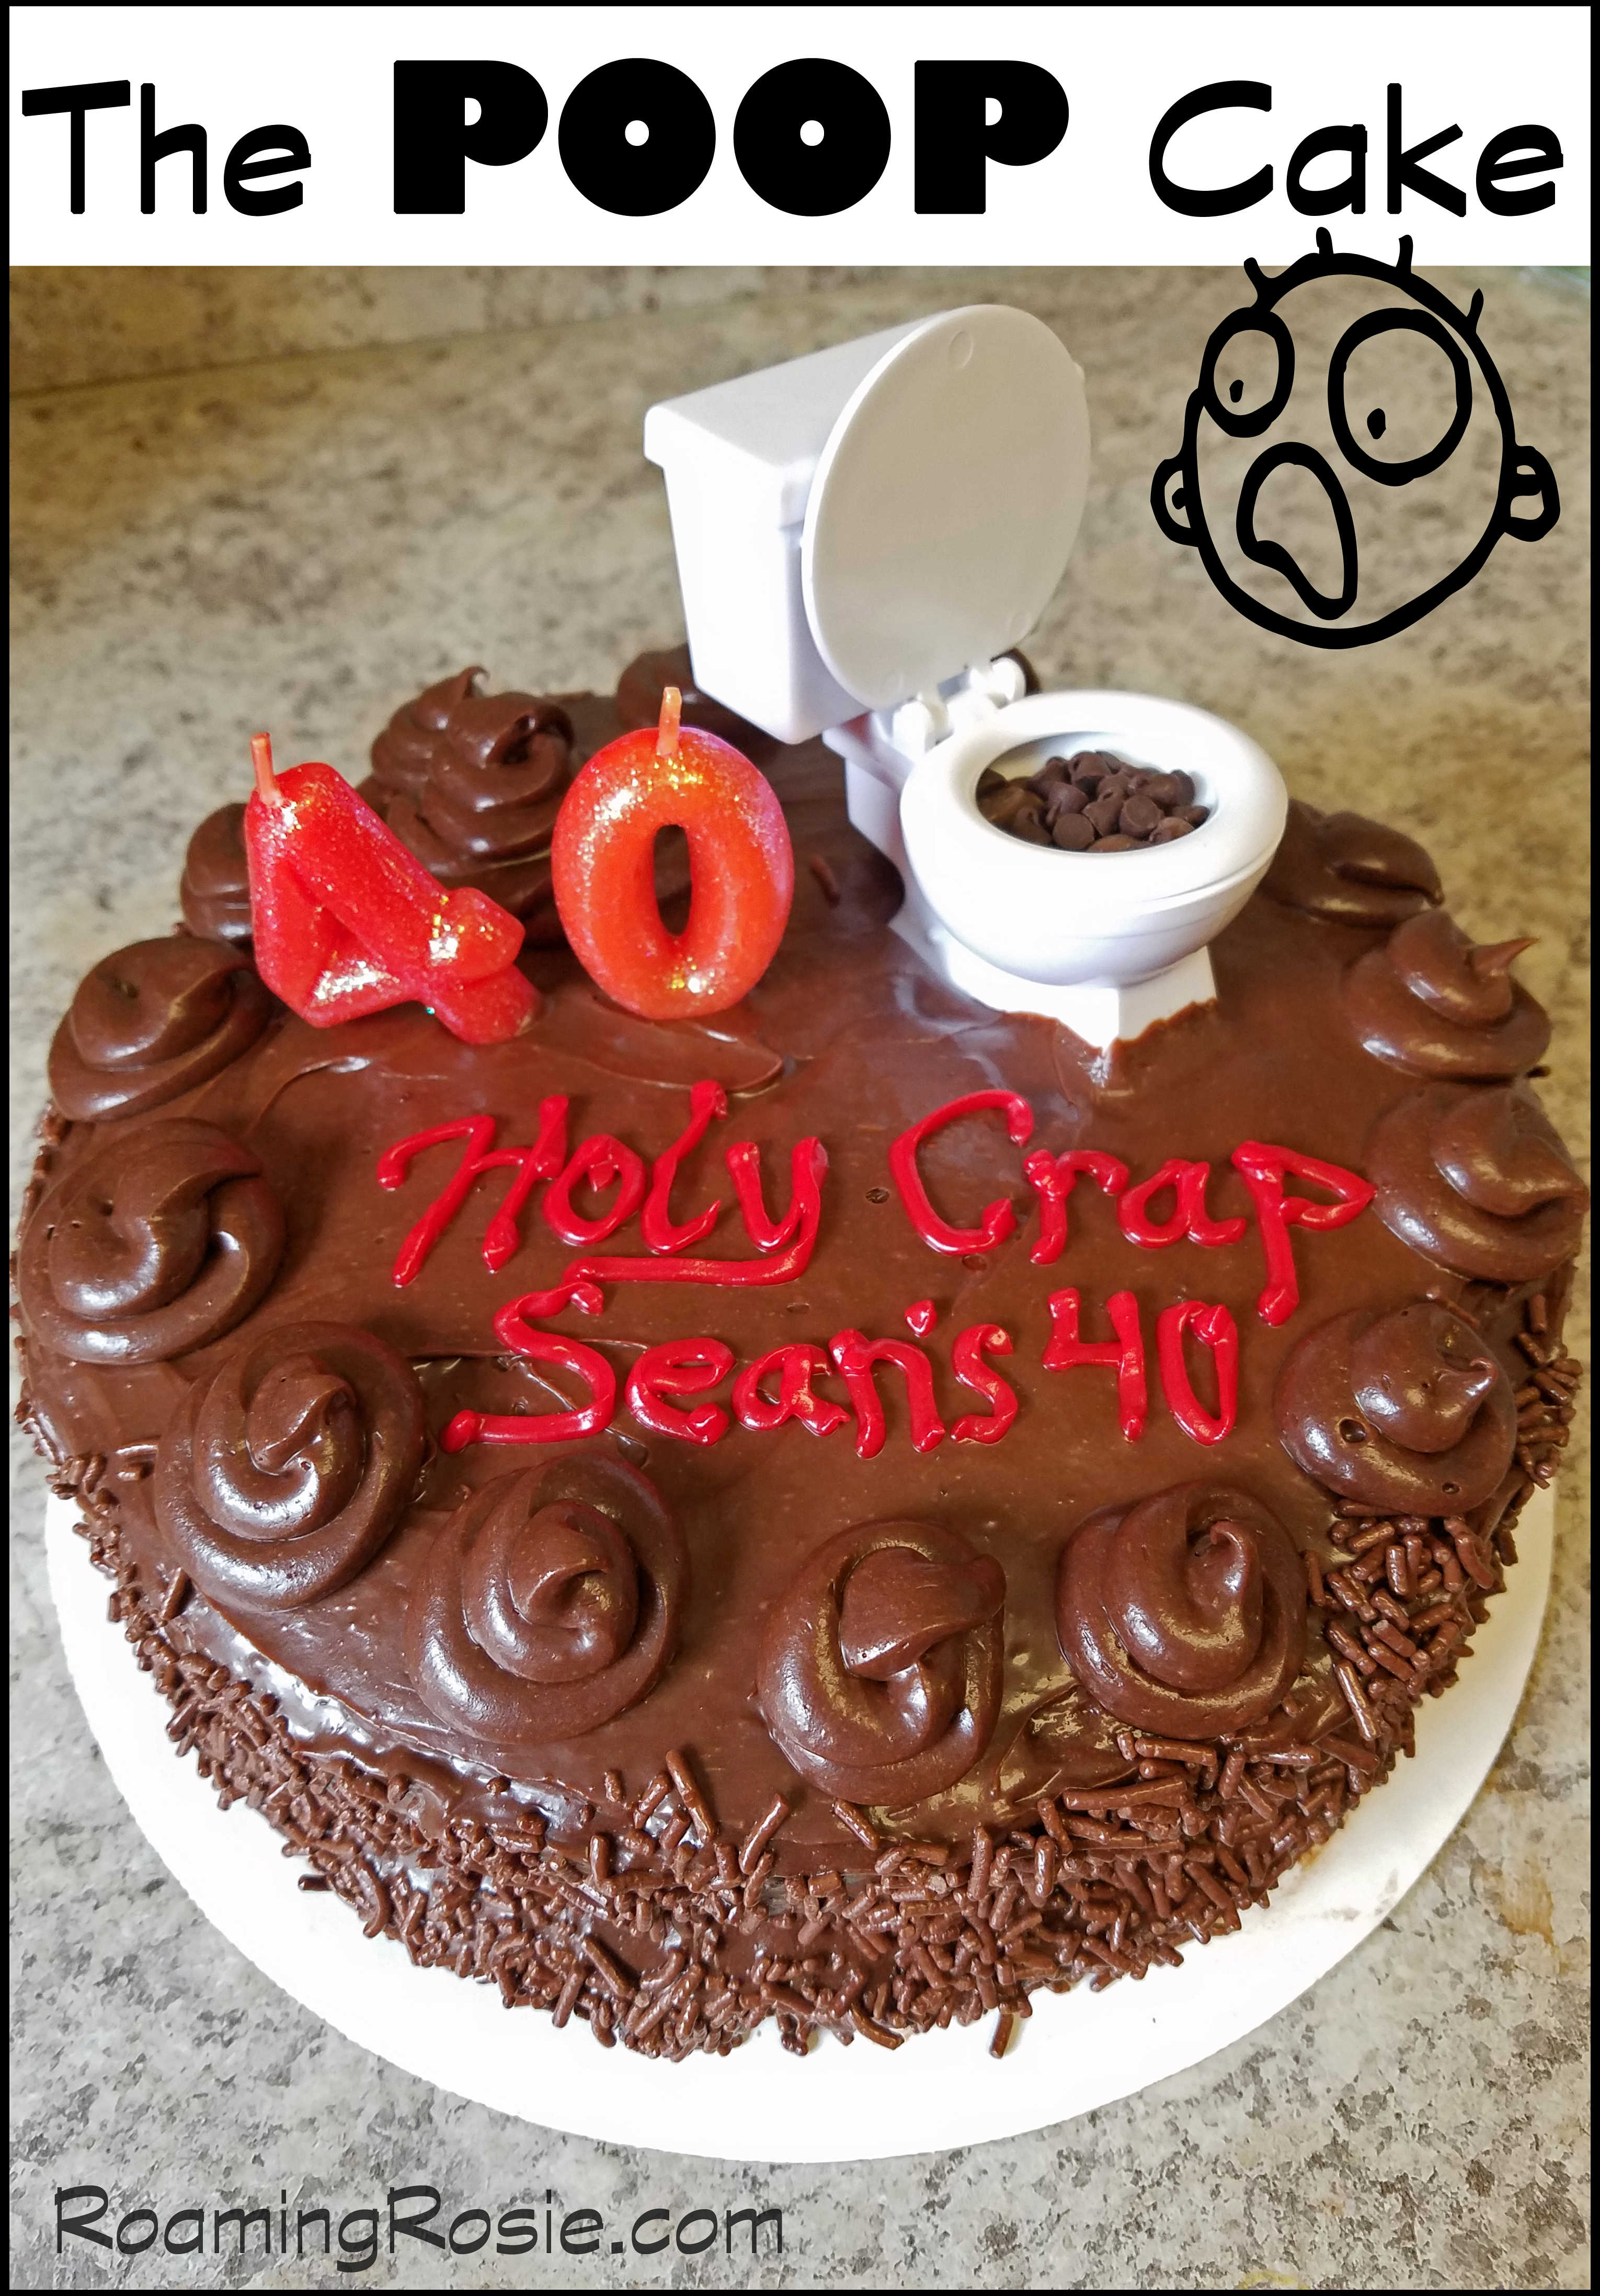
Poop . . . CAKE!?

Now, I know that normally the words “poop” and “cake” are not something you see together in the same sentence.

But “funny chocolate cake?”

Yeah.

I could get behind that.

We’ve been celebrating the kids’ birthdays this week and our birthday conversations seem to inevitably circle back to the epic Poop Cake that I made a couple of years ago for my husband’s birthday.

It left quite an impression.

But it was also SO easy to make. And if you follow my blog you know that my favorite type of recipes are the easy ones – that also happen to be delicious.

I’m sharing the process today more than an actual recipe (um, it was totally a box mix). But if you know anyone who is a fan of toilet humor and chocolate, then you’ll definitely want to try this out. It’s pretty much a guaranteed hit.

Here’s what you’ll need:

1 box chocolate cake mix (I like this one)

3 tubs chocolate icing (like these)

1 tube decorating icing (like this)

1 cup milk chocolate chips

1/4 cup mini chocolate chips

Chocolate sprinkles

Plastic toy toilet (we used this wrestling toy toilet)

Candles (optional numbers like this)

Another thing I should mention is that we freely curse in my house. So, yeah, the cake says “crap,” but if you’re uncomfortable with that, you can totally sanitize it for any kiddos around. Or not.

Depending on your normal vocabulary, here are three options:

“Holy Crap, You’re Old!”

“Holy Shit, You’re Old!”

“Holy Poop, You’re Old!” (This one gets the message across to kids but adults still get the underlying double entendre.)

I will warn you: if you jump in and fully commit to making a cake covered in poo, kids will ask why. They’ll want to be in on the joke. For us, this was no issue at all. Crap=Poop and dayum my hubby is old. It’s the big 4-0! Holy shit!

Some of the other gifts and decor mimicked this phrase. I did manage to find this one that managed to match the sentiment of the cake perfectly:

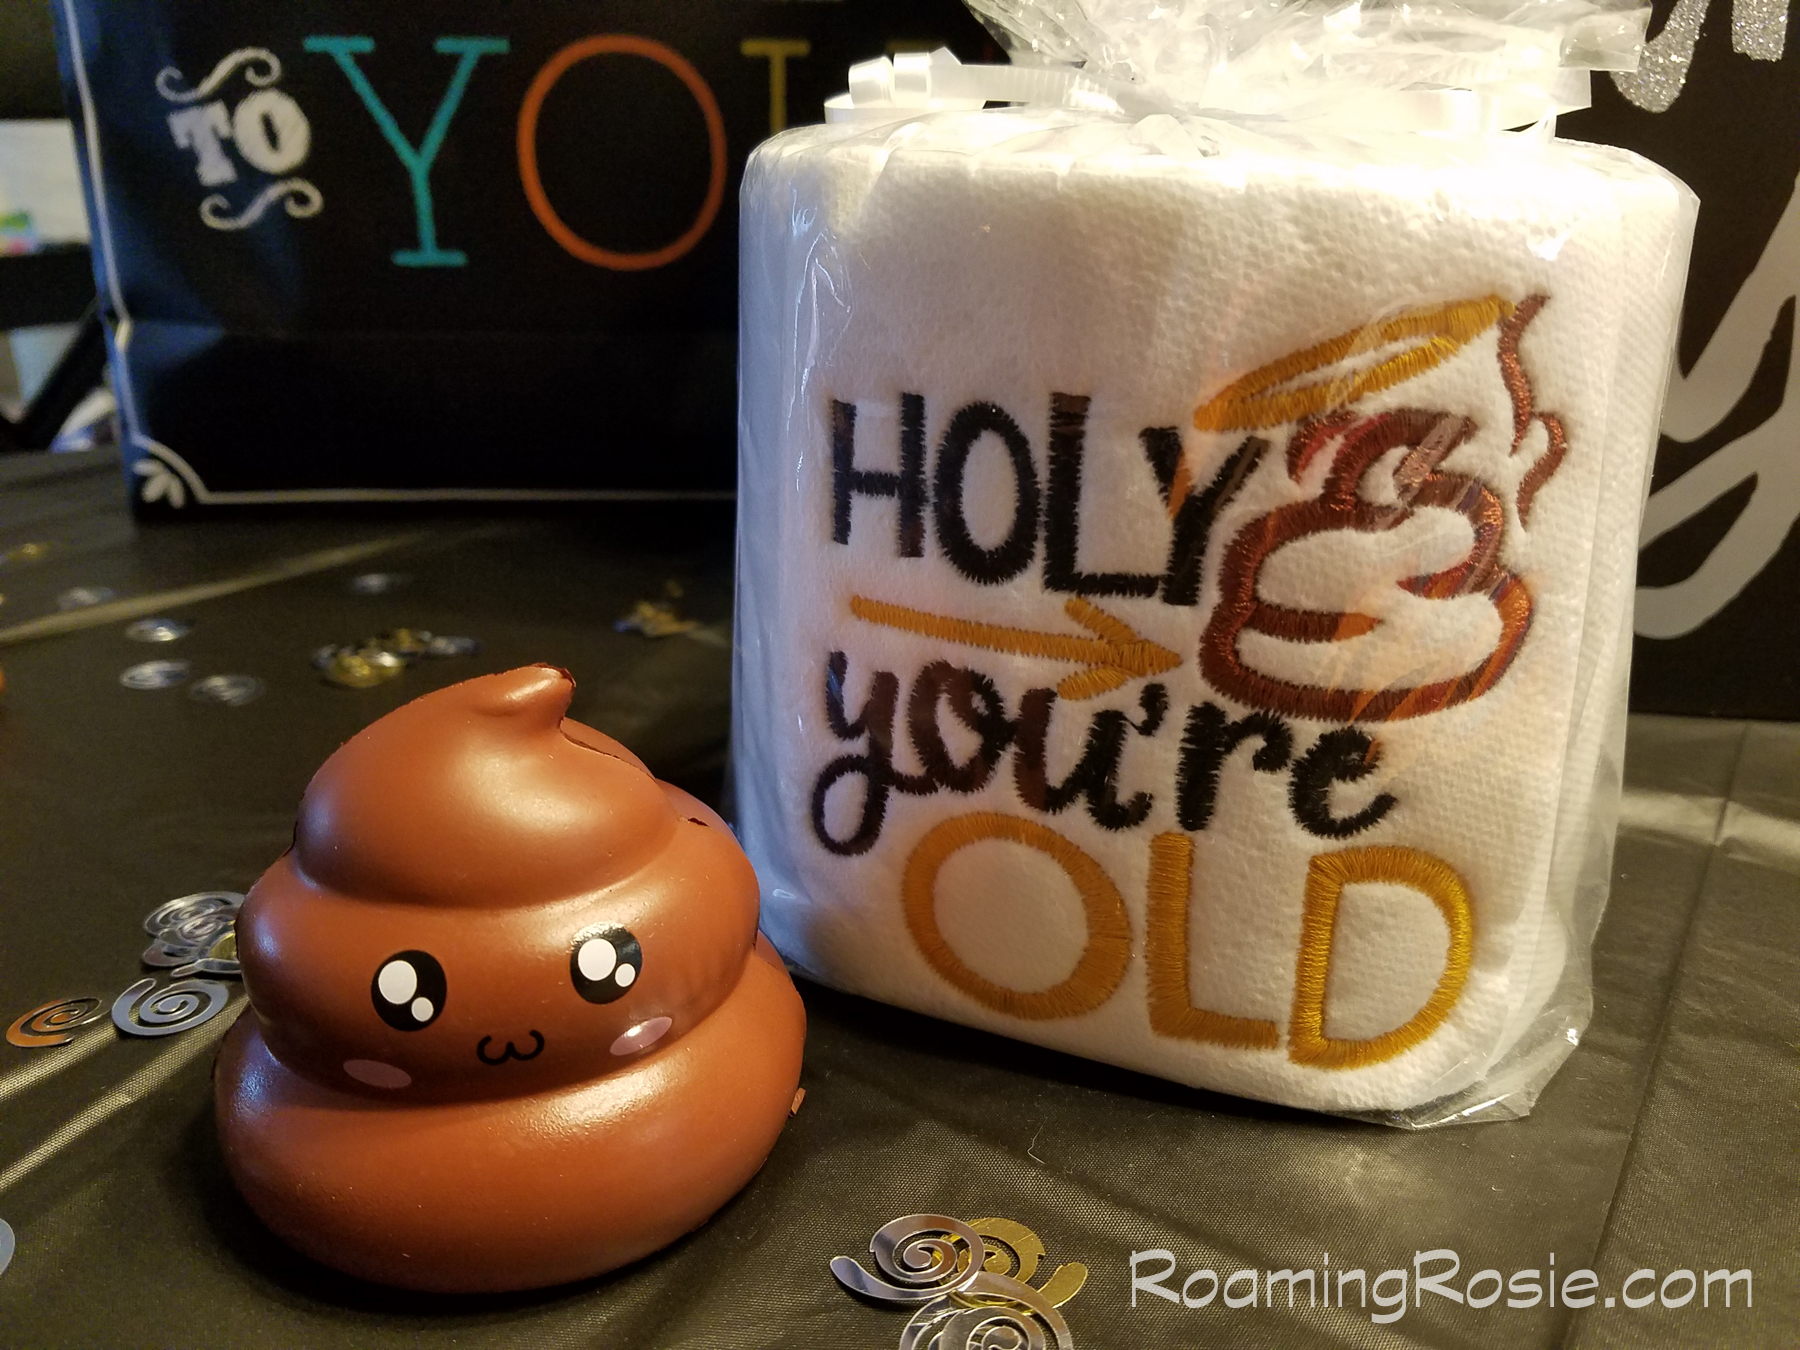
The embroidered toilet paper is from Etsy. (Going for romantic? Try this instead.)

I can’t find this particular poop squishy for sale anymore but here’s a similar one.

I also found poop emoji Easter eggs (the popularity of the poop emoji in recent years helped greatly with decorating!)

The rest of the signs and banners and streamers generally matched the color scheme: black with touches of gold and silver. I kept all of that fairly neutral so the focus would be on the humorous pieces.

Oh and that toy toilet? We didn’t just throw it out afterwards. It was an accessory for wrestling figurines so it happened to fit perfectly in the Barbie house. Dual purpose, yo.

So, how did I put together the cake?

Good question. This playful hunk of deliciousness was a pretty straightforward process. Check out the supplies I listed above. Most should be available in your local grocery store and you’re not making anything from scratch here so it shouldn’t be overwhelming.

And remember – always remember – homemade doesn’t have to look perfect! (Especially if it’s swirls of poo. Just saying.)

Step one: make the cake. Follow the package directions to make two 8-inch rounds of cake and let them cool completely. If they puffed up too much with big round tops, trim them flat. If they’re mostly flat already, just leave them as they are.

I suggest getting 3 tubs of pre-made icing, though you may be able to get by with two. I tend to be a bit paranoid about running out of things mid-cooking while prepping for parties so sometimes I overestimate. Besides, those things are shelf stable.

Here’s one of the fun parts. I forgot to photograph the inside of this cake (or a slice) but there’s an extra layer of chocolatey goodness. I did show pics on my post about the Merida cake I made, so check out those photo examples here. Essentially, place one layer on a plate or cardboard tray, and smear chocolate icing all over it. Then sprinkles those milk chocolate chips over the icing. Then take the other layer of cake, flip it so the flat bottom is now up, and place it on top.

Those chocolate chips inside add extra flavor and texture. I totally recommend it.

Now that you’ve got the basic cake base, spread chocolate icing over the whole thing. Before it sits too long and starts to harden, take handfuls of the chocolate sprinkles and press them into the side of the cake.

Next, scoop some of the icing into a decorating bag or a gallon sized plastic bag with one corner snipped off. Make the poop decorations by swirling the bag as you squeeze out the tiny piles along the top.

I also put one big pile right behind where I placed the number candles.

The final step is the decorations and text. Press the toy toilet into the cake, add the number candles if you’re using them, and write out your message with some decorating icing.

Then dump a handful of miniature chocolate chips into the open toy toilet and voila – a mildly inappropriate but wildly entertaining birthday cake!

Nothing left but to blow out the candles and enjoy.

If you make your own, please share with me! Leave a comment here or post a pic on my Facebook page.

Happy Baking!

Nutella Chocolate Birds Nests

Nutella Chocolate Birds Nests Recipe

We’ve made Chocolate Birds Nests in the past, but this year we changed it up…. by adding Nutella!

These Nutella Chocolate Birds Nests were a lot of fun to make with my girls.  It gets them in the kitchen with a combination of cooking and crafting.

And we also picked up a little Edible Grass this time around.  It’s easy to snip into bite-sized pieces with kitchen shears and adds a nice visual touch, but it isn’t necessary if you’re having a tough time finding it.  (And I picked mine up for half off after Easter – since these can be a fun treat all season long.)

Nutella Chocolate Birds Nests 2

All our ingredients gathered and ready to go….

Since there is no actually baking involved, it’s mostly mixing and shaping and decorating, once the chocolate chips are melted.

Nutella Chocolate Birds Nests 3

Melt the chocolate at half power, stirring every 30 seconds until smooth.

Then stir in the Nutella.

(And, yes, my kids are wearing superhero costumes while we cook.  That’s how we roll at our place.)

Nutella Chocolate Birds Nests 4

I slowly poured in the noodles while they stirred.

Make sure all the noodles get covered in the chocolate mixture, because that is the glue that holds everything together.

Nutella Chocolate Birds Nests 5

Spray some nonstick baking spray in the muffin tins and scoop in some of the chocolate noodles.

You want to be able to shape them into nests with your fingers, so with a small indention in the center, or at least flat as opposed to hill-shaped.  If it’s too bumpy and you’re having trouble flattening it, just take some out.

Nutella Chocolate Birds Nests 6

Put three eggs in the center of the nest and sprinkle a little edible grass over top, if you like.

You can see that my kids also added a few of the confetti-like bunnies that came with the edible grass.

This recipe makes 24 nests, but if that’s just too much for you, you could half the recipe.  Or share with all the neighbors.

When you first make them, the nests will be gooey and will fall apart if you try to pick them up.  They are still okay to eat, especially for anxious kids who want to try their creations, but they’re much easier to eat if you let the chocolate set first.

Put the pans in the fridge for an hour or so to help the chocolate set (because if you live in a humid place like me, that would take forever at room temperature), and then scoop them out with a spoon.  Preferably a plastic spoon so you don’t scratch the metal.

Store them in covered containers, using waxed paper to separate stacked layers.

Nutella Chocolate Birds Nests 7

Chocolate Nutella Birds Nests

Ingredients:

1 cup milk chocolate chips
1 cup Nutella
12 oz. chow mein noodles
72 candy-coated malted milk chocolate eggs (I used Whoppers Robin Eggs)
Edible Grass, cut into 1-inch pieces (optional)

Melt the chocolate chips in a large microwave-safe bowl at half power, stirring every 30 seconds until smooth.  Stir in the Nutella.

Pour the noodles into the chocolate mixture and stir gently until they are all fully coated.

Spray 24 muffin tins with nonstick baking spray and scoop a spoonful of the noodle mix into each tin.  Move the noodles with a spoon or your fingers so that they are shaped like a nest.

Place 3 chocolate eggs in the center of your nest while the chocolate is still slightly melted.  Sprinkle a little edible grass over the top, if desired.

Put the nests in the refrigerator for at least an hour to allow the chocolate to set.  Remove from the muffin tins with the help of a spoon.

Store in a closed container in the fridge, using waxed or parchment paper to separate stacked layers.

**********

And here’s the free printable PDF of the recipe:

Nutella Chocolate Birds Nests

Happy Eating!

Roaming Rosie Signature

Save

Mint Chocolate Cheesecake Bars

Mint Chocolate Cheesecake Bars

Annnnnd….. now that it’s almost Easter, I’ve noticed that I’ve completely forgotten to post our St. Paddy’s Day dessert.  So here it is!  ;)

We made these Mint Chocolate Cheesecake Cookie Bars based off of the Lemon Cheesecake Bars that I love so much.  But we made these green (and mint) to celebrate St. Patrick’s Day.

They were a hit with both my kids and my coworkers, so I may try other variations in the future, since the recipe is flexible.

Mint Chocolate Cheesecake Bars 2

The ingredients are pretty easy to pull together, especially if you already happen to have cream cheese on hand.

The base for it is a box of cake mix, which makes it a speedy dish to throw together.

Mint Chocolate Cheesecake Bars 3

The crust will seem a little dry at first, but massaging the ingredients together will help.

If your kids like to get messy, this is a great job for them to help with.

Mint Chocolate Cheesecake Bars 4

You’ll reserve some of the mix for the crumbles that go over the top, but the rest gets pressed into the bottom of the pan.  This is also a good task for little hands.

The crust will seem very thin but don’t worry, it will rise a little as it bakes.  Just be sure you spread it out to cover the entire bottom surface of the pan.

Mint Chocolate Cheesecake Bars 5

I add the food coloring to the cheesecake ingredients before blending, so the mixer brings it all together evenly.

The more you use the deeper the color will be.  I was going for bright and bold because it was a themed dessert for St. Patrick’s Day, but if you’re going for a subtler minty look, start with only a little color.

Mint Chocolate Cheesecake Bars 6

You can see tiny chunks of cream cheese in my cheesecake mixture because it wasn’t fully at room temperature when I mixed it.

This is okay, though.  It will still bake up just fine.

Mint Chocolate Cheesecake Bars 7

Sprinkle the crumbles over the top for a fun look.  They also add a nice texture to the finished dessert.

Mint Chocolate Cheesecake Bars 8

You can technically cut them into any shape you’d like, but I favor the rectangles.  I cut it twice lengthwise, and then cut those three rows into pieces about an inch thick.

This gives me 30 pieces, which makes it a great recipe for sharing!

Don’t eat these when they first come out of the oven and are still warm – chill them for the best results.  They can be enjoyed at room temperature too, but because of the cream cheese, you’ll want to be sure to store leftovers in the refrigerator.

Mint Chocolate Cheesecake Bars 9

Mint Chocolate Cheesecake Bars

Ingredients:

1 box chocolate cake mix (15 to 18 oz.)
2 large eggs, separated
1/3 cup vegetable oil
1 package (8 oz.) cream cheese, softened
1/3 cup sugar
1/2 teaspoon peppermint extract
Green food coloring, gel or liquid

Preheat oven to 350°F (180°C).

In one bowl, combine the cake mix, one egg, and the vegetable oil.  You may need to use your fingers to help it all come together.

Spray a 13” x 9” baking pan with nonstick spray.  Reserve about 3/4 cup of the chocolate crumb mixture for later use, and press the remaining batter into the pan.  It will be thin but should cover the entire bottom of the pan.

In another bowl, beat the cream cheese with an electric mixer until smooth.  Then mix in the other egg, the sugar, extract, and a little food coloring.  Beat until smooth, adding more food coloring if needed until you reach your desired color.

Spread the cream cheese mixture over the chocolate crust in the pan.  Sprinkle the reserved crumb mixture evenly over the cream cheese.

Bake for 25 to 28 minutes, or until a toothpick inserted into the center comes out clean or with dry crumbs.  Cool on a baking rack until it reaches room temperature, then slice.  Make two cuts lengthwise and then cut into ten pieces across to make 30 pieces that measure approximately one by three inches.  Cover and refrigerate overnight before serving for best results.

**********

For the free printable PDF version of this recipe, click the link below:

Mint Chocolate Cheesecake Bars

Happy Baking!

Roaming Rosie Signature

Graveyard Brownie Halloween Cupcakes

Graveyard Brownie Halloween Cupcakes

These Graveyard Brownie Cupcakes are SO MUCH FUN to make (and eat!) and very, very rich.

If you’re a chocolate lover, then you need to try these!

To make them a little less decadent, you could make regular cupcakes in place of the brownie base, and even try a milder flavor like yellow cake dyed orange.

But I was in need of some heavy-duty chocolate.  This hit the spot.

graveyard-brownie-halloween-cupcakes-2

The first thing I did was make some of my Chocolate Covered Marshmallow Pumpkins with my girls.  We made them the day before.

Then we melted some white candy melts to make the chocolate bones using this skeleton mold from Wilton.

We crushed up a handful of Oreo cookies in a plastic bag for our graveyard “dirt,” and we baked up some box brownies according to the package directions.

I’d thought about making the brownies in a big pan to construct a large graveyard scene, but then switched to the cupcake idea.

I was going to use regular cupcake lines and write RIP in icing on some Milano cookies for the gravestones, but then I found these cute graveyard cupcake liners that come with their own paper gravestones on toothpicks.  I happened upon them at Walmart, but there are similar products online and at other stores, too.

graveyard-brownie-halloween-cupcakes-3

We let the brownies cool completely, then iced them with chocolate icing.

We pressed in the graveyard picks and some pumpkins and bones into the icing, before sprinkling over a little of the Oreo dirt.  (If you sprinkle the cookie crumbs first, the chocolate pieces won’t stick into the icing.)

Then we savored the festively decedent chocolate culinary celebrations.

I recommend you share them, and not attempt to eat 18 thick piles of chocolate all by yourself.  Because:  wow.  ;)

Graveyard Brownie Halloween Cupcakes

Happy Halloween Baking!

Roaming Rosie Signature

Save

Spider Web Peppermint Patties

spider-web-halloween-peppermint-patties-1

I am enchanted by these Spider Web Peppermint Patties!

Seriously easy and super cute Halloween treats are my favorite.  Like my Vampire Donuts or Oreo Ghosts or Jack O’ Lantern Cinnamon Buns.

And these are in that vein.  (Is that a Halloween pun??)

Candy plus icing, and done.

I used peppermint extract to flavor the icing, which was nice with the peppermint candy, but you could also use vanilla.

Spider Web Halloween Peppermint Patties

I made icing with a scoop of powdered sugar, a sprinkle of meringue powder, a dash of peppermint extract, and a splash of water.

(You can see the actual recipe on my Chocolate Almond Mummy Cookies, but here I used peppermint extract instead of almond.)

I put the icing in a baggy, snipped off the end, and drew the webs with the icing on top of the York Peppermint Patties.  I drew an asterisk, then made a swishy circle in the shape of a spider web.

I lost the plastic spider-shaped rings I thought I had, which would have looked cute in the photos, but the candy still looked good.  And the kids were super happy!

Happy Halloween Snacking!

Roaming Rosie Signature

Triple Chocolate Iced Scones

Triple Chocolate Iced Scones Recipe

I recently made some Sweet Honey Scones (they’re awesome btw, you should try them) and I was still in the mood for scones, but also really in the mood for chocolate.

This was my solution.

And a pretty darned great one, if I do say so myself.

These Triple Chocolate Iced Scones are thick and crumbly like a biscuit, but moist too and so very chocolatey.

Triple Chocolate Scones Recipe 2

I’ve been eating these for breakfast and dessert.

I love versatility.  ;)

They’re freshest within the first 2 or 3 days, but that shouldn’t be a problem.  They are SO easy to eat.

Oh, and the “triple” in the name comes from them being chocolate scones with chocolate chips throughout and topped by a decadent chocolate icing.  *drools*

Triple Chocolate Iced Scones Recipe

Getting set up.

Triple Chocolate Scones Recipe 4

After you mix together the dry ingredients, you’ll cut in the cold butter.

Triple Chocolate Scones Recipe 5

Then comes the cream and vanilla (yum!) and the chocolate chips.

Triple Chocolate Scones Recipe 6

Looks good once it all comes together, no?

Knead it gently to pull it together.  Overworking the dough will make it tough.

And sprinkle some cocoa powder instead of flour over your work surface to keep it from sticking.

Triple Chocolate Scones Recipe 7

Shape the dough with your hands into a circle or a square.

A circle will make 8 large wedges.  The squares above come in a count of 16, but as you can see in the photo below, I further cut these squares down by slicing them diagonally to make small triangles.

Which made it easier to eat two or three or four at a time…….

Triple Chocolate Scones Recipe 8

The dough is just slightly sticky enough that you may have to reshape it after cutting, especially if you use a pizza cutter like I did.

But that’s okay.  They reshape easily with your fingers.  Just press the dough where you want it to go.

Triple Chocolate Scones Recipe 9

The icing is optional, technically, but such a nice touch.

Just blend the cocoa powder and powdered sugar and stir in a little vanilla and water until you’ve got smooth ribbons of chocolate easily dripping from your fork in thin ribbons.

Triple Chocolate Scones Recipe 10

The baked scones, pre-icing.

Try not to over bake them or the bottoms will burn.  The bottoms will be a little darker than the rest anyway, but keep an eye on them towards the end.

They’ll be done when they look puffy and solid, and there’s no indent left behind when you touch the top with your finger.

Triple Chocolate Iced Scones Recipe

How wonderful do these things look covered in icing??

Triple Chocolate Scones Recipe 12

Cover your work space with waxed paper or something similar to catch the drips of icing.

To decorate your scones like this, scoop the fork into the icing and then wave it back and forth over the scones to drizzle them generously with the liquid yummy-ness.

Let the icing dry completely before storing.  I usually let things like this sit for at least an hour (or more) to make ultra-certain that the icing is hardened all the way through and won’t get smooshed when I stack them in a container.

Triple Chocolate Iced Scones Recipe

Triple Chocolate Iced Scones

Ingredients:
2 1/4 cup flour
1/4 cup dark brown sugar
1/3 cup cocoa powder
2 ½ teaspoons baking powder
1/4 teaspoon salt
1/2 cup (one stick) cold unsalted butter, sliced
1 teaspoon vanilla
1 cup heavy whipping cream
1/2 cup miniature semi-sweet chocolate chips

Icing:
1 cup powdered sugar
1 tablespoon cocoa powder
1/8 teaspoon vanilla
2 to 3 tablespoons water

Preheat the oven to 400°F (200°C).

Whisk together flour, sugar, cocoa powder, baking powder, and salt.  Use a pastry cutter or two knives to cut the cold butter into the flour mixture until it resembles large crumbs.

Add the cream and vanilla to the dry mixture and stir until just moistened.  Add the chocolate chips.  Knead it gently with your hands to pull it all together.  Do not overmix.

Sprinkle a little cocoa powder over your work surface, and shape the dough with your hands into a circle or square about 8 inches across and one inch high.  Cut the circle into 8 large wedges or cut the square into 16 smaller squares.  If you’d like mini triangles, as shown in the photos, cut the 16 squares in half diagonally to make 32 pieces.  Place them an inch apart on a baking pan lined with parchment paper.

Bake for 12 to 15 minutes or until the dough is set and leaves no indent when you touch the top.  Let rest on pan for two minutes then transfer to a cooling rack.

Make the icing by mixing the powdered sugar and cocoa powder with a fork.  Add the vanilla and 2 tablespoons of water and stir well.  Continue adding water a teaspoon at a time until the icing smoothly drips from the fork in thin ribbons.  Drizzle the icing over the completely cooled scones.

**********

To print the free PDF of the recipe click here:

Triple Chocolate Scones

Happy Baking!

Roaming Rosie Signature

Triple Chocolate Spice Cookies

Triple Chocolate Spice Cookies

If you like chocolate and you like Spice Cookies, then you’re going to agree with me that these cookies are Uh-MAZING!!

They’re gooey and chocolately and bursting with fragrant flavor!  A total hit with everyone who has tried them.  Well … the ones I was willing to share!  ;)

They’re loosely based off of the Land O’ Lakes Chocolate Chai Latte cookies.  I like how those had a soft chocolate cookie base, are flavored with spices, filled with chunks of chocolate, and iced with a cinnamon glaze.

So I made this recipe to incorporate those elements, but with all the individual ingredients instead of starting with a cake mix.  Cake mixes differ a lot, and I wanted to know exactly what was going into my cookies.  Plus this way the cookies all turn out the same, unlike if you have a different cake mix on hand from the last time.

I played around with the measurements until I found something I loved, including adding more spice into mine.  I picked out spices I liked and measured them out, instead of using using a drink mix like the Chai cookies.

Because, really, I’m far too unorganized to have a specific cake and drink mix on hand whenever I decide to make these.  All of the ingredients I use here are things I usually have in the pantry.  Except if I’ve forgotten to stock up on powdered milk, but that’s shelf stable, so I usually keep that around, too.

(Scroll down for the printable PDF of the recipe.)

Triple Chocolate Spice Cookies

It looks like a lot of ingredients, but once you get everything set up, it’s super simple to whip up a batch.

And you can see that I used milk chocolate for these.  I suppose you could use semi-sweet or dark, but I like the way the softer and gentler milk chocolate chips contrast with the rest of the cookie.

The chips are one part of the “Triple” chocolates for which I named these.  Aside from the cookie itself, there is also chocolate in the icing.  :)

Triple Chocolate Spice Cookies

Would you just LOOK at all that FLAVOR!?

Triple Chocolate Spice Cookies

The dough is coming together…

A little thick, but that makes for soft, puffy cookies!

Triple Chocolate Spice Cookies

Scoop it out onto parchment paper or on a pan like this that releases the cookies easily.

Triple Chocolate Spice Cookies

The just-baked cookies.

See that moisture in the cracks?  Get ready for some moist, fudgy goodness!

Triple Chocolate Spice Cookies

And the icing ingredients.

I made this icing with both cocoa powder and cinnamon for maximum chocolatey-spicy flavor.

Triple Chocolate Spice Cookies

The icing consistency is ready when it easily drips from the fork or spoon in thick ribbons.

Triple Chocolate Spice Cookies

Drizzle the icing over the cooled cookies by dipping the fork back into the icing then waving it back and forth above the cookies.

Wait until the icing hardens completely to eat them.  The slight crunch of the icing makes a wonderful combination with the soft cookies.

Store them covered, and if you’ve waited until the icing is completely cooled (doesn’t smoosh and melt apart when you press it with your finger), then you shouldn’t even need to separate the layers of cookies with paper or anything.  Just throw the ones you didn’t consume immediately into a container.

Triple Chocolate Spice Cookies

Triple Chocolate Spice Cookies

Ingredients:
1 ½ cups all-purpose flour
1 ½ cups sugar
1/2 cup cocoa powder
1/3 cup instant nonfat dry milk powder
1 teaspoon baking powder
1 teaspoon baking soda
1/2 teaspoon salt
2 teaspoons ground cinnamon
1 teaspoon ground cardamom
1 teaspoon ground ginger
1/4 teaspoon ground cloves

1/2 cup (1 stick) butter
2 large eggs
3 tablespoons milk
2 cups milk chocolate chips

Icing:
2 cups powdered sugar
2 tablespoons cocoa powder
2 teaspoons ground cinnamon
3 to 5 tablespoons water

Preheat the oven to 350°F (180°). Combine the first 11 ingredients in a large bowl with a whisk or fork. Add in the butter, eggs, and milk and blend with a mixer on medium speed until fully combined. Stir in the milk chocolate chips by hand. The dough should hold together but be thick. Scoop rounded teaspoons of dough onto cookie sheets, about two inches apart. Bake for 10 to 12 minutes. The cracks in the cookies will still look moist when they are done. Allow to cool on cookie sheets for two minutes, then transfer to cooling racks and allow to cool completely.

Using a fork, combine the powdered sugar, cocoa powder, and cinnamon in a bowl. Add in 3 tablespoons of water, stirring well until icing is smooth. Add a teaspoon more of water at a time until the icing drips from the fork in thin, unbroken ribbons. Line your workspace with waxed paper beneath the cooled cookies, and use the fork to drizzle the icing over the cookies. Allow icing to harden completely and store cookies covered. Makes four dozen.

**********

Click here to print the free PDF version of the recipe:

Triple Chocolate Spice Cookies

Happy Baking!

Roaming Rosie Signature

Chocolate Covered Marshmallow Pumpkins: Version 2015

Chocolate Covered Marshmallow Pumpkins for Halloween

I really love these little guys.  There just isn’t much of a better bite-size snack around Halloween than these tiny Chocolate Covered Marshmallow Pumpkins.

I’ve made these many times, and this year my girls helped out.  My 5yo made quite a few completely on her own.

It’s a great way to get your kids in the kitchen – the main challenge being getting them not to eat all the marshmallows!

It takes a little bit of time to get all of those tiny marshmallows covered, but it is SO worth it!  Biting into the smooth vanilla-flavored chocolate that surrounds the pillow-like center with that one tiny crunch of the sprinkle “stem” is just utter delight!

Be sure to make a bunch – they’re great to share but will go fast!

Chocolate Covered Marshmallow Pumpkins for Halloween 2

You’re going to need some mini marshmallows, some orange candy melts, and some flower green flower shaped sprinkles, kinda like these or these.  Or, if you can’t find flower shaped sprinkles, you could substitute with regular chocolate sprinkles.

Melt the candy melts according to the package directions, making sure the chocolate is smooth and drips from the fork somewhat easily, but that it’s not very hot.

Meanwhile, separate out the green sprinkles.

Throw a marshmallow in the bowl and use a fork or two to cover it with chocolate.  Scoop it out with the fork and gently tap the fork on the edge of the bowl to get rid of the excess chocolate.  Then use a second fork to scrape the marshmallow off of the first fork and onto some parchment or waxed paper, making sure the marshmallow is upright.

Do this for a few marshmallows, and then take a break to insert a green sprinkle in the top of each pumpkin before the chocolate starts to harden, and trace around it with a toothpick if there is a lot of excess chocolate.  This will make it easier to break off any extra big chunks once it has dried.

Coat the marshmallows until you run out of chocolate.  One bag of candy melts will use up about half a bag of mini marshmallows.  Let the pumpkins sit until fully hardened, about an hour.  Then remove them from the paper.  Store covered… and enjoy!

Be sure to check out my other Halloween marshmallows, too:

Chocolate Covered Halloween Ghost and Pumpkin Mini Marshmallows 1

Chocolate Covered Marshmallow Pumpkins and Candy Corn

Halloween Marshmallow Mummies

Happy (Yummy) Halloween!

Roaming Rosie Signature

Chocolate Fudge with Chocolate Chip Topping

Chocolate Fudge with Chocolate Chip Topping

Did I REALLY just publish THREE fudge recipes in a row??

Yes.  Yes, I did.

And I may do it again one day…. I AM working on some new recipes… ;)

But for today, let’s just stick with this chocolate fudge with its INCREDIBLE chocolate chip topping.

Because, really, the awesomeness here deserves a massive amount of attention.

Chocolate Fudge with Chocolate Chip Topping

It starts out like any normal fudge (well – the kind WITHOUT condensed milk, which are the only ones I’ll cook now).

And go right ahead and ignore those mini chocolate chips in the photo…. I’d put them out before I realized they weren’t the ones I wanted to use.  Don’t ask.  Crazy Mom Brain, I guess.

What you SHOULD use are milk chocolate chips.  Why?  Because they’re softer and it’s a slightly contrasting flavor to the main body of the fudge.  In other words, it compliments the fudge while still standing on it’s own.

Chocolate Fudge with Chocolate Chip Topping

First things first:  whisk together the milk, cream, butter, sugar, and cocoa in a pot.

BUT in a bigger pot than what I photographed above.  Don’t ask.  Probably due to Crazy Mom Brain operating on no sleep.  Either way, this pot overflowed and you just really don’t want to waste any chocolate like that.

So use a bigger pot.

Like this one:

Chocolate Fudge with Chocolate Chip Topping

Bring the mixture to a boil without stirring it.

Then reduce to a rolling simmer.

Chocolate Fudge with Chocolate Chip Topping

After 15 minutes, check the temperature.  Remember:  no stirring.

It NEEDS to hit 235 degrees Fahrenheit.  If it doesn’t hit that temperature (also known as soft ball stage), it won’t set.

But you may need to keep simmering it until it hits 235.  Don’t worry if it takes longer – just keep checking until you get where you need to be.

It’s totally worth the wait.

Chocolate Fudge with Chocolate Chip Topping

Once you get to 235, you can take it off the stove and mix in the vanilla.

To really, really make sure that the fudge sets like it should, you should put the pan over a bowl of ice and stir it for a few minutes until it gets thicker.

Chocolate Fudge with Chocolate Chip Topping

Pour the fudge into a pan prepared with butter or cooking spray (foil really helps, too), and immediately sprinkle the chocolate chips over the top.

Spread out the chips so that they cover the entire top evenly and press down gently to make sure that they adhere.

The fudge shouldn’t be hot enough to melt them at this point if you stirred it over the ice for a couple of minutes, but just warm enough to let the chips slightly melt just enough so that they stick.

Chocolate Fudge with Chocolate Chip Topping

There you go.

Isn’t that beautiful??

Let it sit, preferably on a wire rack to cool the bottom faster, then remove it from the pan.

Flip it over – gently! – for a few minutes to allow the bottom to dry, then – gently! – flip it back and cut it into pieces.

Chocolate Fudge with Chocolate Chip Topping

The inside will still be a little moist, which is why I suggest allowing the cut pieces to sit out, not touching each other, for at least an hour, if not overnight.

That way, the outside is completely dry.  But the inside stays nice and smooth and melt-in-your-mouth amazing.

Seriously.  If you love chocolate, you’re gonna be in heaven with these little bits of bliss.

Don’t be surprised if you take a tray to work or a pot luck and they’re gone before you can blink.

Chocolate Fudge with Chocolate Chip Topping

Chocolate Fudge with Chocolate Topping

Ingredients:

1 cup whole milk
1 cup heavy whipping cream
3 cups sugar
2/3 cup unsweetened cocoa powder
1/2 cup (1 stick) butter, softened
2 teaspoons vanilla extract
1 cup milk chocolate chips

Prepare an 8×8-inch baking dish with foil and a light coating of butter or cooking spray.

Whisk together the milk, cream, sugar, cocoa, and butter in a large saucepan. Bring it to a boil.

Reduce the heat and simmer it without stirring. This is important: do NOT stir the mixture! After 15 minutes, test the temperature with a thermometer. Once it reaches 235°F or soft ball stage, remove from heat. Do NOT stop simmering until it reaches this temperature, or it will not set. This may take a few more minutes. It will be noticeably thicker at this point, but still slightly runny. Remove from heat and stir in the vanilla extract.

Fill a large bowl with ice and place the saucepan into the bowl on top of the ice. Stir the fudge for a few minutes until it is very thick. Then (making sure not to let any of the melted ice get into your fudge) pour it into the prepared baking dish, spreading it smooth. Immediately sprinkle the chocolate chips over the top. Spread them evenly, covering the entire surface, and gently press them down to make sure they adhere to the top of the fudge.

Place baking dish on a wire rack and allow to completely set. This may take a half hour or a little longer, depending on the temperature and humidity of your home. Carefully remove the fudge from the dish by pulling out the foil. Place fudge on a wire baking rack for a few minutes to allow the bottom to dry.

Cut into squares or rectangles with a sharp knife and allow the pieces to sit for a while without touching. I usually leave them out overnight to make sure each piece is fully set and has a nice solidity all the way around the smooth interior. Makes about 3 dozen 1-inch pieces.

[Note: you can also use semi-sweet or dark chocolate chips instead of the milk chocolate.]

********

Click here to print the free PDF version of the recipe:

Chocolate Fudge with Chocolate Chip Topping

And if you like fudge, check out my Vanilla Fairy Fudge and my mini pieces of traditional Chocolate Fudge:

Vanilla Fairy Fudge Recipe Chocolate Fudge Recipe

Happy Baking!

Roaming Rosie Signature

Chocolate Fudge Recipe (with no condensed milk!)

Chocolate Fudge Recipe

As I recently mentioned in my post about Vanilla Fairy Fudge, I really, really, really don’t like fudge that’s made with condensed milk.

So I’ve been experimenting with fudge recipes lately (ones withOUT condensed milk), and today I wanted to share my Chocolate Fudge.

This stuff is AH-may-zing!!!

Just supremely smooth and decadent and perfectly chocolatey!

I think I’m in love.

Chocolate Fudge Recipe

Just look at that pile of perfection.

Sigh……

This is the stuff dreams are made of.

Chocolate Fudge Recipe

Anyway – back to the recipe.

Basic fudge stuff, plus a cocoa powder that you like.

Chocolate Fudge Recipe

Mix together the sugar and cocoa….

Chocolate Fudge Recipe

Then mix all of it (except the vanilla) in a sauce pot.

Then whisk it to make sure it’s all mixed.

Chocolate Fudge Recipe

Bring it up to a boil…..

Chocolate Fudge Recipe

Then simmer until it hits 235 degrees Fahrenheit.

Which is important.  You gotta wait until it gets to 235 (soft ball stage) before you take it off the stove.  Otherwise it won’t set properly.

Chocolate Fudge Recipe

Stir in the vanilla and then put the whole pot on top of a bunch of ice cubes in a big bowl.

Stir, stir, stir.

After a couple of minutes, it will be much thicker.  Time to transfer to your prepared pan!

Chocolate Fudge Recipe

I recommend lining your pan with tin foil and then greasing it with a very light layer of butter or a nonstick cooking spray.  I like coconut oil spray.

BUT – I need to stress that the pan pictured here is NOT a big 9 by 13 inch baking pan!  I didn’t realize that it would look like that in the photos.  I usually use an 8 by 8 inch baking dish for this, but just happened to grab this little guy when I was photographing this batch.

The dish pictured here is actually 1.5 quarts or approximately 6 by 10 inches.

Chocolate Fudge Recipe

After a short time, you’ll be able to pick the fudge up out of the pan with the foil and turn it over to allow the bottom to set.

Then you can (carefully) flip it over again and cut it into pieces.

Let those pieces sit out for a while to fully set all around.  I will usually leave them out overnight or for at least a few hours, just to make extra sure they’ve hit the texture I’m looking for before I pack them away.

Chocolate Fudge Recipe

The pieces of fudge you will get from this recipe are pretty small, by design.

If you want really thick giant chunks, you’ll have to either double (triple??) the recipe, or just pour it into a smaller pan to set.

But just take a look at that gorgeous pile of deliciousness…… you’ll be wanting to try this.  About right now.

Chocolate Fudge Recipe

Chocolate Fudge

Ingredients:

1/2 cup whole milk
1/2 cup heavy whipping cream
1 ½ cups sugar
1/2 cup unsweetened cocoa powder
6 tablespoons butter, softened
1 teaspoon vanilla extract

Prepare an 8×8-inch baking dish with foil and a light coating of butter or cooking spray.

Whisk together the milk, cream, sugar, cocoa, and butter in a saucepan. Bring the mixture to a boil.

Reduce the heat and simmer it without stirring. This is important: do NOT stir the mixture! After 15 minutes, test the temperature with a thermometer. Once it reaches 235°F or soft ball stage, remove from heat. Do NOT stop simmering until it reaches this temperature, or it will not set. It will be noticeably thicker at this point, but still slightly runny.

Let it sit for a minute and then stir in the vanilla extract.

Fill a large bowl with ice and place the saucepan into the bowl on top of the ice. Stir the fudge for a few minutes until it is very thick. Then (making sure not to let any of the melted ice get into your fudge) pour it into the prepared baking dish, spreading it smooth.

Place baking dish on a wire rack and allow to completely set. This may take a half hour or a little longer, depending on the temperature and humidity of your home. Then carefully remove the fudge from the dish by pulling out the foil. Carefully invert it on a flat plate or platter and allow the bottom to dry. Again, this may only take a few minutes.

Cut into squares or rectangles with a sharp knife and allow the pieces to sit for a while without touching. I usually leave them out overnight to make sure each piece is fully set and has a nice solidity all the way around the smooth interior. Makes about 4 dozen very small pieces, depending on how you cut it.

[Note: the recipe can be doubled or put in a smaller pan if you like thicker pieces.]

**********

Click below for the free printable PDF version of this recipe:

Chocolate Fudge

And if you like this, be sure to check out my Vanilla Fairy Fudge:

Vanilla Fairy Fudge Recipe

Or if you’d prefer cookies……..

Chocolate Chip Peanut Butter Cookies Mini M M Chocolate Chip Cookies Soft Iced Sugar Cutout Cookie Leaves Strawberry Cream Cheese Sandwich Cookies

Happy Baking!

Roaming Rosie Signature