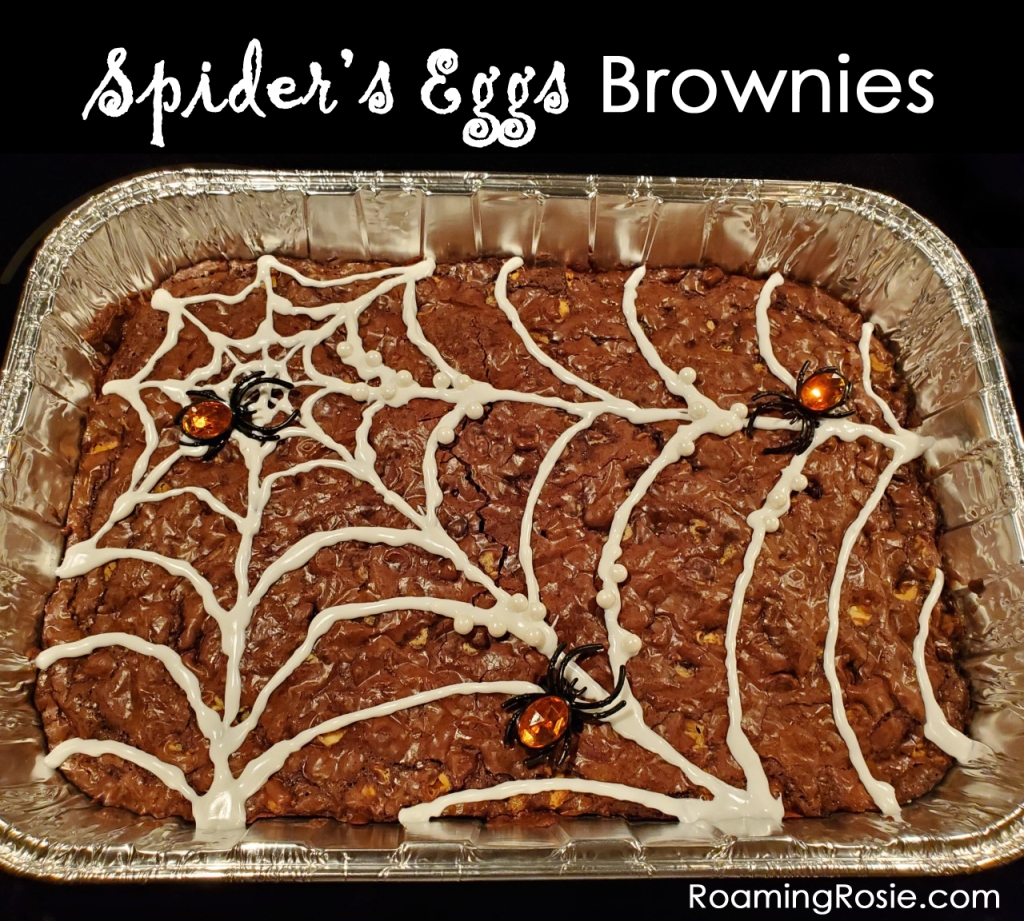
Halloween Spider’s Eggs Brownies

Roaming Rosie Halloween Spiders Eggs Brownies

This is the type of Halloween dessert I love – satisfyingly spooky but quick to put together. Because let’s face it, I make a lot of Halloween-themed meals all month long, and I can’t spend hours and hours on each one!

These Spider’s Eggs Brownies were constructed with an easy shopping list and can be made ahead of time. In this case, I brought these brownies to a potluck. They’re really easy to travel with (don’t forget something to cut them!) but you could always make them in a more permanent pan just as easily.

Here’s the shopping list:

1 box brownie mix (plus ingredients listed on box)
1 cup white chocolate chips
1 tube white cookie icing
1/4 cup sugar pearls
1 package Halloween toy spider rings
1 disposable foil cake pan (optional)

(These items should be readily available in your local grocery/big box/dollar store around Halloween, but if they’re not, try the links posted above.)

As you can see from the photos above, I wanted to fill these brownies full of delicious spider eggs! Mixing in those white chocolate chips really helps to highlight this.

Instructions:

  1. Make the brownies according to the instructions on the box.
  2. Mix the white chocolate chips into the batter.
  3. Pour batter into pan of choice and bake according to instructions on the box.
  4. Allow cooked brownies to cool completely.
  5. Draw a spider web on top of cooled brownies with cookie icing.
  6. Before icing dries, sprinkle sugar pearls over the icing so they stick.
  7. Add in a few spider rings by pressing them into the top.
  8. Freak out your friends and coworkers!

I’ve found brownies to be a pretty safe bet for satisfying the greatest amount of people at a party. I do have a tried-and-true homemade brownie recipe, but if I’m in a rush, I mix a few chocolate chips into a box mix.

And, if it’s Halloween, I spookify it.

Share some of your brownie creations with me on Facebook!

Happy Baking!

Spiderweb Cinnamon Rolls

spiderweb cinnamon rolls

This is one of those recipes that’s so stinkin’ cute but also super easy.

Halloween is a time of year when we eat a lot of “fun” foods.

(Yeah I said “time of year.”  It ain’t just a single day in this family – we celebrate for at least a month … but I’m always up for something spooky.)

So I like to spruce up meals and snacks when I can.  Which means some are quite elaborate and others… well, are like this!

This dish that has essentially two ingredients:  a can of cinnamon rolls and a bag of chocolate chips.

spiderweb cinnamon rolls 2

To get this platter of spookiness, bake the cinnamon rolls according to package directions and place the finished rolls in a circle on a plate.

Melt some candy melts or chocolate chips.  Candy melts are smoother but I didn’t have any on hand.  If you melt the chocolate chips in the microwave, do it at half power 30 seconds at a time.

Put the melted chocolate into a piping bag or a baggie with the corner cut off, and squeeeze out the chocolate into a big and little circle for a spider’s body, along with eight legs, onto one of the rolls.

Then draw a web over the rest.  I did this with the straight lines first and then spiraled around to make it look like a web. And don’t worry if it doesn’t look perfect – it’ll be gobbled up soon anyway!

Happy Early Halloween!

Roaming Rosie Signature

Spider Web Peppermint Patties

spider-web-halloween-peppermint-patties-1

I am enchanted by these Spider Web Peppermint Patties!

Seriously easy and super cute Halloween treats are my favorite.  Like my Vampire Donuts or Oreo Ghosts or Jack O’ Lantern Cinnamon Buns.

And these are in that vein.  (Is that a Halloween pun??)

Candy plus icing, and done.

I used peppermint extract to flavor the icing, which was nice with the peppermint candy, but you could also use vanilla.

Spider Web Halloween Peppermint Patties

I made icing with a scoop of powdered sugar, a sprinkle of meringue powder, a dash of peppermint extract, and a splash of water.

(You can see the actual recipe on my Chocolate Almond Mummy Cookies, but here I used peppermint extract instead of almond.)

I put the icing in a baggy, snipped off the end, and drew the webs with the icing on top of the York Peppermint Patties.  I drew an asterisk, then made a swishy circle in the shape of a spider web.

I lost the plastic spider-shaped rings I thought I had, which would have looked cute in the photos, but the candy still looked good.  And the kids were super happy!

Happy Halloween Snacking!

Roaming Rosie Signature

Halloween Sensory Bath

Halloween Sensory Bath {RoamingRosie.com}

I wanted to do something special for Halloween, and settled on a sensory bath with orange, green, and purple noodles that would be mixed with black, creepy toys.

It was a hit.  But then, I knew it would be.

How could kids NOT love a sensory bin that you let them climb inside of?

Earlier this year we did an Ocean Sensory Play Bath.  My girls really enjoyed it and requested it again and again.

But this time we did a “creepy” version.

Seemed a good way to get into the Halloween spirit.

Halloween Sensory Bath  {RoamingRosie.com}

I had the food coloring on hand, but the rest of the supplies I picked up at the dollar store.

You’ll need:

4 lbs. of spaghetti
Food coloring in orange, green, and purple
Various toy bugs

I got a package of 8 rubbery mice, 8 rubbery spiders, and a dozen plastic centipedes.

I thought about sticking with the traditional colors of orange and black, but eventually decided to throw in the green and purple, too.  They added a nice dimension to it.

Halloween Sensory Bath  {RoamingRosie.com}

You need to cook the spaghetti ahead of time, but it can sit for awhile.  This is helpful, for example, if you want to take care of this part while your kids are sleeping or at school.

I put most of the 4 lbs. into one large pot with a big scoop of orange food color.  Then I put green and purple into two smaller pots with smaller amounts of spaghetti.

I cooked them according to the package directions, then took the pots off the heat and allowed the noodles to sit in the colored water for 20 or 30 minutes.

You could also cook all the noodles in one big pot and then separate them into plastic baggies.  You can add the food color to the baggies and mix it all around to dye the noodles this way.

Sometimes I have issues with that method, so I used the dye-them-on-the-stove technique.  It takes very little time to wash the pots afterwards, and if you don’t have that many pots, you can always reuse the same one or make fewer colors.

Halloween Sensory Bath  {RoamingRosie.com}

Once you’re ready to drain the pasta, make sure you rinse the noodles with cool water, too.

Rinse until the water that’s draining from the bottom of the colander runs clear.

Some of the food color that is in the spaghetti will still leak into the tub as the noodles steep, but rinsing helps eliminate as much color as possible beforehand.

Halloween Sensory Bath  {RoamingRosie.com}

Here is a photo of the dyes spaghetti in one big bucket and all the creepy, crawly critters in a little dish.

I put these on the bathroom counter until we were ready to play.

As I mentioned, the spaghetti can sit for awhile.  We waited at least an hour, because my youngest was still napping.

And if you don’t have a bathtub {or just can’t imagine putting food in your tub}, you could always use something else.  For example, a kiddie pool.  Or, if you don’t want your kids sitting in the spaghetti, you could put it in a water table or large plastic bin instead, and let them play with it that way.

Halloween Sensory Bath  {RoamingRosie.com}

Fill up the tub with just a few inches of water.

Then dump in the spaghetti and any toys.  Here you can see me and my daughter tossing in all the creepy vermin.

Swirl everything together with your hand or a small strainer.

We used the small mesh strainers to clean up afterwards, but also to play.  The girls used them to scoop up the toys.

Halloween Sensory Bath  {RoamingRosie.com}

The orange faded from the spaghetti rather quickly.

Next time I would use more color and perhaps let it sit a little longer, since orange is such a light color.

And, as you can see, the green and purple did seep into the bathwater.  This makes it even creepier, though, and more of a challenge to find all the toys.  So not a total negative.

Plus, in case you’re wondering, my kids did not turn green and purple.

Halloween Sensory Bath  {RoamingRosie.com}

To clean up, we took out all the toys and scooped all of the noodles back into the bin.

We used both our hands and the mesh strainers to remove the pasta.  My kids have nearly as much fun with this part as they do with playing in the spaghetti.

Once all {or as much as I can find} of the noodles are out of the tub, I drain the water.  Then I make sure there’s no food coloring left in the tub and my kids get a real bath.

When the bath is over, I sprinkle a bunch of baking soda over the drain and rinse it down with white vinegar.  {This is my normal method of cleaning bathtub/sink drains.}  It is inevitable that some noodles will escape down the drain, and certainly some starch, so this extra step is important.

Have fun!

Roaming Rosie Signature


Happy {Caffeinated} Halloween

halloween pumpkin coffee art

Happy Halloween!

Mwabwahahahahaha… [insert creepy voice here]

But no holiday (or any hour of any ordinary day either) would be complete without coffee.

So, for this holiday, I’m sharing with you some thematically appropriate awesomeness via Etsy.  ‘Cause I just think Etsy rocks.

witches brew halloween coffee spoon

Witch’s Brew Coffee Spoon

pumpkin coffee cozy for halloween

Pumpkin Cozy

boo spider halloween coffee mug

Boo Mug

black cat coffee vintage sign

Black Cat Coffee Sign