Halloween Spider’s Eggs Brownies

Roaming Rosie Halloween Spiders Eggs Brownies

This is the type of Halloween dessert I love – satisfyingly spooky but quick to put together. Because let’s face it, I make a lot of Halloween-themed meals all month long, and I can’t spend hours and hours on each one!

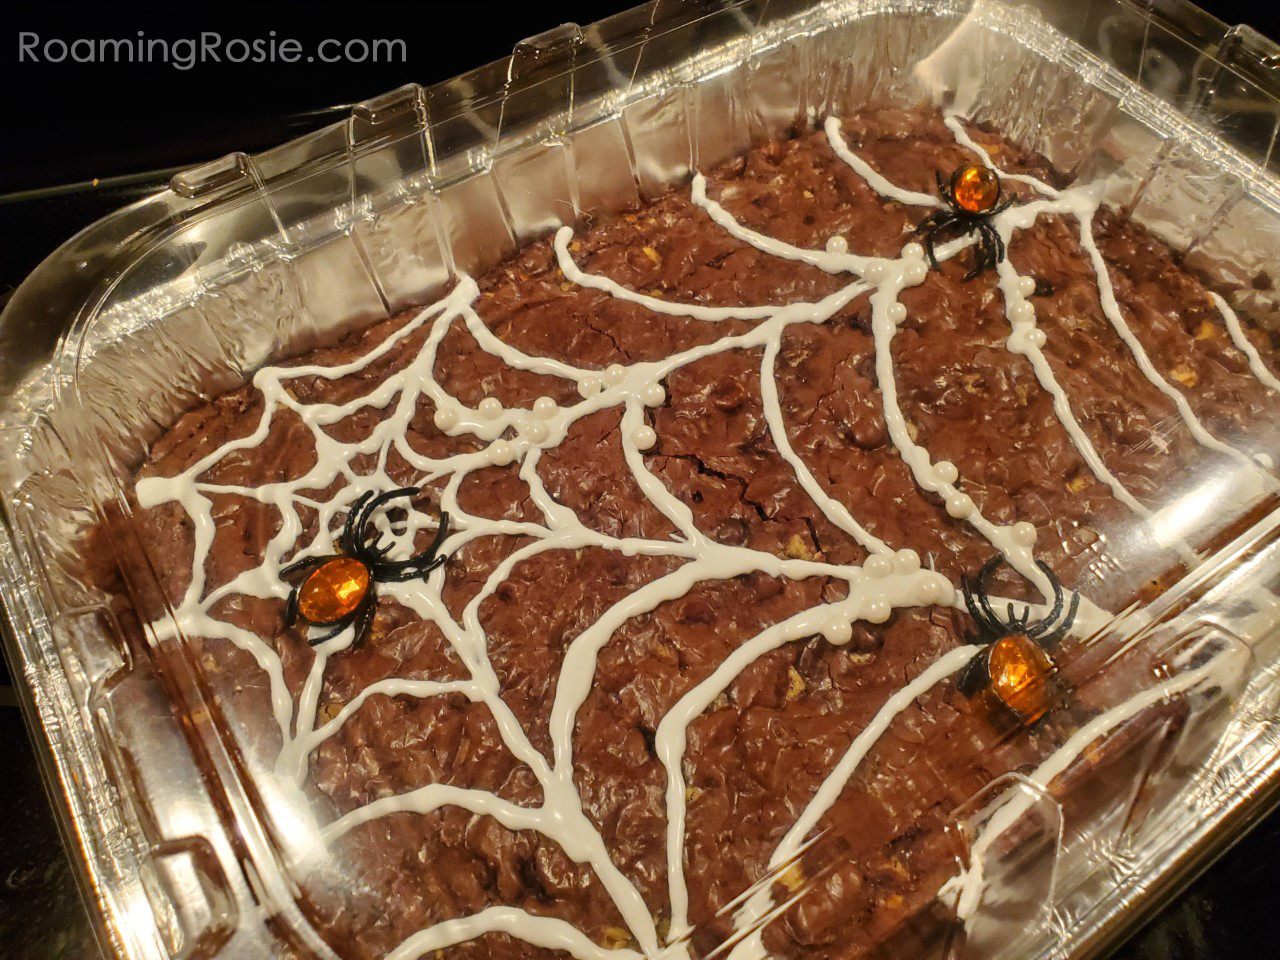
These Spider’s Eggs Brownies were constructed with an easy shopping list and can be made ahead of time. In this case, I brought these brownies to a potluck. They’re really easy to travel with (don’t forget something to cut them!) but you could always make them in a more permanent pan just as easily.

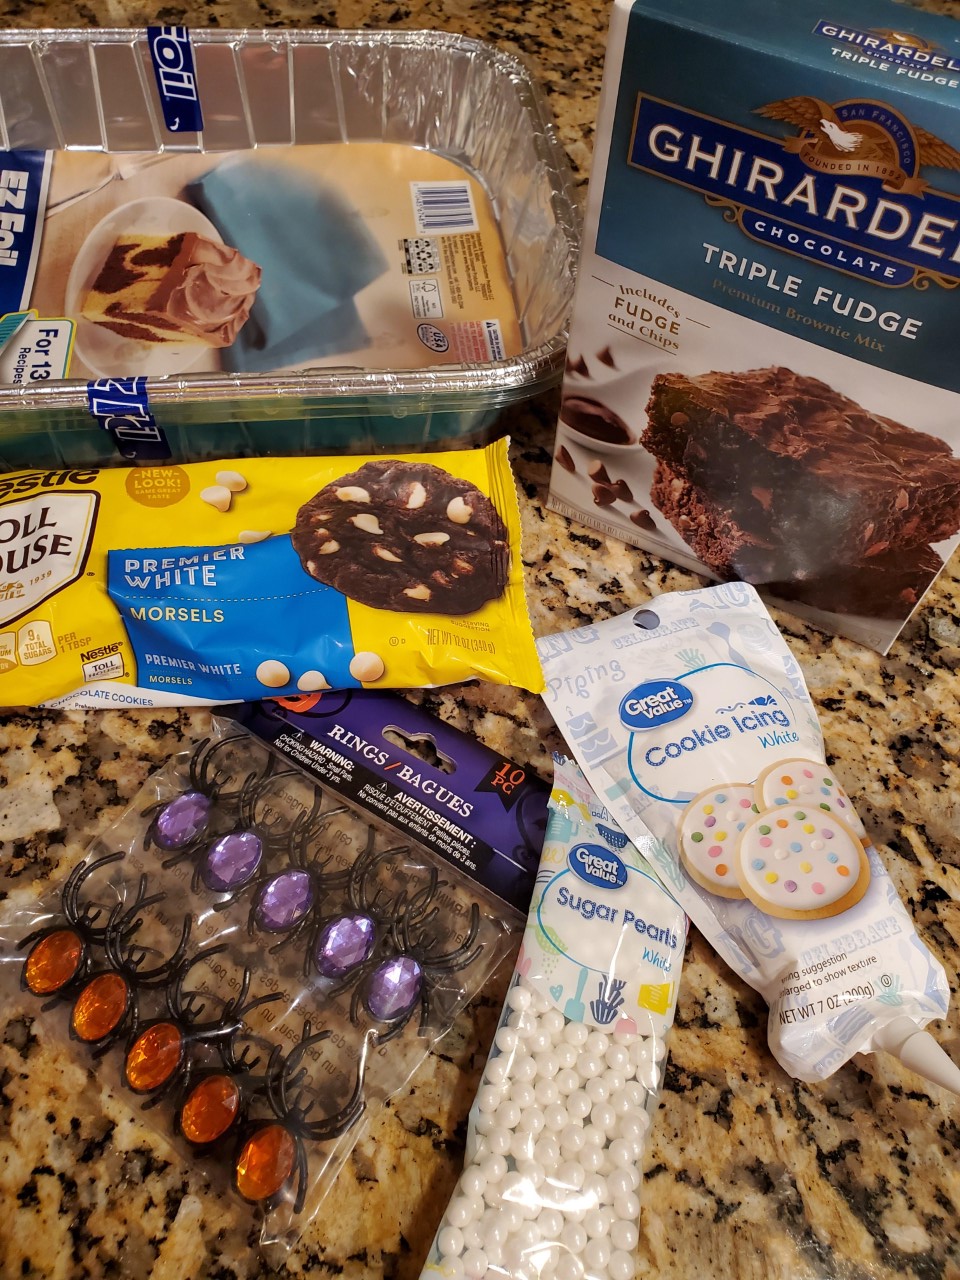
Here’s the shopping list:

1 box brownie mix (plus ingredients listed on box)
1 cup white chocolate chips
1 tube white cookie icing
1/4 cup sugar pearls
1 package Halloween toy spider rings
1 disposable foil cake pan (optional)

(These items should be readily available in your local grocery/big box/dollar store around Halloween, but if they’re not, try the links posted above.)

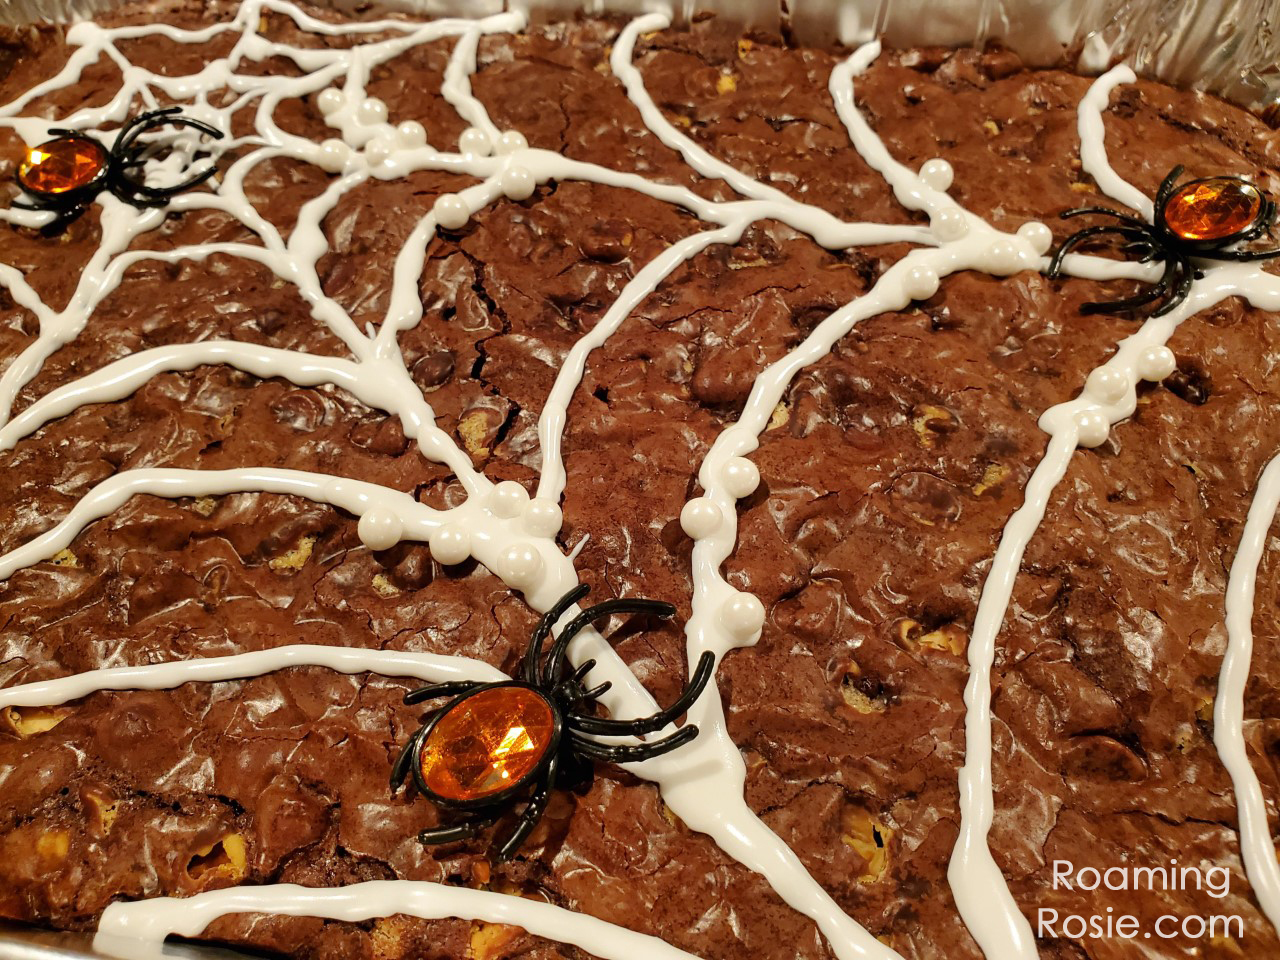
As you can see from the photos above, I wanted to fill these brownies full of delicious spider eggs! Mixing in those white chocolate chips really helps to highlight this.

Instructions:

  1. Make the brownies according to the instructions on the box.
  2. Mix the white chocolate chips into the batter.
  3. Pour batter into pan of choice and bake according to instructions on the box.
  4. Allow cooked brownies to cool completely.
  5. Draw a spider web on top of cooled brownies with cookie icing.
  6. Before icing dries, sprinkle sugar pearls over the icing so they stick.
  7. Add in a few spider rings by pressing them into the top.
  8. Freak out your friends and coworkers!

I’ve found brownies to be a pretty safe bet for satisfying the greatest amount of people at a party. I do have a tried-and-true homemade brownie recipe, but if I’m in a rush, I mix a few chocolate chips into a box mix.

And, if it’s Halloween, I spookify it.

Share some of your brownie creations with me on Facebook!

Happy Baking!

Graveyard Brownie Halloween Cupcakes

Graveyard Brownie Halloween Cupcakes

These Graveyard Brownie Cupcakes are SO MUCH FUN to make (and eat!) and very, very rich.

If you’re a chocolate lover, then you need to try these!

To make them a little less decadent, you could make regular cupcakes in place of the brownie base, and even try a milder flavor like yellow cake dyed orange.

But I was in need of some heavy-duty chocolate.  This hit the spot.

graveyard-brownie-halloween-cupcakes-2

The first thing I did was make some of my Chocolate Covered Marshmallow Pumpkins with my girls.  We made them the day before.

Then we melted some white candy melts to make the chocolate bones using this skeleton mold from Wilton.

We crushed up a handful of Oreo cookies in a plastic bag for our graveyard “dirt,” and we baked up some box brownies according to the package directions.

I’d thought about making the brownies in a big pan to construct a large graveyard scene, but then switched to the cupcake idea.

I was going to use regular cupcake lines and write RIP in icing on some Milano cookies for the gravestones, but then I found these cute graveyard cupcake liners that come with their own paper gravestones on toothpicks.  I happened upon them at Walmart, but there are similar products online and at other stores, too.

graveyard-brownie-halloween-cupcakes-3

We let the brownies cool completely, then iced them with chocolate icing.

We pressed in the graveyard picks and some pumpkins and bones into the icing, before sprinkling over a little of the Oreo dirt.  (If you sprinkle the cookie crumbs first, the chocolate pieces won’t stick into the icing.)

Then we savored the festively decedent chocolate culinary celebrations.

I recommend you share them, and not attempt to eat 18 thick piles of chocolate all by yourself.  Because:  wow.  ;)

Graveyard Brownie Halloween Cupcakes

Happy Halloween Baking!

Roaming Rosie Signature

Save

Best EVER Fudgy Peanut Butter Brownies

Best Ever Fudgy Peanut Butter Brownies

These things are amazing.

Fudge-ily, goo-ily, peanut buttery, amazingly amazing.

If you like fudge brownies, you’re SO going to love these.

The peanut butter is like icing on an awesome cake.  And you could probably change it up, too:  try almond butter or nutella instead.  I used honey roasted peanut butter.

Annnnnnnd I am so drooling again………

Best Ever Fudgy Peanut Butter Brownies

Anyway, I should point out that there ARE quite a few steps involved in making these brownies from scratch – but they are so completely and utterly worth it!

Plus, I had such a fun time in the kitchen cooking with my girls.  :)

I only make them once or twice a year, but that has more to do with how many I devour than how long it takes to make them.  Because they are sooooooo worth it.

Besides, you can always freeze some.

Best Ever Fudgy Peanut Butter Brownies

Now just try and tell me that those don’t look amazing!!

You can get the recipe on Food Network:  Peanut Swirl Brownies from Ina Garten.

Best Ever Fudgy Peanut Butter Brownies

Enjoy!

{I know you will!!}

Roaming Rosie Signature

Chocolate Christmas Tree Brownies

Chocolate Christmas Tree Brownies

December can be dangerous.

Especially when I find myself inspired to make things like chocolate Christmas trees that perch on sprinkle-coated brownies.

And it all started because I was hungry when I walked past the candy melts in the grocery store.  Never shop hungry.

Anyway, the result was these adorable chocolate Christmas trees, which I placed on top of little, square brownies that represent crunchy Christmas presents.  :)

Making Chocolate Christmas Trees

Before baking the brownies, I coated the top with nonpareils.  While the brownies were baking, I melted the green candy in a baggy in the microwave (at 50% power).

Once the chocolate was melted, I snipped off a very small point on the corner of the baggy, and squeezed out the chocolate onto waxed paper in the pattern of a Christmas tree.

To make the trees, I went back and forth, tracing out a triangle shape.  Make sure the lines are thick enough and enough of them are touching each other.  If the lines are too thin and too far apart, the trees will probably break.  Also, be sure to draw a “trunk” at the bottom of the tree, so that you can stick it into the brownies.

As soon as you draw a tree, stick a flower or star-shaped large sprinkle at the top, preferably in yellow to represent the tree star, and sprinkle nonpareils over the rest of the tree, to represent the ornaments.

I used Christmas colored nonpareils, but you could also use the normal multicolored ones.  I used the same nonpareils for the brownies and trees.  And for the tree star, I used flower sprinkles that are available year round.  Those are easy to reuse for other holidays, since all I needed were a handful of the yellow ones.

Chocolate Christmas Trees

Let the trees completely cool and harden.  A couple hours is best.  You could also draw them on a cookie sheet that you place in the fridge if you’re in a hurry.

Once the brownies and trees are both completely cooled, cut the brownies into squares.  In the center of each brownie, use your knife or a toothpick to break through the shell of sprinkles and make a little hole for the trees.

The chocolate trees are fragile, so you don’t want to have to put much pressure on them to get them into the brownie.  Gently, but securely, insert the trunk of the tree into the hole in the brownie while holding the tree as close to the bottom of the “branches” as possible, instead of pushing it from the top.

Chocolate Christmas Tree Brownies

You don’t need a whole bag of candy melts to make trees for one tray of brownies.  About half should do it.

But I made extras because these chocolate trees will keep fresh in a container for, well, at least the rest of the season.  I’m saving my extras for the cookie trays.  :)