Nature Art

Nature Art

I suppose it’s a bit of a swing to go from Halloween projects to something completely different … or is it?

Today I wanted to highlight the glory of Nature Art.  Or, in general, making art with things found in nature.

These pictures are from a couple years ago but we have done this project many times.

Basic supplies you’ll need:

  • paper
  • pencil
  • glue
  • leaves, flowers, sticks, grass, feathers, tiny stones, etc.

Nature Art 2

I like doing this project on plain white printer paper because the things we collect really pop against the bright background, but it can easily be done on any color construction paper.

We don’t have the giant colorful leaves that you find up north, but this craft is really about exploring your own space and using what you have where you are.

Though I may point out a few suggestions, I let my kids pick whatever they find inspiring.

We also use it as a learning experience to look up a plant when we’re not sure what it is.

Nature Art 3

You can draw something very specific, like a house or tree, and recreate those items with the things you’ve collected, or you can go more abstract.

This particular day, my daughter was making random patterns.

This was her favorite finished piece:

Nature Art

And, like I said, what’s so great about this is allowing kids the creative space to explore their local environment and then utilize simple supplies to create anything they can imagine, all while experimenting on how things fit together.

It’s a great way to spend an afternoon, especially since we’re finally heading into autumn, and we’re still not able to socialize like we used to.  This year has had us doing a lot of stuff at home – so we try to add in art where ever we can!

More outdoor ideas to try:

Birdseed Christmas Ornaments 1

Birdseed Ornaments 

Power Word Hopscotch

Sight Word Hopscotch

How to Make Pom Pom Acrons 1

Pom Pom Acorns

Painting with Chalk 1

Painting with Chalk

Happy Crafting and Creating :)

Roaming Rosie Signature

Spiderweb Cinnamon Rolls

spiderweb cinnamon rolls

This is one of those recipes that’s so stinkin’ cute but also super easy.

Halloween is a time of year when we eat a lot of “fun” foods.

(Yeah I said “time of year.”  It ain’t just a single day in this family – we celebrate for at least a month … but I’m always up for something spooky.)

So I like to spruce up meals and snacks when I can.  Which means some are quite elaborate and others… well, are like this!

This dish that has essentially two ingredients:  a can of cinnamon rolls and a bag of chocolate chips.

spiderweb cinnamon rolls 2

To get this platter of spookiness, bake the cinnamon rolls according to package directions and place the finished rolls in a circle on a plate.

Melt some candy melts or chocolate chips.  Candy melts are smoother but I didn’t have any on hand.  If you melt the chocolate chips in the microwave, do it at half power 30 seconds at a time.

Put the melted chocolate into a piping bag or a baggie with the corner cut off, and squeeeze out the chocolate into a big and little circle for a spider’s body, along with eight legs, onto one of the rolls.

Then draw a web over the rest.  I did this with the straight lines first and then spiraled around to make it look like a web. And don’t worry if it doesn’t look perfect – it’ll be gobbled up soon anyway!

Happy Early Halloween!

Roaming Rosie Signature

Jack Skellington Rice Krispies Treats

I love me some Nightmare Before Christmas.

So Jack Skellington recipes are kind of a given.  This Halloween treat is made with a Rice Krispies base and decorated with candy melts.  The pattern in black and white is striking and it really pops on a platter.

It’s a fun project to make, with (or even without) kids.

To start, make a batch of Original Rice Krispies Treats (links to recipe from Kellogg’s site). I often throw in a splash of vanilla extract to the melted marshmallow mixture for a nice touch of extra flavor.

Once you have your pile of sticky cereal, spread it out on a large pan or cookie sheet that’s been prepped with non-stick spray.  Flatten it with your fingers (spraying them with non-stick as well) until it’s as smooth as you can get it.

Then cut out circles with round cookie cutters like these or these, or whatever else you have lying around.

Dip the circles in a shallow bowl of melted white candy melts, and shake them a bit to make sure the candy isn’t too thick before you set it back down to set.  I recommend doing all this on top of waxed or parchment paper.

Instead of the white candy melts, you could also use an icing like this one that I made for my Chocolate Almond Mummy Cookies.

Next, melt some black (or dark chocolate) candy melts in a piping bag (or a baggie with the corner snipped) and draw on those smiling faces.

It’s great because the faces are easy to make.  A couple of large eyes, small nose dots, and a string with lines for teeth and voila!

jack skellington rice krispie treats 3

This was the display I brought into work.  I loved the way the Jack Skellington faces stood out.  Actually all of the treats pop – even in the recycled take out containers!

Yummy AND cute!

The spiderwebs on the right are tiny Peppermint Patties.  You can see the larger version of them that I did on this post.  Another super simple recipe that makes a big visual impact – my fave.

And for the pumpkins in the middle, I tried out something new for my kids.  Specifically the youngest who is obsessed with Nutella.

I took some silicone pumpkin molds (not really sure which store I picked them up at) and coated the inside of the mold with some melted orange candy melts.  Once that set, I put a tiny scoop of Nutella into the center of the mold, then drizzed more of the orange candy melts over to cover the Nutella.

The pumpkins took a little more time and effort to get right, but were definitely worth a try.  Plus, they’re filling so a few go far in a party setting.

jack skellington rice krispie treats 2

Sooo much sweetness in this post!

I love it though.

Of course, this is also why I make so many savory Halloween dishes – to balance out the sugar!

I’m not sure what Halloween is going to look like this year, when it comes to trick-or-treating or parties, but I sure know one thing:  we’ll have some eerily festive food.  ;)

Follow me on Pinterest for more recipes!

Happy Early Halloween!

Roaming Rosie Signature

Cheesy Ghosts and Pumpkins … aaand I’m Back!

Halloween Cheesy Ghosts and Pumpkins open faced sandwiches

So I took a look at when I last published a post on this blog and … *gasp* it’s been HOW long?

Well, my attempt at balancing work and kids and going back to school for my masters and planning a wedding all at the same time did not work out as planned.  And things got even more complicated this past spring when we all went into lock down and I was both working from home and home schooling my girls.

I still access this blog all the time, especially for recipes.  And heaven knows I’ve never stopped taking pictures of what my girls and I get up to.

But with the craziness that’s surrounding us all right now, I’ve decided to start writing again.  There aren’t suddenly more hours in the day, but I miss doing this.  Plus, it calms my anxiety (extra important in these stressful times!) and, hey, I love sharing food with you guys.

Halloween is practically around the corner – it IS August after all.  So I’m going to start by sharing Halloween recipes and ideas.

https://static.catsoncatnip.co/images/rwXkWuJxaqSj_700.jpg

This recipe here is for an age-old favorite of mine:  open faced cheese sandwiches.

These are so much fun.  And in the fall especially, my girls wind up getting some variation of these for lunch quite a bit.

Cheese and bread make a great base for a lunch since they go with so many different sides.  I can throw these on a plate with pretty much whatever fruit is on hand and it works.

Halloween Cheesy Ghosts and Pumpkins open faced sandwiches


For the pumpkins and ghosts pictured above, I used yellow American cheese and white Provolone.  You could also substitute another white cheese like Swiss, Mozzarella, white Cheddar or Monterey Jack, depending on your family’s favorites.

I placed the cheese slices on the bread and microwaved it for about 8 or 10 seconds, just until the cheese started to melt.  This makes sure it doesn’t fall apart in their lunchboxes.  You could also try warming it in a toaster oven instead – just keep an eye on them so they don’t burn.

I personally like mine with crispy half-burnt cheese, but well, these aren’t for me…

Once the cheese is melted to the bread, simply use cookie cutters to cut out the shapes.  I can’t remember the brand of cutters I have, but they are similar to these and these.

I was able to get two pumpkins out of one slice with the size cookie cutters I have.  And, really, I often just save the scraps to eat as part of my own lunches.  Or, you know, midnight snack.  If they make it till midnight.

You could also use them as cheesy croutons in tomato soup.  If yours last longer than mine…

Here is a similar way I like to change it up:  Jack O Lantern Cheesy Bread

Follow my Halloween Pinterest Board for more ideas!

Happy Early Halloween :)

Roaming Rosie Signature

Christmas Cinnamon Roll Reindeer Breakfast {Or, The Illusion of Being Busy}

Reindeer Christmas Cinnamon Rolls

Well, it’s that time of year again . . . when it’s actually NEXT year (January) and I still have yet to post any of my Christmas projects or recipes. Never mind Halloween or Thanksgiving . . .

And when I took a close, sobering look at my blog, I see that I haven’t updated it in over six months.

Six MONTHS, people.  And not just that, but I haven’t been updating my Facebook page either, let alone Twitter or Pinterest.

I seem to be a tad behind.

So here I am:  feeling the need to make arguments for how busy I am.  And of course I’m busy – but aren’t we all?  I could make a very long list mentioning my full-time job and my two young kids, and how I moved recently and adopted a new kitten and how my schedule and stress levels were completely thrown off when Hurricane Irma rolled through . . .

But those are all just excuses.  We find time for the things that are important to us.  And this blog is important to me.  Sharing crafts and books and recipes that connect me to my children is important to me.

So here I am.  I also realized that this past holiday season I remade a lot of old recipes (already posted here) with my kids and don’t have a lot of new things to post, but there ARE still things to share.  And I’m going to make the time for it.

Starting with these Cinnamon Roll Reindeer, because, I mean, aren’t these just the most adorable cinnamon rolls EVER?

Reindeer Christmas Cinnamon Rolls 2

This past holiday season I spent a lot of time striving for recipes and crafts that embraced simplicity.

These yummy treats are a representation of that.  In the picture below you can see the 3 things I used to make them:  Grands cinnamon rolls, miniature candy canes, and M&Ms.

I made sure to unwrap the candy canes ahead of time, so I wouldn’t have to deal with the plastic wrappers before my coffee kicked in, but other than that task, these were thrown together in no time.

I used the Grands because they have little pockets, so to speak, to slip the candy canes into.  They’re made in a roll shape instead of the little cake-like cinnamon rolls that are one solid piece.  This way the candy canes just slid right in and were supported with no problem.

After baking the rolls according to the package directions, apply the icing.  Before the icing hardens, add two M&Ms for the eyes and a red M&M for a Rudolph-like nose.  Put two candy canes on each side of the “head” to represent the antlers.

You’ll need 4 candy canes per roll.  So if you have a package of 5 rolls like I did, then you’ll need 20 miniature candy canes.

Reindeer Christmas Cinnamon Rolls 3

I served these with some sausage and fruit.  They were a lot of fun and certainly enjoyed by the kids.  I plan to make these a regular tradition.

Happy Baking ;)

Roaming Rosie Signature


Custom Pancake Bar & Reading List

Custom Pancake Bar 1

Sometimes I forget that my kids don’t always know where things come from (“Is the corn in cans different from corn-on-the-cob?”) or where things go (“What happens to the water after we flush it?”).

So I like to show them the extra steps for things when I can.  Of course, I don’t have wheat growing in my backyard so we won’t be grinding that into flour to make pancakes completely from scratch any time soon.  But what I CAN do is grab some colorful books to demonstrate the process.

I wanted to make a “Custom Pancake Bar” with my girls to show them how versatile pancakes could be.  But even without the grinding of flour, I still wanted to do more than just stir up a box mix.  Pancakes are easy anyway.

We’ve drawn with pancake batter and celebration pancakes are always fun, but I realized that I had yet to post an actual pancake recipe on this blog.  I’m calling this recipe the “Overnight or Now Pancakes” because I like to make the batter the night before, but it could also be used right away.

I am not, by any means, a morning person.  So I like to get things ready the night before:  breakfast, school lunches, my coffee maker … whatever CAN be done WILL be done.

Like this batter.  All made up and left to sit in the fridge until needed.  I also set up the griddle and toppings and even our plates the night before.

Because having kids means I’m often required to do things before I’m caffeinated.

Which can be … interesting.

Custom Pancake Bar 6

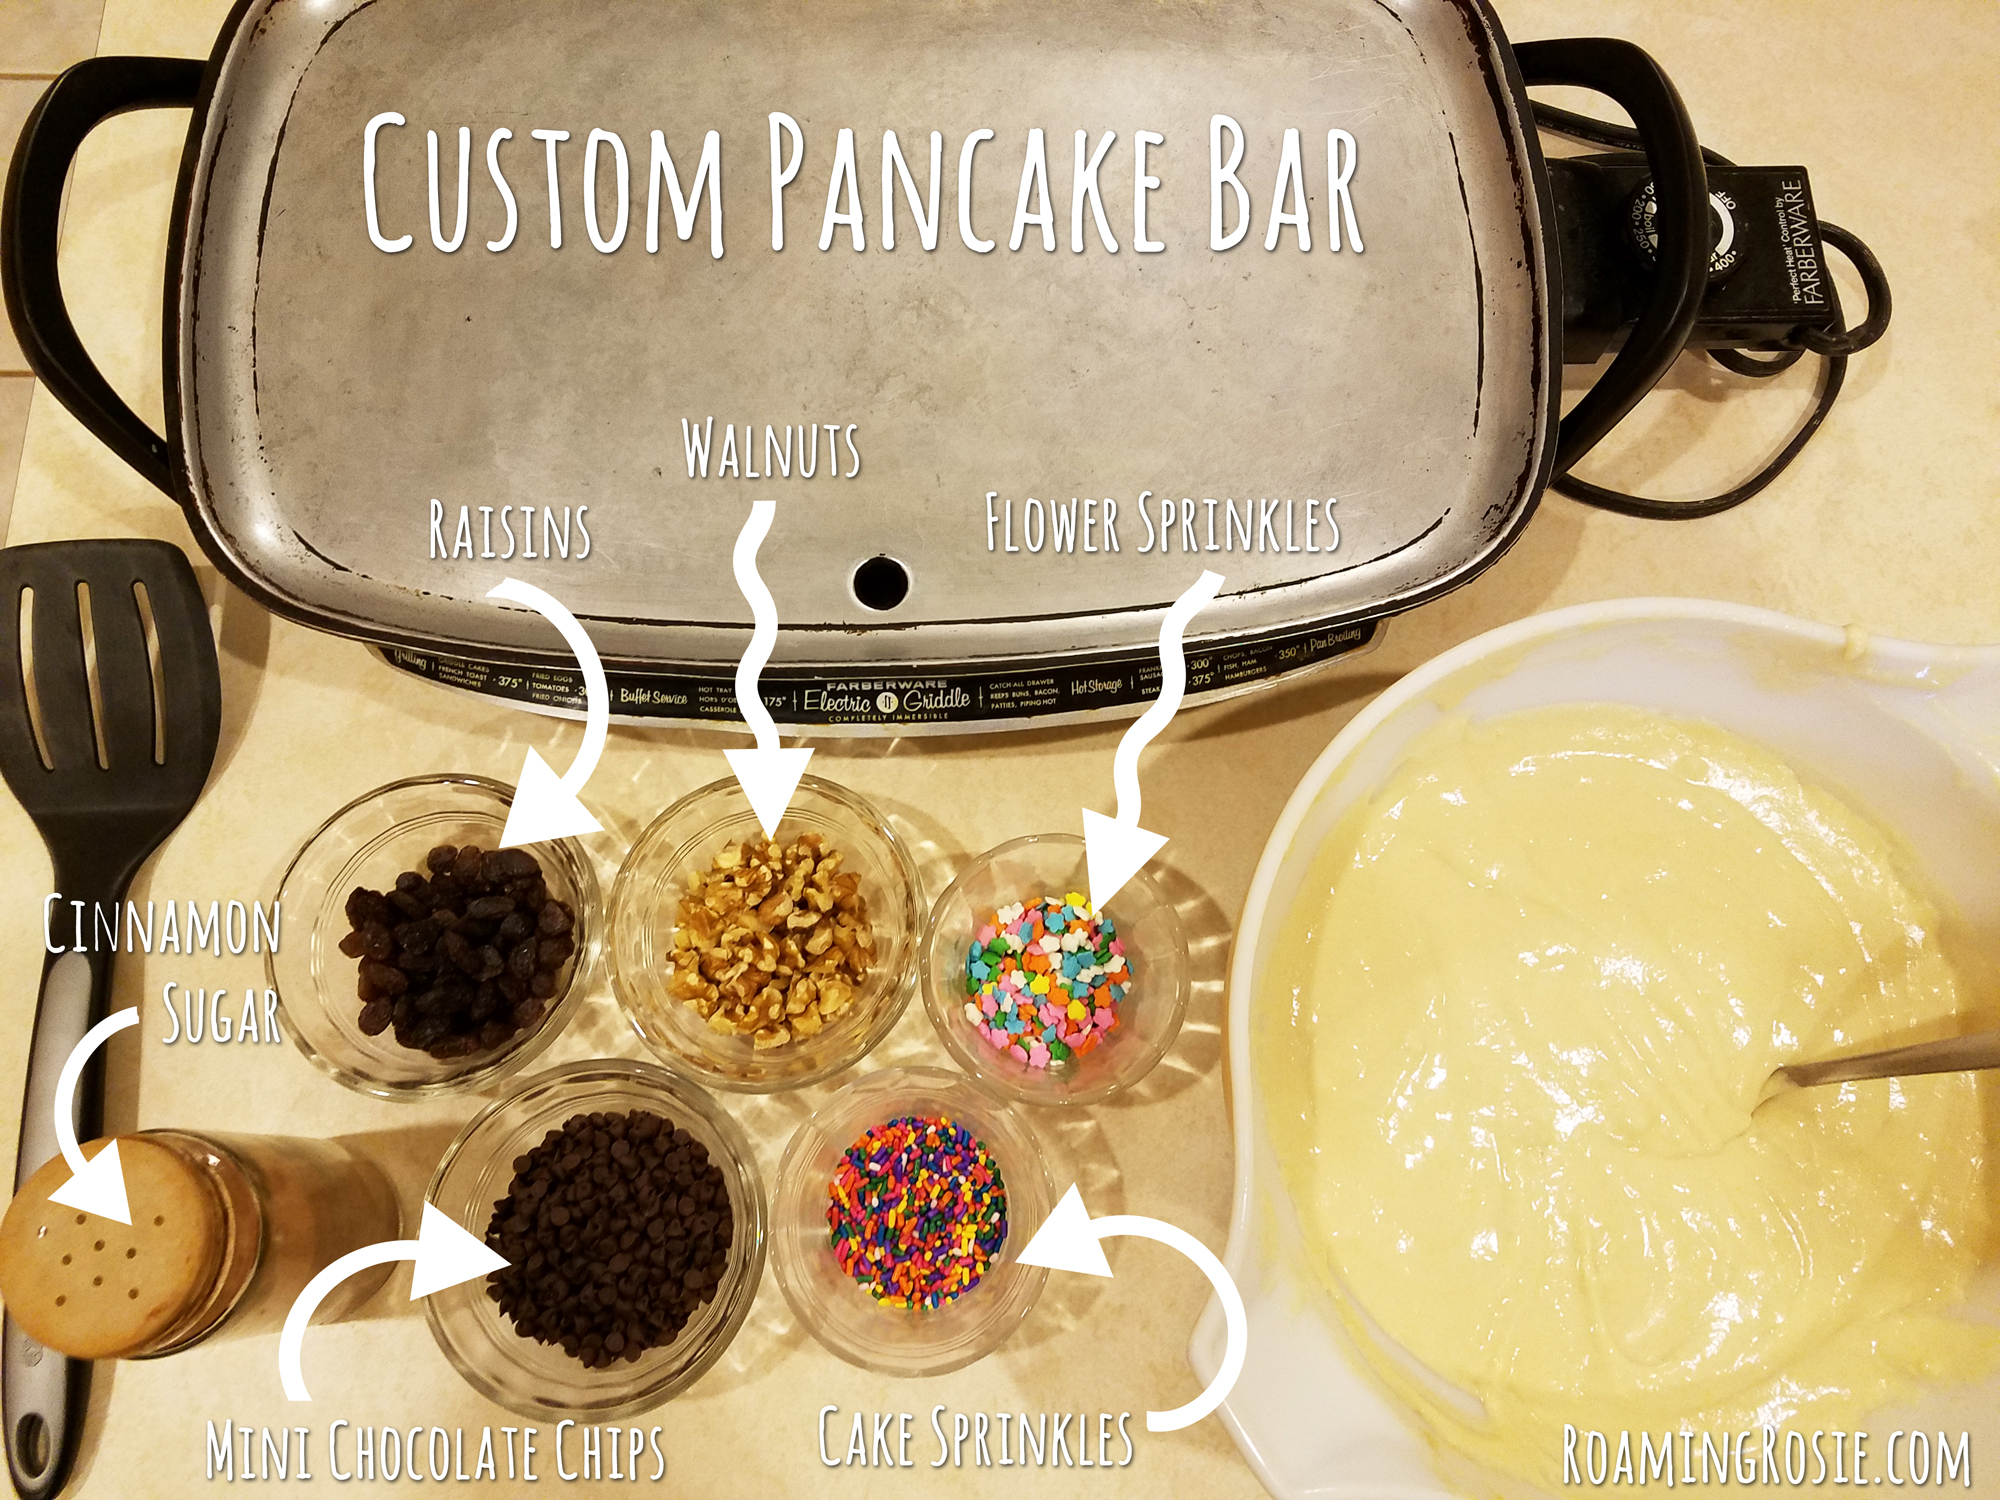
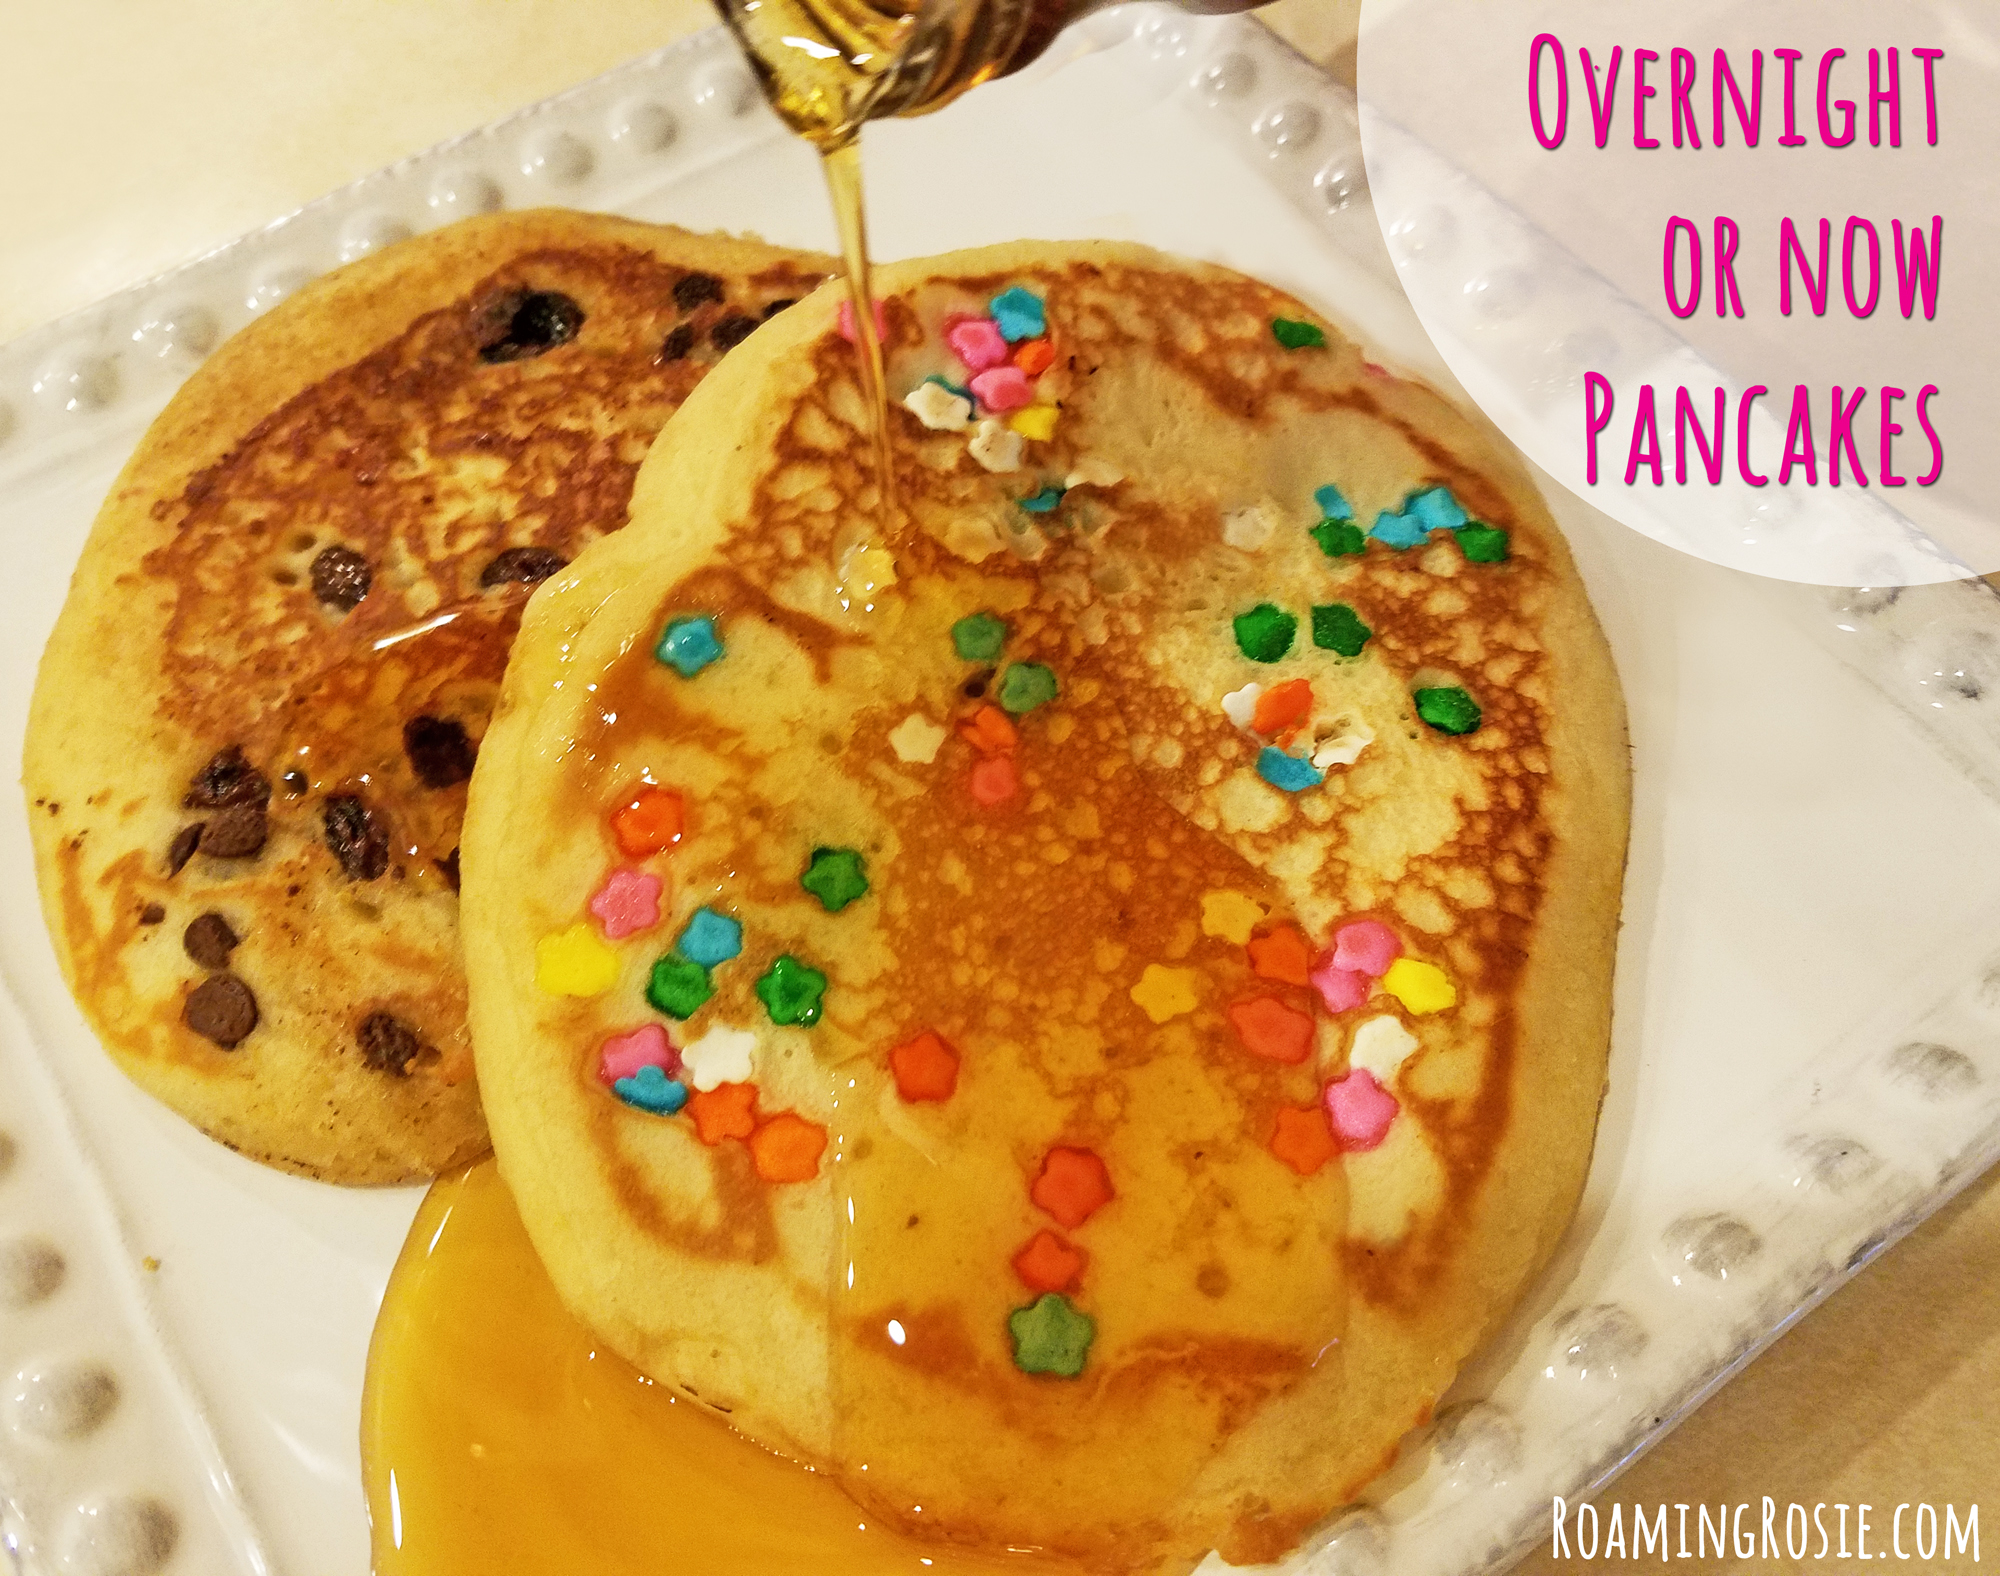
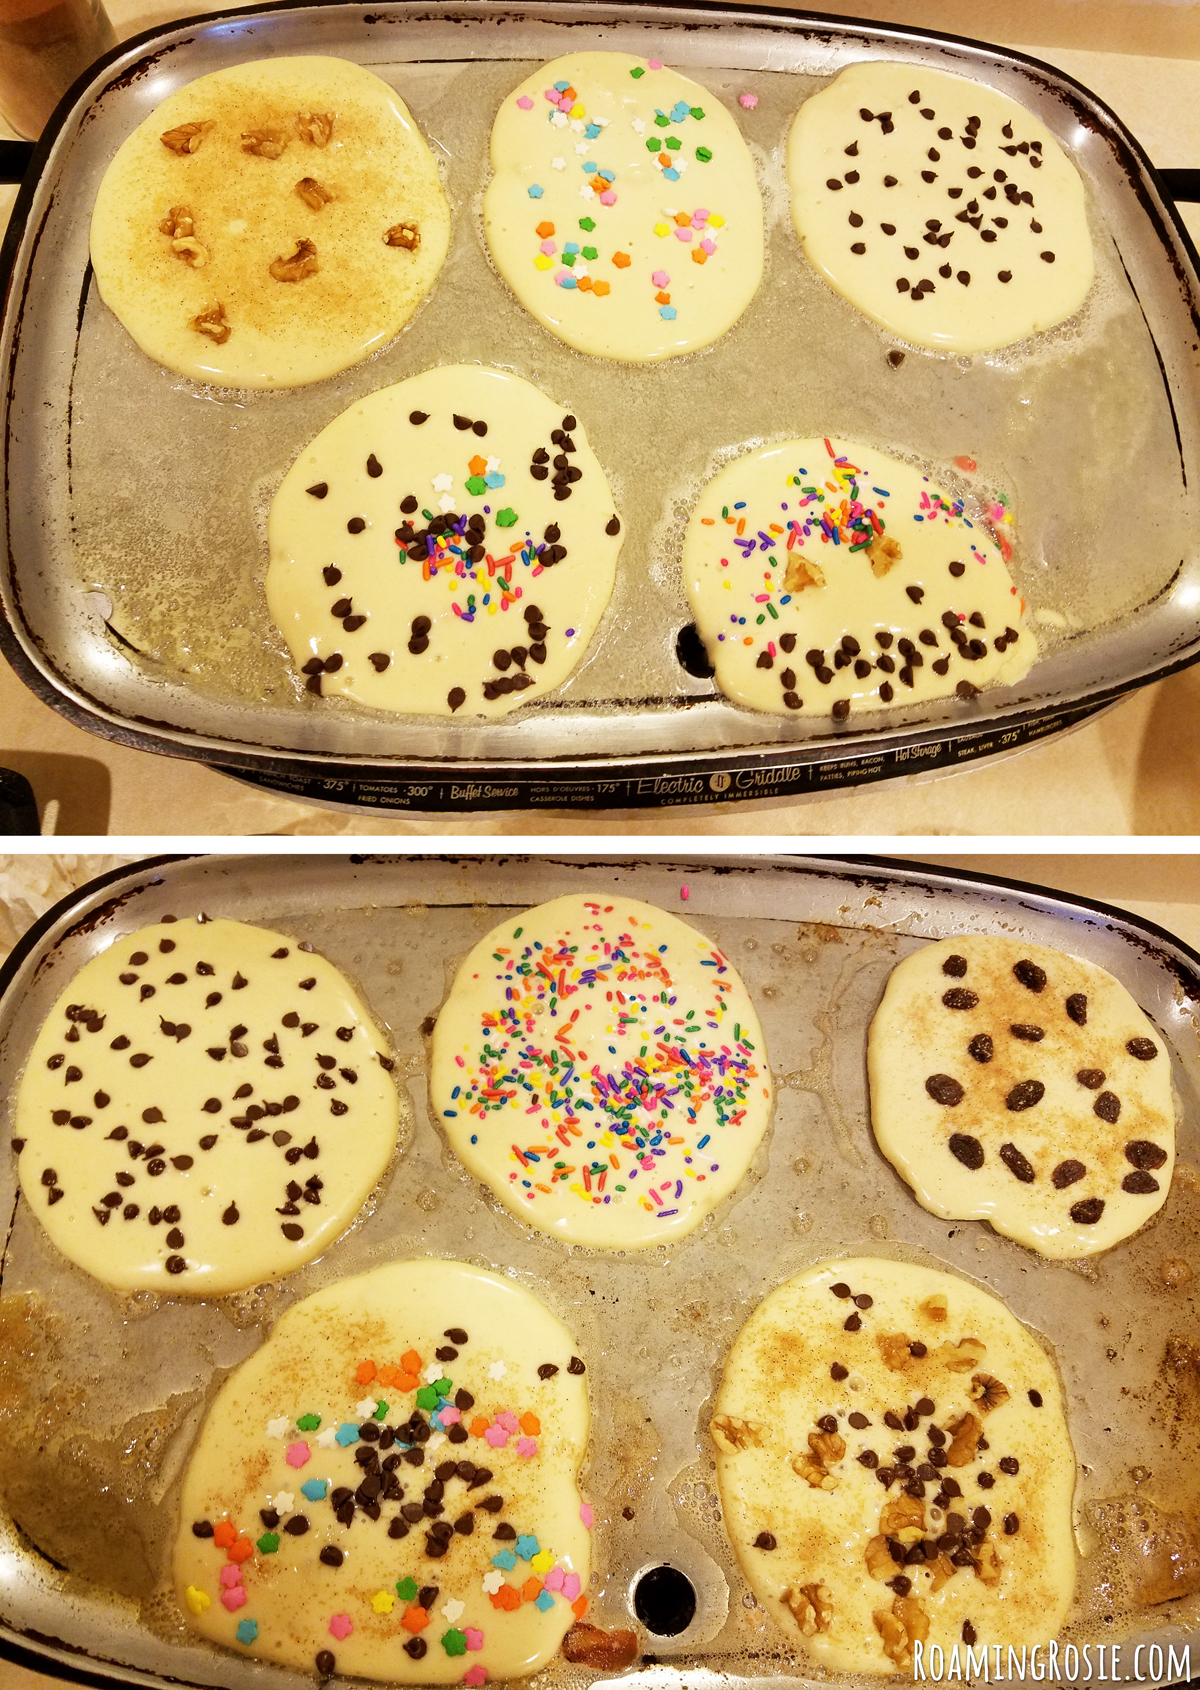
We had a lot of fun with this, though, because we personalized all of the pancakes.  Some had just mini chocolate chips or raisins, others sprinkles, and some a combination of everything.  A few had walnuts and cinnamon sugar, which is quite possibly my new favorite.

My daughter even made a face for one with walnut eyes, a chocolate chip mouth, and sprinkle hair.

There are other toppings you could incorporate, like blueberries or pieces of apples or bananas.  Coconut is also good (kinda like I used on my Tropical French Toast).  Just remember to use extra butter when flipping to make sure it doesn’t stick.

Before I share the recipe, I want to talk a little about the books we read.  I picked them all up at the library, but I’ve included (affiliate) links to Amazon in case you’d rather have your own copies.

Pancake Picture Books

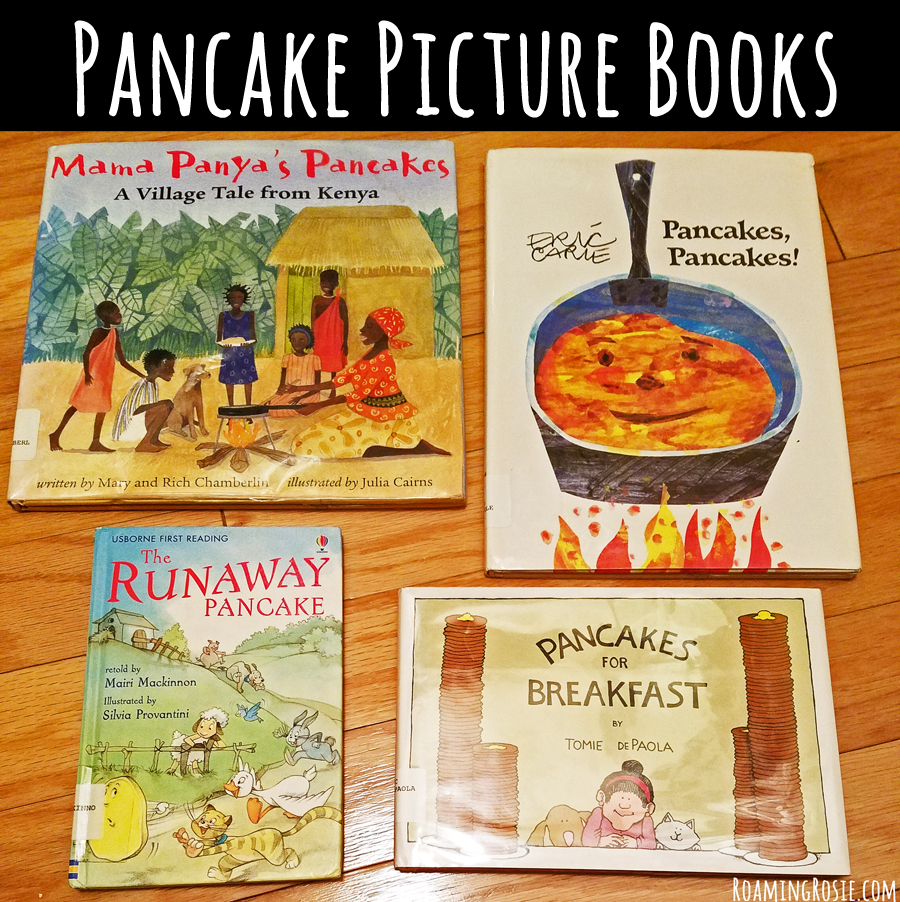
Pancakes, Pancakes by Eric Carle

This one is great because it shows the ENTIRE process for making pancakes from scratch – including harvesting wheat and churning butter.  The colorful illustrations demonstrate that there is an awful lot that goes into making our meals, but the story is told in a way that is playful.

There is also a board book version of Pancakes, Pancakes that is abridged.

Pancakes for Breakfast by Tomie dePaola 

This wordless picture book is a delightful story about a woman who wakes up and decides to make pancakes.  But she’s out of eggs and milk and needs to get some more from her chickens and cow.  She even gets maple syrup from a nearby farmer.  But when she gets back with the syrup, her pets have turned her kitchen upside down and she can no longer make her pancakes … but luckily her neighbors had the same idea!

The pictures are pretty straightforward but drawn in a charming way.  And because the wordless pictures are easy for kids to “read,” it works well for either story time or reading-to-self for even the youngest of readers.

Mama Panya’s Pancakes

This story is a little different.  It also includes some steps in making pancakes, like buying flour and spices, but it focuses more on the people doing the cooking.  It tells us about a boy named Adika who is headed to the market with his mother, who also happens to invite everyone he sees back to their place to eat their pancakes with them.  It’s a wonderful tale of joy and generosity with a positive message about sharing.

There is a recipe, but my kids were more interested in the background information.  They were eager to hear all about village life in Kenya, and as soon as I started to read off the glossary of Kiswahili words, my 7-year-old jumped up to grab a paper and pencil so she could take notes.  I loved the way this book helped me to show my kids that things as basic as shopping with mom or sharing exciting news with friends (or making pancakes) are universal concepts practiced all over the world.

The Runaway Pancake 

This is a fun story which is based off of a fable from Norway and Germany about a pancake who really doesn’t want to be eaten.  He rolls through the forest trying to escape everyone who is trying to eat him, but makes the wrong decision to trust a seemingly kind but very hungry pig.  It briefly mentions how pancakes are made, but the real draw here is the silly story and cute illustrations.  It’s also one a beginning reader can read on their own.

And now … back to the recipe!

I’ve made these to have a noticeable taste of vanilla, and strongly suggest that you invest in some Madagascar pure vanilla extract because it has simply done AMAZING things with everything I use it in, from cookies to cheesecake to, well … pancakes!

But the vanilla in the recipe could easily be halved if (for some strange reason) you’re not a big vanilla fan.  And you could stir in your add-ons ahead of time (like chocolate chips or walnuts or sprinkles) instead of doing it the pancake-by-pancake way.

The individual way was an awful lot of fun for my kids, but just make sure to keep safety in mind!  Remember that flipping pancakes can cause splatter — and nobody wants to be pelted with splashes of hot butter!

When it comes to making the batter, we did it the night before and stuck it in the fridge.  It’s easy for kids to put together, which makes it nice for them because they are so involved in the whole process.

One of the things I wanted to mention, was that we decided to add some extra milk to the batter the next morning.

I don’t know why I did that.  I blame it on the caffeine deficiency.

Anyway, my point is that the pancakes still tasted great, but were much thinner than I had intended them to be.  It’s not necessary to add the extra milk like I did.  If you follow the recipe and don’t add any extra milk, your pancakes will be thicker than the ones photographed here.  Just stir the batter when you pull it out of the fridge in the morning and start frying!

Custom Pancake Bar 7

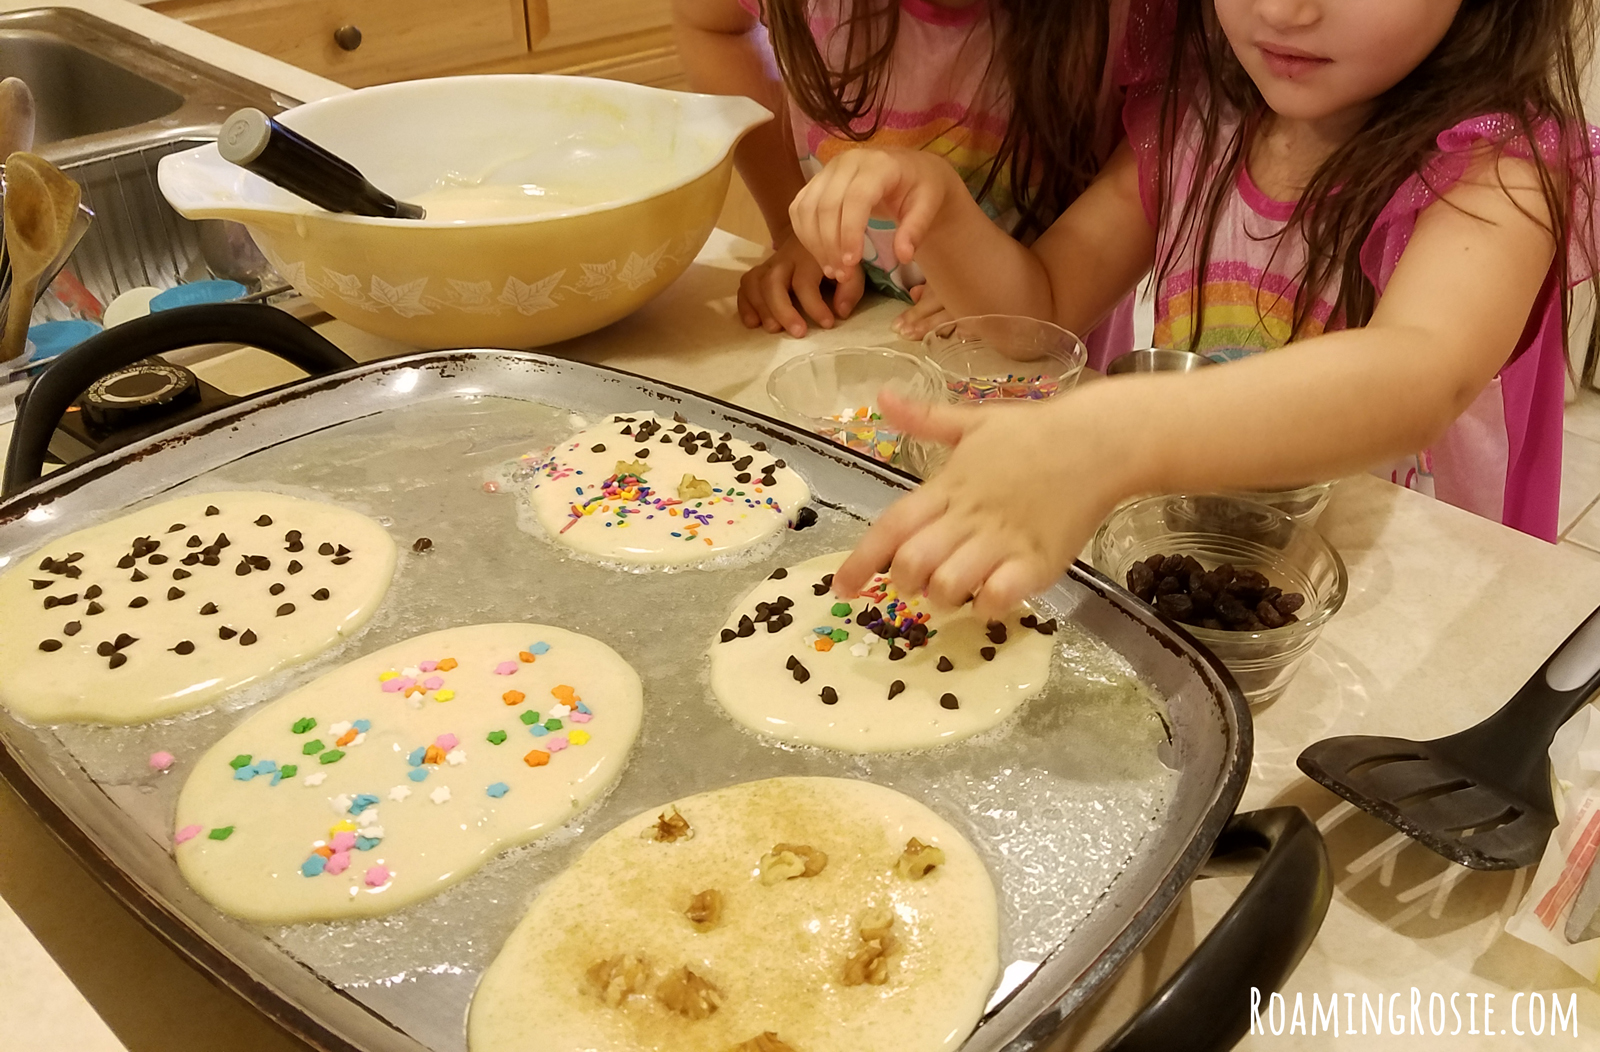
I used an ice cream scoop to measure out the batter.  My oldest daughter measured out one or two, but I mostly did that part.

And (again) make sure there are plenty of reminders of how hot the griddle gets and how much we realllly don’t want to touch it.

Cooking is fun, but safety is important too.

Custom Pancake Bar 8

Some of the add-ons made things a little sticky, so make sure to add more butter, or non-stick spray, when flipping the pancakes.

You can see where we made some with only one topping, like mini chocolate chips, and others which were combinations of toppings, like the one with chocolate chips, walnuts, and cinnamon sugar.

Custom Pancake Bar 9

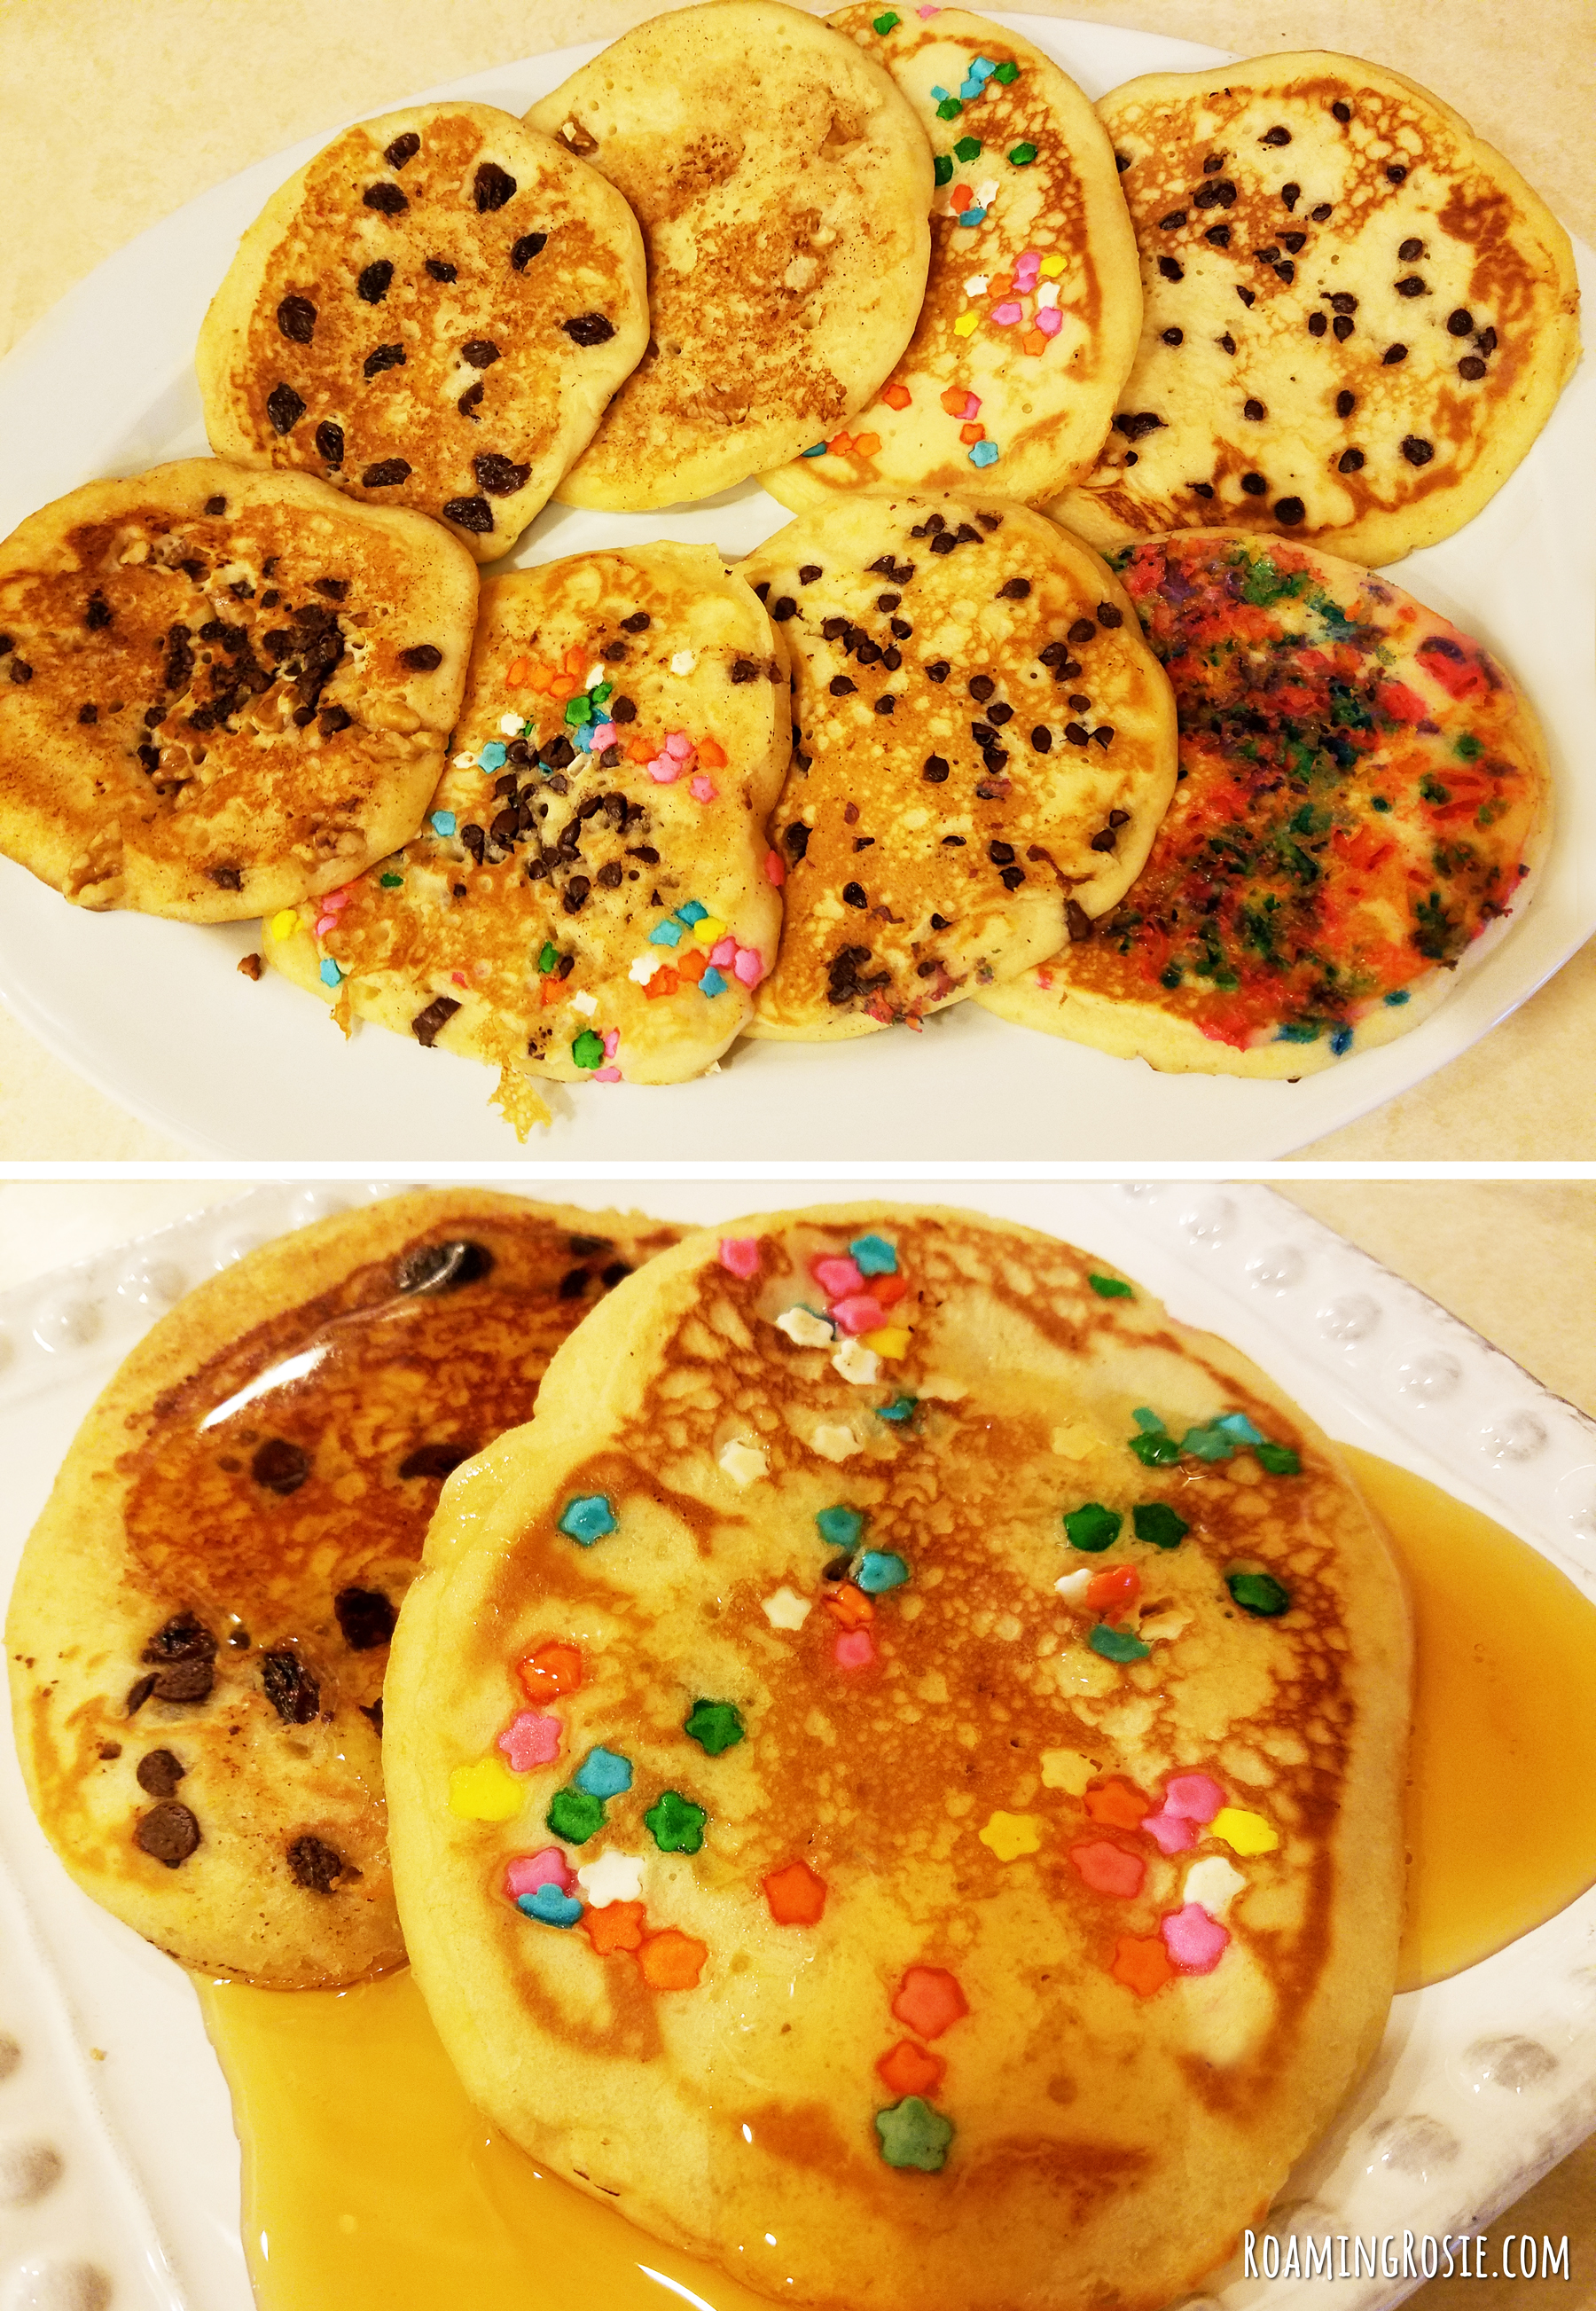
Don’t those look delicious??

You can see where the cake sprinkles seeped color into the rest of the pancake, but the flower sprinkles held their shape and color nicely.  Both tasted nice, and the thicker sprinkles gave a little sugary crunch to the pancake.

I put them on the platter with the topping side up and spread them out so you could see which was which.

Leftovers refrigerate and freeze nicely.

Let’s get cooking…

Overnight or Now Vanilla Pancakes

Ingredients:

1 1/2 cups milk
1/4 cup white vinegar
2 cups all-purpose flour
1/4 cup sugar
2 teaspoons baking powder
1 teaspoon baking soda
1/2 teaspoon salt
2 eggs
4 tablespoons (half stick) butter, melted
1 tablespoon vanilla extract
Optional:  Toppings like mini chocolate chips, nuts, sprinkles, chopped fruit, etc.

Combine the milk and vinegar and allow to sit for 5 to 10 minutes to “sour” into buttermilk.

In a large bowl, combine flour, sugar, baking powder, baking soda, and salt.  Whisk eggs, melted butter, and vanilla into the milk.  Then whisk the milk mixture into the flour until the large lumps are gone.  Make sure all the ingredients are fully incorporated, but don’t over mix.

Cover the bowl with plastic wrap and refrigerate overnight, or use right away.

Before cooking, stir in any extras you’d like.  For example, you can mix in about 1/2 cup of miniature chocolate chips, blueberries, strawberry pieces, or something similar.  Or you can do the Custom Pancake Bar (see below).  For the Custom Pancake Bar, do not mix anything extra into the batter.

To make pancakes, preheat a large skillet or griddle to medium heat.  Coat surface with butter or nonstick cooking spray, and spoon about 1/4 cup of batter onto cooking surface for each pancake.  Cook until bubbles appear on the surface, then flip and cook 2 minutes or until browned on the other side.

Serve with syrup.  Leftovers can be refrigerated or frozen.  Makes 15 to 20 pancakes.

For Custom Pancake Bar:  Do not mix extras into batter.  Leave batter plain.  After scooping batter onto griddle, sprinkle your toppings over the pancake.  When it bubbles, flip the pancake and cook for about 2 minutes or until lightly browned on the other side.

*****

Click here for the free printable PDF copy of the recipe:

Overnight Or Now Pancake Recipe

Follow me on Facebook or Pinterest for more recipes!

Happy Cooking!

Roaming Rosie Signature

Painting with Crayons & Water Colors

Painting with Crayons and Water Colors 1

This was one of those super-simple craft projects that’s nearly free.  You may already have all of the supplies on hand, but this changes things up from a normal painting or coloring project because it mixes the mediums.

It’s also a lot of fun.

What we did was create a drawing with crayons, and then color it in with watercolor paints.  We did some regular pictures (butterflies and flowers) and some that were patterns of lines and shapes.

And don’t mind the ancient crayon box full of mixed crayon types…. this is a “rediscovered” conglomerate of art supplies from my own youth. We use what we can here… it’s part of what makes this craft free, or nearly-free (the water colors are new).   We keep a craft drawer of leftover supplies from other projects, too, and sometimes we have a free-for-all craft with whatever we can find.

The kids love it.

Painting with Crayons and Water Colors 2

We discovered that the crayon looks much better if you draw thicker lines to help it stand out against the paint.  It also creates a neat, smooth texture.

And we experimented with the paint as well.

My older daughter tried painting with her fingers, instead of the brush, and she also would tilt the paper in different directions to see what happened when the excess paint dripped across her picture.

Painting with Crayons and Water Colors 3

My youngest daughter tried different things, like using multiple paintbrushes at one time.  This project gave them both the freedom to be creative in their own ways.

This project was cheap (free if you already have the crayons, paint, and paper) and easy to set up.  It gave them a creative outlet, and it kept them busy for a long time.  It had a lot of benefits on top of the fun-factor.

Plus, I had some beautiful fridge-worthy artwork at the end of it.

Here are a few of the finished products, including one of mine:

Painting with Crayons and Water Colors 4

Happy Crafting!

Roaming Rosie Signature

Book Review: A Unicorn Named Sparkle

A Unicorn Named Sparkle

I recently read A Unicorn Named Sparkle by Amy Young and it seriously gave me a case of the giggles.

I mean, it’s a story about a little girl who orders a unicorn for 25 cents from an ad in the back of a magazine (whoever tells you that’s not a dream come true is lying), but what shows up is a goat with an ice cream cone stuck to his forehead.

How can you not love this premise?

It’s a delightful picture book that my children found to be fun and silly.  The illustrations are bright and colorful and … sparkly.

Lucy’s wild hair and polka dot shirt are painted with soft watercolors and dance across pages of wide white spreads, and the baby unicorn/goat practically dances right into your heart with his own little heart-shaped cutie mark.

Now, when Lucy imagines what kind of unicorn will be delivered to her, she pictures something perfect and pretty with a flowing mane and impeccable manners.  When the goat arrives, with his scruffy mane and tendency-to-eat-things manners, she decides to return him.

The truck arrives to take him back, but, luckily, Lucy realizes her mistake before it’s too late.

Because although he was not quite what she expected, “she had to admit:  sometimes he made her smile and sometimes he made her laugh.”  And while friends might not always be perfect, they are certainly precious.

So if you or your kids love unicorns (or goats), check out A Unicorn Named Sparkle for a fun and charming story!

Happy Reading!

Roaming Rosie Signature

Strawberry Butter

Strawberry Butter 1

I made some Strawberry Butter with my kids for a fun sweet treat, so I wanted to share it with you.

It was super simple to make (just 3 ingredients), and it made for a fun snack or breakfast dish.

It’s the type of dish you could make when you wake up in the morning for a fresh homemade breakfast with very little effort.

Strawberry Butter 2

The first time we made it, my oldest daughter said it was actually too sweet, so we adjusted it for less sugar the next time, which is what you’ll find in the printable recipe below.

It was also a nice way to use up some extra strawberries, since my girls prefer to eat strawberries only when they’re fresh and crisp.  Once they start to get soft, I have to incorporate them into a recipe.  They won’t eat “mushy” berries.

But mushy or crisp strawberries both work for this.

You could use the butter to top any kind of bagel or English muffin or pancakes, but we like it in the King’s Hawaiian Sweet Rolls, which is what you see in my photos.

Make sure your butter is completely room temperature when you start, to make it a quick and simple process.  If you’re going to make it in the morning, leave the butter out overnight.

You can refrigerate this Strawberry Butter if you don’t use it all right away, but allow it to come to room temperature before serving.  Or at least don’t use it right out of the fridge, because it will be too stiff.

Strawberry Butter

Ingredients:

1 cup (2 sticks) butter, softened
1/4 cup powdered sugar
1/2 cup diced strawberries, fresh or frozen

In a small bowl, beat the butter and sugar with a mixer until light and fluffy.  Stir in the strawberries and mix well by hand.

Serve immediately or store in the refrigerator.  Bring to room temperature before serving for best results.  Best if used within three days.

Note:  You can use salted or unsalted butter for this.  The salted butter will balance out the sweetness.  And you can use fresh or frozen strawberries, but keep in mind the frozen strawberries may add more juice to the butter, and be sure to thaw them fully first.

**********

And click below for the printable PDF version:

Strawberry Butter

Happy Eating!

Roaming Rosie Signature

Nutella Chocolate Birds Nests

Nutella Chocolate Birds Nests Recipe

We’ve made Chocolate Birds Nests in the past, but this year we changed it up…. by adding Nutella!

These Nutella Chocolate Birds Nests were a lot of fun to make with my girls.  It gets them in the kitchen with a combination of cooking and crafting.

And we also picked up a little Edible Grass this time around.  It’s easy to snip into bite-sized pieces with kitchen shears and adds a nice visual touch, but it isn’t necessary if you’re having a tough time finding it.  (And I picked mine up for half off after Easter – since these can be a fun treat all season long.)

Nutella Chocolate Birds Nests 2

All our ingredients gathered and ready to go….

Since there is no actually baking involved, it’s mostly mixing and shaping and decorating, once the chocolate chips are melted.

Nutella Chocolate Birds Nests 3

Melt the chocolate at half power, stirring every 30 seconds until smooth.

Then stir in the Nutella.

(And, yes, my kids are wearing superhero costumes while we cook.  That’s how we roll at our place.)

Nutella Chocolate Birds Nests 4

I slowly poured in the noodles while they stirred.

Make sure all the noodles get covered in the chocolate mixture, because that is the glue that holds everything together.

Nutella Chocolate Birds Nests 5

Spray some nonstick baking spray in the muffin tins and scoop in some of the chocolate noodles.

You want to be able to shape them into nests with your fingers, so with a small indention in the center, or at least flat as opposed to hill-shaped.  If it’s too bumpy and you’re having trouble flattening it, just take some out.

Nutella Chocolate Birds Nests 6

Put three eggs in the center of the nest and sprinkle a little edible grass over top, if you like.

You can see that my kids also added a few of the confetti-like bunnies that came with the edible grass.

This recipe makes 24 nests, but if that’s just too much for you, you could half the recipe.  Or share with all the neighbors.

When you first make them, the nests will be gooey and will fall apart if you try to pick them up.  They are still okay to eat, especially for anxious kids who want to try their creations, but they’re much easier to eat if you let the chocolate set first.

Put the pans in the fridge for an hour or so to help the chocolate set (because if you live in a humid place like me, that would take forever at room temperature), and then scoop them out with a spoon.  Preferably a plastic spoon so you don’t scratch the metal.

Store them in covered containers, using waxed paper to separate stacked layers.

Nutella Chocolate Birds Nests 7

Chocolate Nutella Birds Nests

Ingredients:

1 cup milk chocolate chips
1 cup Nutella
12 oz. chow mein noodles
72 candy-coated malted milk chocolate eggs (I used Whoppers Robin Eggs)
Edible Grass, cut into 1-inch pieces (optional)

Melt the chocolate chips in a large microwave-safe bowl at half power, stirring every 30 seconds until smooth.  Stir in the Nutella.

Pour the noodles into the chocolate mixture and stir gently until they are all fully coated.

Spray 24 muffin tins with nonstick baking spray and scoop a spoonful of the noodle mix into each tin.  Move the noodles with a spoon or your fingers so that they are shaped like a nest.

Place 3 chocolate eggs in the center of your nest while the chocolate is still slightly melted.  Sprinkle a little edible grass over the top, if desired.

Put the nests in the refrigerator for at least an hour to allow the chocolate to set.  Remove from the muffin tins with the help of a spoon.

Store in a closed container in the fridge, using waxed or parchment paper to separate stacked layers.

**********

And here’s the free printable PDF of the recipe:

Nutella Chocolate Birds Nests

Happy Eating!

Roaming Rosie Signature

Save