Candy Corn Cookies

White Chocolate Chip Cookies with Candy Corn at RoamingRosie.com

Fall is here!  It’s time for all things Fall.  Like pumpkins and candy corn.

My daughter loves candy corn.

Loves it.

Starts asking for it months before Halloween.

So, adding candy corn to things is kind of a natural progression of celebrating Fall in our house.

I loved the idea of candy corn in cookies.  I mean, the candy is essentially made of sugar and honey – so how could it go wrong?

Turns out it can.

But don’t worry.  I got it all figured out now.

White Chocolate Chip Cookies with Candy Corn

First of all, we start with a pretty basic chocolate chip cookie recipe.

You can use a mixer to blend it all together {until adding the chips}, but I just use a spoon.

Less to wash.

And what you can see in the photo below is that I mixed in the candy corn when I stirred in the chocolate chips.

Which is where I made my first mistake.

I also was making these after baking something else and forgot to turn the oven down, but hopefully you won’t do that.  :)

White Chocolate Chip Cookies with Candy Corn

So, with the oven accidentally set too high, the candy corn melted.

I had a giant, gooey mess on my hands.  But I scraped it off the pan and into a bowl and ate it like that.  It was kinda like a cookie stew.  Pretty ugly, but darned tasty.

Anyway, I adjusted the oven temp for the next batch and changed the method of adding the candy corn, because even with a lower oven temp, any candy corn that was on the bottom of the cookie stuck to the pan.

Now, you could just let it cool completely on the pan if the candy makes it stick and then try to delicately slide a thin spatula under it, but that’s a lot of work.

To solve this problem, you can simply add the candy corn to the top of the cookies after scooping the dough onto the pans.  Just press a few into the top.

But I do suggest keeping an eye on these.  Just in case.

I mean – keep an eye on them while they’re baking.  ‘Cause once they’re done, and once your family tastes them, they’ll disappear.

White Chocolate Chip Cookies with Candy Corn

White Chocolate Chip Cookies with Candy Corn

Ingredients:

1 1/2 cups all-purpose flour
I/2 tsp. baking soda
1/2 tsp. salt
1/2 cup (1 stick) butter, softened
1/2 cup granulated sugar
1/2 cup packed brown sugar
I tsp. vanilla extract
1 egg
1 cup white chocolate chips
1/2 to 1 cup candy corn

Preheat oven to 340°F.

In a small bowl, combine the flour, baking soda, and salt.

In a different bowl, cream together the butter, sugar, and brown sugar. Blend in the egg and vanilla. Mix in the chocolate chips.

Scoop the dough in teaspoonfuls onto cookie sheets. Press a few pieces of candy corn into the top of each cookie.

Bake for 8 to 10 minutes, or until edges are set. Cool on wire racks. Store covered.

**********

And to print the free PDF version of the recipe, click here:  White Chocolate Chip Cookies with Candy Corn

Enjoy!

Roaming Rosie Signature

Letter D: Alphabet Activities for Kids

Letter D:  Alphabet Activities for Kids at RoamingRosie.com

Welcome to Letter D Day!

If you haven’t read the Introduction to the Alphabet Activities, you should start there.

Don’t forget to check out the Letter D:  Free Alphabet Worksheets for Kids, too!

Letter Sorting:  D is for Dolphins {Alphabet Activities at RoamingRosie.com}

For our letter sorting activity, I cut out two dolphin shapes.

After gluing down the dolphins, my daughter sorted the lowercase and capital Ds and glued one onto one dolphin and the others onto the second dolphin.

D is for Dragons {Alphabet Activities at RoamingRosie.com}

To make some letter Ds into Dragons, I had precut the big and little D, the dragon’s heads, a wing and tale for each, plus a breath of fire for each.

D is for Daisies {Alphabet Activities at RoamingRosie.com}

When we did this project, my daughter was still struggling with cutting straight lines, so I precut these shapes as well.

Now that she’s a little older, I’d let her at least cut out the stems, and try to do the leaves and petals as well.

D is for Dogs Eating Doughnuts File Folder Game {Alphabet Activities at RoamingRosie.com}

This is another file folder game I designed and, yes, we still play this one, too.

On one sheet are the dogs and their dog dishes.  On another sheet are the piles of doughnuts.  You cut out the doughnuts so your kids can match them to the dogs and dishes, largest to smallest.

My daughter loves to tease me by pretending to put the wrong doughnut pile on the wrong dish and watching for my reaction.  :)

You can find this free printable on my Letter D: Free Alphabet Worksheets for Kids post.

D is for Dots  {Alphabet Activities at RoamingRosie.com}

Dot markers {or Dot a Dot Markers} are something we use now and again.

For this worksheet, I made letter Ds from bubble shapes that can be filled with dots from the markers.

You can find this free printable on my Letter D: Free Alphabet Worksheets for Kids post.

D is for Driving  {Alphabet Activities at RoamingRosie.com}

This was loads of fun.  My younger daughter, who was still crawling at the time, even got into it.

I made a capital and lowercase D on the floor with painters tape, adding small dashes inside the letter to replicate a road.

We drove the Hot Wheels through the letters like we were writing them.

You can also use the painters tape on tile or linoleum floors.  Sometimes it sticks to wooden decks or concrete, if you’d prefer to do this outdoors, though I’ve had trouble when dirt gets under the tape.

D is for Dog and Dolphin {Alphabet Activities at RoamingRosie.com}

This was really just a fun craft that we did because my daughter loves painting so much, but we picked two animals that started with the letter D and I wrote their names on the paper to accentuate the letter.

These things are still hanging from her bathroom mirror with little suction cups.

D is for Dragon Drums {Alphabet Activities at RoamingRosie.com}

We also made Dragon Drums.

For the drum, I used old formula cans with the labels peeled off, but just about any type of can will work.  The small one was green beans, I think.  I had picked the formula can because it was large, but using two different sizes also allowed us to compare the different sounds they made.

As you can see below, we filled the cans with rice, so that they also functioned as shaker drums.

The top of the can was covered with the top half of a green balloon which I’d cut in two and secured with a rubber band.

We had cut wings and heads from green construction paper and I folded the ends up to make it easy to slide the paper under the rubber band as well.

D is for Dragon Drums {Alphabet Activities at RoamingRosie.com}

I let the girls beat on the drums with the ends of wooden spoons, and we shook them, too.

These dragon drums lasted a long time, even with the rough play of two young kids.  And we got a lot of enjoyment out of them.

D is for Dinosaur Pizzas {Alphabet Activities at RoamingRosie.com}

These are seriously fun pizzas to make.

I had intended for them to be “deep dish” when I made them, but they didn’t turn out that way.  I can’t remember why I still labeled them as such on the picture.

Anyway, as you can see in the step-by-step photo below, we started with my Easy Pizza Dough.

I rolled out the dough and used our Dinosaur Cutter to cut out dinosaur-shaped crusts.  I carefully transferred these to a parchment lined baking pan, trying to retain the shape of the dinosaur, but making sure to leave some room between them.

I also used the dinosaur cutter to cut out pieces of cheese from slices of mozzarella cheese {the kind meant for sandwiches}.

D is for Dinosaur Pizza {Alphabet Activities at RoamingRosie.com}

To assemble the pizzas, we added tomato sauce to them, then sprinkled them with Parmesan cheese.  I also like to add some salt, pepper, and garlic powder, but that’s optional.  We topped them with the cheese slices and with a letter D that I had cut out of pepperoni.

I made the meaty letters by cutting slices of pepperoni in half and carefully using a small paring knife to carve out the center.

The cheese spread a bit when they cooked, but we didn’t mind that at all.  :)

D is for Dulce De Leche Doughnuts {Alphabet Activities at RoamingRosie.com}

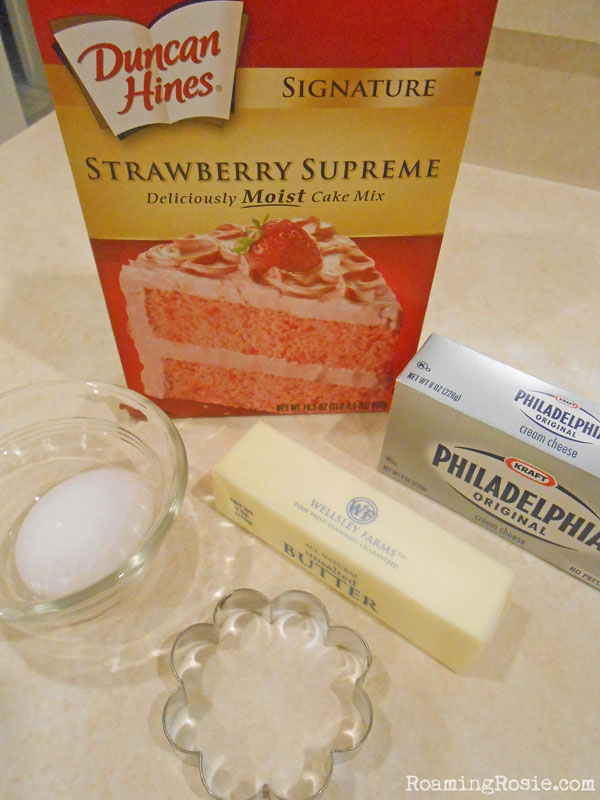
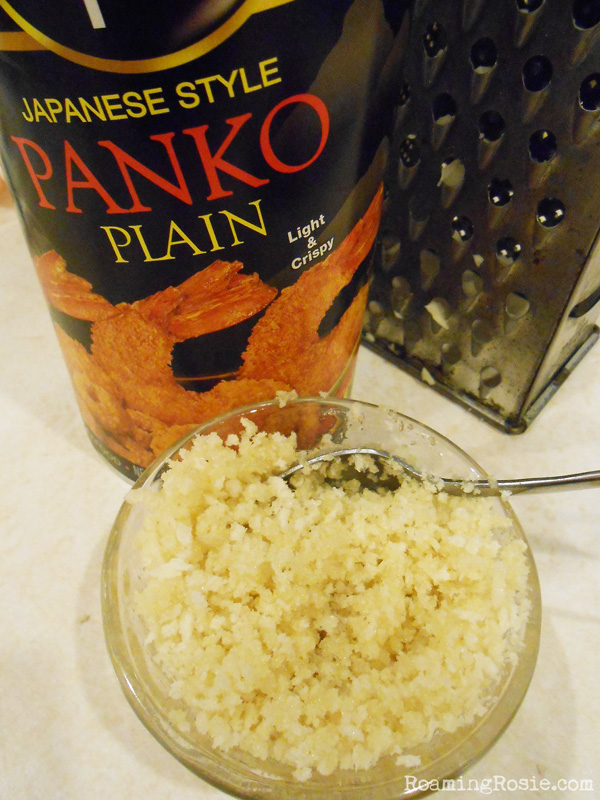
These Dulce de Leche Doughnuts were surprising good and relatively simple {although time-consuming} to make.

I’ve posted the step-by-step photo below, so you can see the process.  And actually, when I say it’s time consuming, it’s only because of cutting out the letter Ds and dipping each finished D into the caramel.  Not hard, but it does take a few minutes.  My daughter enjoyed the process, though, so – at least to me – it was worth it.

The doughnuts themselves are pretty easy to make since they’re baked, and the caramel has only one ingredient.  We topped them with nonpareil sprinkles for decoration, and though the caramel was a tad sticky, these were thoroughly enjoyed.

D is for Dulce De Leche Doughnuts {Alphabet Activities at RoamingRosie.com}

Normally I would add the entire recipe right here but this post is already pretty long, so I’m just going to post the printable recipe instead.  To print out the PDF copy of the recipe, click here:  Dulce de Leche Doughnuts

And here are some of the supplies I’ve mentioned in this post, including dot markers, painters tape, dinosaur cutter, and cookie cutters {for the letter D}.

Dot a Dot Markers Painters Tape Dinosaur Sandwich Cutter Cookie Cutters

I’d love for you to share if you’ve done any of these projects with your little ones!

Follow me on Facebook and Pinterest to see my latest posts.

And don’t forget to check out the Easy Pizza Dough recipe I used for the Dinosaur Pizzas:

Easy Pizza Dough Recipe {And How to Proof Yeast} at RoamingRosie.com

Have fun!

Roaming Rosie Signature

Perfectly Popped Popcorn {with coconut oil}

Perfectly Popped Popcorn with Coconut Oil

This is some pretty amazing stuff right here.

I make a lot of popcorn … I MAY have mentioned once or twice my Garlic Infused Parmesan Popcorn … but sometimes it’s nice to enjoy just the butter and the salt of traditional movie theatre popcorn – but without all the gross chemicals and additives.

Perfectly Popped Popcorn with Coconut Oil and Himalayan Salt

This recipe was my solution to that.

And it’s AMAZING.

Now, part of that is because of the virgin coconut oil.  If you don’t use virgin, then you won’t get the coconut taste.  Maybe that’s what you want.  But it’s not what I wanted.

The subtle tropical flavor suits the puffed kernels so perfectly.

And the Himalayan salt tastes pretty amazing all on its own anyway.

Plus, I buy my popcorn kernels in bulk at my local health food store.  I like this popcorn for two reasons:  it’s organic and it pops light and fluffy every time.

Oh – and yet another benefit:  the combination of the popcorn and the virgin coconut oil will make your kitchen smell incredible.

Seriously.

Perfectly Popped Popcorn

Okay, to make the popcorn, start with a large pan with deep sides, or a pot.

Melt the coconut oil over medium heat, then toss in 3 kernels of popcorn.  Cover.  When you hear the 3 kernels pop, add in the rest.

Perfectly Popped Popcorn

When you add in the rest of the popcorn, quickly shake a pinch of salt over them, then cover.

Shake the pan now and then to make sure all the kernels cook evenly.  Even tilt it from side to side.  Just hold the cover on while shaking.

Perfectly Popped Popcorn

Once the popcorn is done, put it into a “giant” paper lunch bag (mine are approx. 11 x 6 x 4 inches and I found them at Walmart).  Or, use a small paper grocery bag.  You could try using a regular paper lunch bag, but that won’t allow the popcorn as much movement when shaking.

Drizzle the melted butter over it and add a few more pinches of Himalayan salt.

Fold over the top of the bag and shake vigorously until you’re quite certain that all of the popcorn is covered with the toppings.

Some of the melted butter will start to soak through the bag.  That’s okay.

And remember, you can always add more salt if there’s not enough for your taste, but you can NOT take it away.  Better to add too little than too much.  Himalayan salt is really strong and you don’t need a lot of it.

Perfectly Popped Popcorn

Then pour it into a bowl and enjoy!

It’s hard to beat fresh, incredible food that takes only a few minutes.  And the taste … *drools*

Perfectly Popped Popcorn {with coconut oil}

Ingredients:

1/4 cup virgin or extra virgin coconut oil
1/3 cup organic popcorn kernels
2 Tbsp butter, melted
Himalayan salt, to taste

Melt the coconut oil over medium heat in a large pan with high sides.

Once melted, add 3 popcorn kernels and cover. When the 3 kernels pop, add the rest of the kernels, spreading evenly over the bottom of the pan. Quickly sprinkle a pinch of salt over the kernels and cover.

While continuing to cook over medium heat, occasionally shake the pan (making sure the cover is secure). It should take only a few minutes for all the kernels to pop.

When the popping has slowed and there are a few seconds between popping sounds, remove the pan from the heat and carefully shake it once more to make sure there are no more unpopped kernels floating around inside.

Transfer the popped popcorn to a large paper lunch bag (or a small paper grocery bag). Drizzle the melted butter over it and then shake a few more pinches of salt into the bag. Fold over the top of the bag and shake vigorously to cover all of the popcorn with the toppings.

Pour into a bowl and enjoy!

[Note: the virgin coconut oil is what gives this recipe its unique taste, but you can still use regular coconut oil if you prefer.]

**********

Click here to print the free PDF version of the recipe:  Perfectly Popped Popcorn with coconut oil

Enjoy!

Roaming Rosie Signature

Garlic Parmesan Chickpeas

Garlic Parmesan Chickpeas

I pretty much love anything that’s flavored with garlic and Parmesan (esp. my Garlic Infused Parmesan Popcorn), so I wanted to give roasted chickpeas a try.

I thought they were great.  Crunchy on the outside, soft and smooth on the inside, and with a nice spice to them.

They do get a little soft after a day or two, so I suggest serving them the day you make them, like for a dinner party.  But if you want to make them ahead of time, or just for yourself where you’re not going to eat the whole batch in one sitting, then you can broil them briefly before serving them, stirring them and keeping a close eye on them.

Garlic Parmesan Chickpeas

There are only a few ingredients.

Just some butter to help the cheese and spices stick to the beans.

Garlic Parmesan Chickpeas

Draining and drying off the chickpeas only takes a couple of minutes.

It’s important, though, because you don’t want all that moisture from the can on them.  They won’t roast as well.

Garlic Parmesan Chickpeas

See?  Only a handful of ingredients.

Garlic Parmesan Chickpeas

When you pour out the chickpeas onto the pan, be sure to sprinkle any remaining cheese from the bowl over them.  This extra cheese will melt and cook onto them.

Garlic Parmesan Chickpeas

Can’t you just see the yumminess?

Garlic Parmesan Chickpeas

Ingredients:

1 can (15.5 oz.) chickpeas
1 Tbsp. butter, melted
1/2 cup grated Parmesan cheese
1 tsp. garlic powder
1/2 tsp. ground pepper

Preheat the oven to 350°F.

Drain the can of chickpeas and pat them dry with paper towels.

In a bowl, mix the chickpeas with the melted butter.

Stir in the garlic and pepper, mixing well. Then stir in the cheese until all the chickpeas are coated.

Using parchment paper, line a medium baking pan with raised sides. Pour the chickpeas onto the pan, spreading them out, and pour over them any remaining cheese from the bowl.

Bake for 35 to 40 minutes or until browned and crispy.

Store covered.

[Note: These are crunchiest the first day. If they get too soft after being stored, broil them for 5 or 6 minutes before serving.]

********

To print the free PDF copy of this recipe, click here:  Garlic Parmesan Chickpeas

Roaming Rosie Signature

Chocolate Chip Cinnamon Banana Bread

Chocolate Chip Cinnamon Banana Bread

This is some awesome bread.

I came up with this recipe to get a bread that was moist and soft and very, very chocolatey.

It’s kinda rich, too.

If you prefer to have a little crunch in the middle, though, you could substitute half of the chocolate chips with chopped walnuts.

Chocolate Chip Cinnamon Banana Bread

It’s a pretty basic banana bread recipe.

All the usual suspects.

Plus the chocolate chips, and a little cinnamon for an extra layer of flavor.  I love cinnamon.

Chocolate Chip Cinnamon Banana Bread

It will look pretty wet as you’re mixing it, but that’s okay.

Chocolate Chip Cinnamon Banana Bread

Here’s the dough in the pan.

The little bit of moisture around the edge is from the baking spray I used.  I don’t usually have the patience to butter and flour a pan, so I use the baking nonstick spray that has flour in it.  Maybe not the healthiest thing in the world, but it’s easy.

I did add a piece of parchment paper to the bottom of the pan, as well, just in case.  Better safe than sorry.

Chocolate Chip Cinnamon Banana Bread

Doesn’t that look amazing?

And it smells even better than it looks.

Chocolate Chip Cinnamon Banana Bread

Like I said:  very, very chocolatey.

That chocolate in every bite is what I think makes the smoothness of the bananas and the spice of the cinnamon extra awesome.

Sometimes I eat it just like that, and sometimes with butter.  Sometimes for breakfast, and sometimes for dessert.

Either way, it’s pretty filling.

And awesome.

Chocolate Chip Cinnamon Banana Bread

Chocolate Chip Cinnamon Banana Bread

Ingredients:

3 large, ripe bananas
1/3 cup butter, melted
1 cup sugar
1 egg, beaten
1 tsp vanilla extract
1 tsp ground cinnamon
1 teaspoon baking soda
1/8 tsp salt
1 1/2 cups all-purpose flour
1 cup miniature chocolate chips

Preheat oven to 350°F and prepare a 9×5 inch loaf pan.

In a large bowl, smash the bananas with a fork until mostly smooth. Mix the melted butter into the bananas. Mix in the sugar, egg, and vanilla until combined. Then mix in the cinnamon, baking soda, and salt. Stir in the flour, 1/2 cup at a time. Stir in the chocolate chips.

Pour the batter into the loaf pan. Bake for 50 minutes to 1 hour, until browned. Cool in pan for 5 minutes, then transfer to a wire rack and cool completely.

[Note: This is a moist bread with chocolate in every bite. If you want less chocolate, and a little crunch, you could substitute half of the chocolate chips for chopped walnuts.]

********

For the printable PDF version of the recipe, click here:  Chocolate Chip Cinnamon Banana Bread

Enjoy!

Roaming Rosie Signature

Easy Flatbread Pizzas

Easy Flatbread Pizzas

This was one of those easy lunch [or dinner] ideas that I just had to share.

My mother has a tendency to stock up on things at Publix when they’re Buy One Get One.  So I sometimes have things, like Nature’s Own Sandwich Rounds, that I wouldn’t otherwise ordinarily have in the pantry.  Since we don’t eat a lot of sandwiches (bread and meat and cheese, yes, just not in sandwich form for some reason…), I needed to find something to make with them.

I decided to go with pizza.

Which is always a good choice.

For this pizza, I grabbed the Sandwich Rounds, a can of tomato sauce, grated Parmesan, shredded Mozzarella, and some salt, pepper, and garlic powder.

Easy Flatbread Pizzas

The first time I made this, I didn’t toast the Sandwich Rounds.

But the sauce made them slightly soggy.  Toasting them before baking fixed that.

So don’t forget to give them a quick toast while you’re grabbing the other ingredients.

Easy Flatbread Pizzas

Anyway, throw some Rounds on a baking pan and spread on some tomato sauce.

Then sprinkle on some salt, pepper, and garlic powder.

Next, shake on some Parmesan and, finally, top with Mozzarella.

If you’re going to throw anything else on top, like meat or veggies, make sure they’re at least partially cooked, because these really don’t take very long.

Easy Flatbread Pizzas

I put these flatbread pizzas in the convection oven at 350 degrees F until the cheese was melted and slightly browned.

Depending on your oven, this should take about 10 minutes.

Enjoy!

Roaming Rosie Signature

Lemon Cheesecake Bars

Lemon Cheesecake Bars

It’s been awhile since I’ve made these, so I had to come up with an excuse for needing them again.

Luckily, there was a potluck party this weekend.

I used that.

But these crumb cake-like, cream cheesy bars don’t really demand an excuse.  They work great even for a random weeknight dessert.

Especially since they’re so easy to make.

{If you keep up with my blog, you know easy=awesome in my book.}

Lemon Cheesecake Bars

Anyway, these bars start with a cake mix.

And you could probably use real lemon juice/zest, but I’ve only tried it with the extract.

Lemon Cheesecake Bars

Once you make the cake mix batter that serves as both the crust of the bars and as the crumb topping, you’ll need to set aside a cup of it.

That cup of crumbs will go on top.

What you’re left with won’t look like enough to cover the bottom of a 13×9 baking dish – but it will.

It rises as it bakes, so it’s okay that it’s really thin.

Just go ahead and press it out to cover the entire bottom.

Lemon Cheesecake Bars

Here it is with the yummy cream cheese mixture spread over the cake crust.

Lemon Cheesecake Bars

And here it is with the cake-ish crumbs sprinkled over the top, just before baking.

Be careful not to let the edges brown too much.  The finished bars should still look a little moist in the center.

But even if the edges cook a little too much, you can always slice them off when cutting the bars to serve.  And, you know, throw them in a bowl and devour them by the forkful when your kids aren’t watching.

Lemon Cheesecake Bars

Lemon Cheesecake Bars

Ingredients:

1 box (18 oz.) yellow cake mix
8 oz. cream cheese, softened
2 eggs, separated
1/3 cup vegetable oil
1/3 cup sugar
1 tsp. lemon extract

Preheat oven to 350°F.

In a large bowl, combine the cake mix, one egg, and the oil until it reaches a crumbly consistency.

In a medium bowl, use a mixer to beat the cream cheese until smooth. Add in the remaining egg, sugar, and lemon extract and continue beating until fully incorporated.

Reserve one cup of the cake mix batter, and press the remaining batter into the bottom of a greased 13 x 9 inch baking dish. It will be thin.

Spread the cream cheese mixture over the cake mix batter.

Sprinkle the reserved cake mix batter over the cream cheese.

Bake for 25 minutes or until the edges are just golden brown.

Cool completely before cutting.

************

To PRINT your free PDF of this recipe click here:  Lemon Cheesecake Bars

Enjoy!

Roaming Rosie Signature

Strawberry Cream Cheese Sandwich Cookies

Strawberry Cream Cheese Sandwich Cookies

These are amazing.

Even though I probably said that about the Easter Bunny Spiced Sandwich Cookies, too.  But that’s only because it’s true.

I developed this recipe when I made the Bunny cookies because I wanted to incorporate cream cheese into both the cookie itself and the icing.  And the results were sooooooooooo good.

Strawberry Cream Cheese Sandwich Cookies

Above are most of the ingredients.  Just add a little confectionery sugar and vanilla extract for the icing, and that’s all you need.

Simple, right?

Strawberry Cream Cheese Sandwich Cookies

When you cream together the butter, cream cheese, and egg for the cookie dough, it should look nice and creamy like this.

Then mix in the cake mix and extra flour.

Strawberry Cream Cheese Sandwich Cookies

It’s a soft dough, so you’ll need to refrigerate it before rolling it out.

And if it’s still a little too soft to handle, just knead in a bit of flour.

Strawberry Cream Cheese Sandwich Cookies

Sprinkle some flour over your counter generously before rolling out the dough.

And be sure to keep the dough a little thick.  The cookies need to be thick and just-ever-so-slightly undercooked so that you can bite through them and the icing without the icing squirting out all over the place.

Strawberry Cream Cheese Sandwich Cookies

Once the cookies are cool, you can add the icing.

I usually make the icing while the cookies are cooling.

Then I like to add a little decoration to the top with some melted chocolate.  I used Wilton’s Bright White Candy Melts here to mimic the shape of the cookies.

Ain’t they just adorable??

Strawberry Cream Cheese Sandwich Cookies

Strawberry Cream Cheese Sandwich Cookies

Cookie Ingredients:

1 box (16.5 oz.) strawberry cake mix
1/4 cup all-purpose flour
4 ounces cream cheese, softened
1/3 cup butter, softened
1 tsp. vanilla extract
1 large egg

In a large bowl, use a mixer to cream together the butter and cream cheese. Add egg and vanilla and blend until fluffy.

Slowly sprinkle in the cake mix and flour and blend until combined.

Shape cookie dough into a flattened disc, wrap in plastic wrap and refrigerate for at least a half hour.

Preheat oven to 375°F. Roll out dough to a 1/4 inch thick on a lightly floured surface. (If you want to make a sandwich cookie with a cutter that is not symmetrical, then make sure you cut out an equal number of matching cookies, using both sides of the cookie cutter.)

Bake on parchment lined cookie sheets for 5 to 8 minutes, depending on the size and thickness of your cookies. They should not yet be noticeably browning on the edges. Do not overcook them or your sandwiches will be difficult to eat.

Allow cookies to rest on the hot pan for a few minutes, then remove to cooling racks. Cool cookies completely before adding icing.

Icing:

4 ounces cream cheese, softened
3 Tbsp. butter, softened
1 tsp. vanilla extract
2 cups confectioners sugar
White chocolate chips or candy melts (optional)

With a mixer, cream together the butter and cream cheese. Mix in the vanilla. Add in the sugar a half cup at a time, blending well.

Put icing in a decorating bag or a baggy with the corner cut off, and squeeze it onto the bottoms of half of the cooled cookies. Place another cookie on top of the icing and press down gently.

If desired, melt some white chocolate chips to draw a pattern on top of the cookie.

************

To PRINT the free PDF, click here:  Strawberry Cream Cheese Sandwich Cookies

Enjoy!

Roaming Rosie Signature

Orange Creamsicle Cookies

Orange Creamsicle Cookies

If you’re looking for an amazing cookie that just screams “summer,” you need to try these.

I love anything orange creamsicle related.  Including the Popsicles, of course.  And these were just so much fun to eat.

Plus, they were super simple, since I started with a box mix.

Orange Creamsicle Cookies

If you follow the directions on the box, they suggest adding the matching flavored icing to the cookies, but I tend to avoid icings that may not actually dry.  Too difficult to store.

So I dipped them in white chocolate instead.

And to really get the creamsicle-flavor, I also added a cup of white chocolate chips to the batter.

If you were in a bind and didn’t have the time to dip the cooled cookies in chocolate (even tho it only takes a few minutes), you still need to add in the chocolate chips.  They really send the cookies over the edge.

Orangesicle Cookie Mix

Above is a pic of the box mix that I used.  Picked it up at the grocery store in the cake mix aisle.

But if you can’t find it in your local store, the Pillsbury Orangesicle Premium Cookie Mix is also available online.

Orange Creamsicle Cookies

Here you can see the batter with the chocolate chips mixed in.

Like little gooey balls of creamsicles……

Orange Creamsicle Cookies

After they were baked and fully cooled, I dipped them in some melted Bright White Candy Melts (tho regular white would work, too).

It looks like I dipped the cookies in halfway, but the chocolate really only covers the top and sides – not the bottom.  I didn’t want the chocolate overpowering the orange flavor.

Orange Creamsicle Cookies

Orange Creamsicle Cookies

1 box Pillsbury Orangesicle Premium Cookie Mix
1 cup white chocolate chips
1 cup white or bright white Candy Melts

Make the cookie dough according the package directions.  Stir in chocolate chips and drop dough by rounded teaspoonfuls onto baking sheets.  Bake according to package directions.  Allow to cool completely.

Melt the Candy Melts in a small bowl.  Dip half of the top of each cookie into the melted chocolate and allow to set on waxed or parchment paper.  Store covered.

Roaming Rosie Signature

Smoked Gruyere Mac and Cheese with Capicola

Smoked Gruyere Mac and Cheese with Capicola

In case you didn’t notice with recipes like Sausage and Gouda Mac and Cheese, I’m a huge mac and cheese fan.

And I like to experiment a little.  Change things up.

Sure, I keep some box mac and cheese mixes on hand for days when I’m feeling super lazy, but macaroni and cheese is not a complicated dish.  One of the things I love about it is the casserole nature of the baked mac and cheese that allows me to wash up all the dishes and such while it’s baking.  Which means easy cleanup after dinner.

For me, easy cleanup = easy dinner.

Smoked Gruyere Mac and Cheese with Capicola

Anyway, here are the ingredients for this dish.

I chose Gruyere, which is something I used to eat more of when I lived in Germany, so I like to use it occasionally.

The Capicola is a spicy ham that we put in our cold cut pies around Easter.  Apparently this is an Italian thing.  Either way, I like the ham.

But it CAN be spicy.  And the spice is intensified a little when you fry it, which is why you can see that I only added a small amount to the top of my dish right before serving.  You don’t need a lot.

Smoked Gruyere Mac and Cheese with Capicola

I don’t always use heavy cream when making mac and cheese, but usually just because I don’t have it on hand.

It adds a nice thickness.

Whether you use it or just straight milk, though, your roux should reach a point of being thick enough that the cheese doesn’t fall straight to the bottom when you sprinkle it in.

To get to that point, bring your roux JUST to a boil, stirring frequently.

Smoked Gruyere Mac and Cheese with Capicola

I switch between Panko and regular bread crumbs.  Whatever I’m in the mood for.

In this recipe, I used Panko.

Smoked Gruyere Mac and Cheese with Capicola

Doesn’t that look awesome?

It’s the cooked noodles mixed into the cheese sauce before it’s baked.  You do want it to look a little soupy, because the sauce will thicken up in the oven.

Smoked Gruyere Mac and Cheese with Capicola

Here are the bread crumbs before baking.

Smoked Gruyere Mac and Cheese with Capicola

I used a 1/4 lb. of Capicola, slicing it rather thinly.

You could use more:  it shrinks significantly when you fry it (like bacon), but, like I said, you don’t really need a lot.

It’s just an accent.

Smoked Gruyere Mac and Cheese with Capicola

I threw the Capicola into the pan with just a touch of olive oil to help keep it from sticking.

Fry until nice and dark, but not quite burnt.

Then drain it on paper towels and serve separately.

Smoked Gruyere Mac and Cheese with Capicola

Doesn’t that look good??

If your bread crumbs don’t brown enough during the last few minutes of baking, go ahead and broil it for two or three minutes – just keep a close eye since it can burn.

Smoked Gruyere Mac and Cheese with Capicola

And there’s the finished product:  scooped into a bowl with a pinch of the crispy, spicy ham.

Serve with some salad and you got a meal.

Smoked Gruyere Mac and Cheese with Capicola

 Smoked Gruyere Mac & Cheese with Fried Capicola

Serves: 6+

Ingredients:

3 cups Rigatoni pasta
2 Tbs. butter
2 Tbs. flour
2 cups whole milk
1 cup heavy cream
2 cups Smoked Gouda, shredded
1/2 cup Swiss, shredded
1 tsp. pepper
1 tsp. paprika
1/4 to 1/2 lb. Capicola

For Breadcrumbs:

3 Tbs. butter, melted
1/2 cup Panko breadcrumbs

Preheat oven to 350°F.

Cook the pasta until al dente, or one minute less than the recommended cooking time.

In a medium saucepan, melt the 2 Tbs. of butter. Stir in the flour to create a roux. Whisk in the milk and heavy cream. Cook over medium to medium high heat until just boiling, stirring frequently. Once it starts to boil, remove from heat and stir in the cheeses and spices. Continue to stir over low heat until the cheese has melted.

Mix the 3 Tbs. of butter with the breadcrumbs.

Stir the pasta into the cheese sauce. Pour into an 8 x 8 inch or a 9 x 13 inch pan. Sprinkle breadcrumbs over the top. Cover pan with foil.

Bake for 20 minutes. Uncover and bake for 5 to 10 minutes more, or until the cheese sauce is bubbling around the edges. If the breadcrumbs are not browned, broil for 2 or 3 minutes, watching closely.

Meanwhile, while the macaroni is baking, slice the Capicola thinly and fry over medium heat. Add a touch of olive oil if it seems to be sticking. Once the ham is crispy, drain on paper towels. Serve in a separate dish, to be used as a topping.

[Note: if you use a different shape of pasta, you may need to adjust the amount. Also, the ham is only meant as an accent. If you want a significant portion in your macaroni, use 1/2 to 1 lb.]

*****

Click here to print the free PDF version:  Smoked Gruyere Mac and Cheese with Capicola

Enjoy!

Roaming Rosie Signature