Letter E: Free Alphabet Worksheets for Kids

Free Letter E Printable Worksheets {Alphabet Activities at RoamingRosie.com}

If you’re new here, please read the Introduction to the Alphabet Activities first!

Here are all of the printable PDFs for the Letter E.  They are free for home and classroom use, but please don’t sell or reproduce them.

E is for Eagle and Easter Eggs

E is for Earth

E is for Elephants Eating Eggplants

E is for Emergency

E is for Eyes Googly Eye Worksheet

E is for Spotted Eagle Dot Marker Coloring Page

And don’t forget to check out all of our Letter E Alphabet Activities!

Follow me on Facebook and Pinterest to see my latest posts.

Have fun!

Roaming Rosie Signature

Letter E: Alphabet Activities for Kids

Letter E:  Alphabet Activities for Kids at RoamingRosie.com

Welcome to Letter E Day!

If you haven’t read the Introduction to the Alphabet Activities, you should start there.

Don’t forget to check out the Letter E:  Free Alphabet Worksheets for Kids, too!

Letter Sorting:  E is for Easter Eggs {Alphabet Activities at RoamingRosie.com}

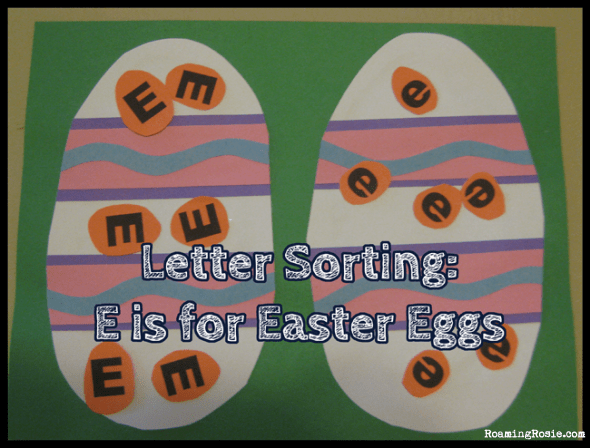
For our letter sorting activity, I cut out two egg shapes and added some paper patterns that made them look like Easter eggs.

E is for Electric Eels  {Alphabet Activities at RoamingRosie.com}

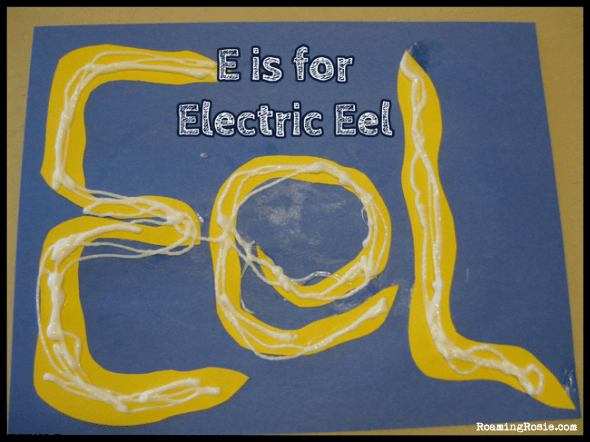
For our next Letter E project, I cut out the letter for Eel in squiggly lines that were supposed to represent the animal.

Then my daughter glued them on the water-colored paper and drizzled on some glow-in-the-dark paint.

The glowing version didn’t photograph well, but it was a big hit in person.

E is for Elephants  {Alphabet Activities at RoamingRosie.com}

We made some elephants with grey paint.

My daughter dipped her hands in the paint, then made hand prints on paper.

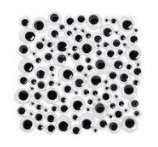
While the paint was still wet, we added googly eyes and a paper oval ear.

E is for Eyes {Alphabet Activities at RoamingRosie.com}

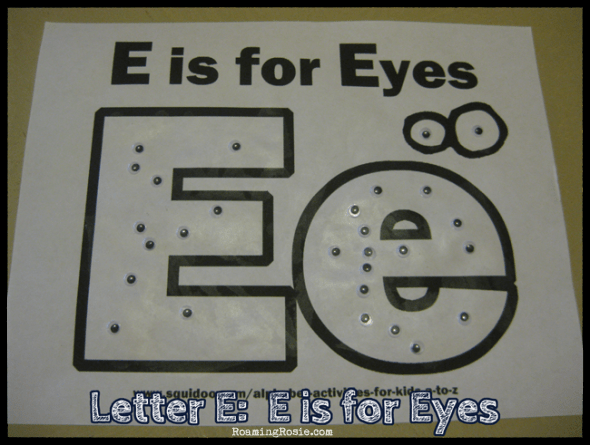
This is one of the worksheets I made that’s available on my Letter E:  Free Alphabet Worksheets for Kids post.

We spread glue all over the letters and added googly eyes.

E is for Earth  {Alphabet Activities at RoamingRosie.com}

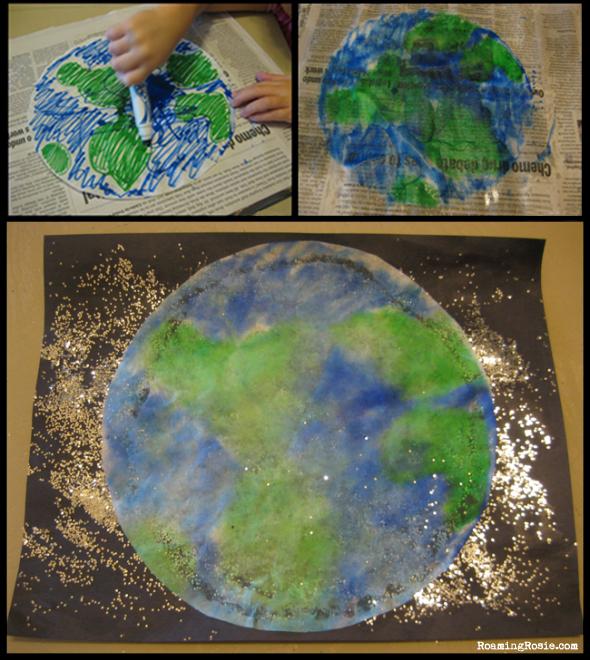
Our next project was a coffee filter craft:  E is for Earth.

The coffee filters were pretty big, so I cut it to fit the construction paper.  Then I outlined some shapes in green to roughly represent the continents.

Next, my daughter and I colored the continents and water with washable markers.  I helped a little because she hadn’t filled them all in completely and it looks best with a lot of color.

We took a spray bottle filled with water and squirted the coffee filter.  Make sure you have something underneath it {like newspaper} to soak up any colors that bleed through.  Don’t be afraid to squirt a lot of water of it, so that the colors will run.

Once it dried, we glued it to a piece of black construction paper with glitter to represent outer space and stars.

E is for Electric Eggs Hunt {Alphabet Activities at RoamingRosie.com}

My girls LOVED this.  And it’s very easy to do.

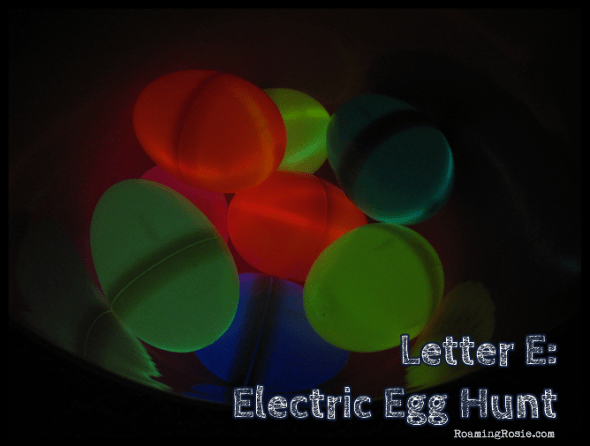
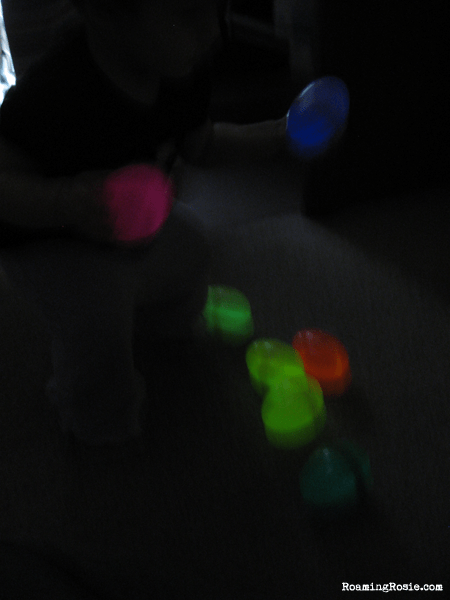
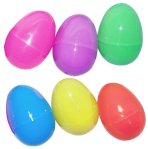
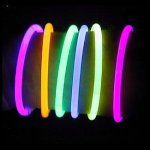
To set up an Electric Egg Hunt {which is also a great Easter activity}, you put bracelet-sized glow sticks inside of plastic Easter eggs.  Then hide them around the room and turn off the lights.

Below you can see my girls finding all the eggs.  One used a basket and the other just made a pile.

We hid them over and over again, so the activity lasted for quite awhile.

And has been requested many times since.

E is for Electric Eggs Hunt {Alphabet Activities at RoamingRosie.com}

E is for Electric Egg Hunt {Alphabet Activities at RoamingRosie.com}

E is for Scrambled Eggs {Alphabet Activities at RoamingRosie.com}

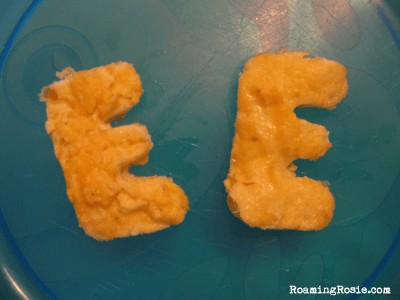
These are scrambled egg Es.  I made some scrambled eggs in a pan and added in some cheese.  I let it sit near the end of cooking it, so that it had the consistency of an omelet instead of scrambled eggs {stuck together instead of falling apart.}

Then I slid it onto a plate and cut out letter Es with a cookie cutter.

E is for Chocolate Eggs {Alphabet Activities at RoamingRosie.com}

These are really cute.

For these miniature eggs, I melted some white candy melts in a little baggy, snipped off the corner, and squeezed out the chocolate in oval shapes onto waxed paper.  Before the chocolate set, I put a yellow M&M on top.

It cools and sets in a few minutes, but they also stay fresh so you can make them days ahead of time, if you want.

E is for Green Eggs {Alphabet Activities at RoamingRosie.com}

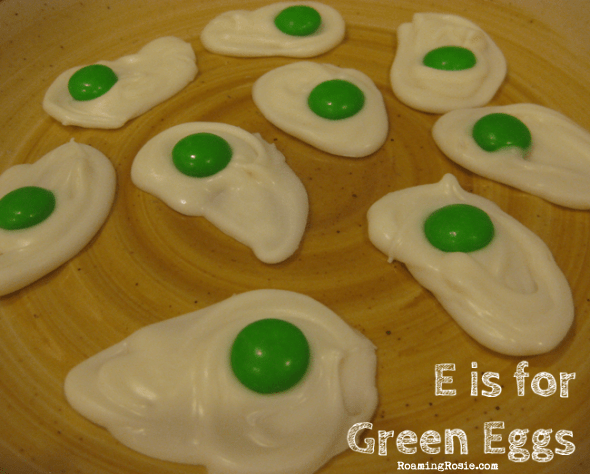
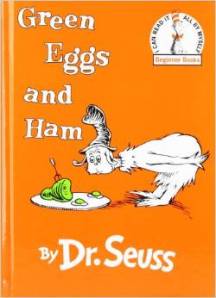
And since we also read Green Eggs and Ham for Letter E Day, I added green M&Ms to some of the chocolate eggs.  :)

Green Eggs and Ham by Dr. Seuss

E is for Easy Eclairs {Alphabet Activities at RoamingRosie.com}

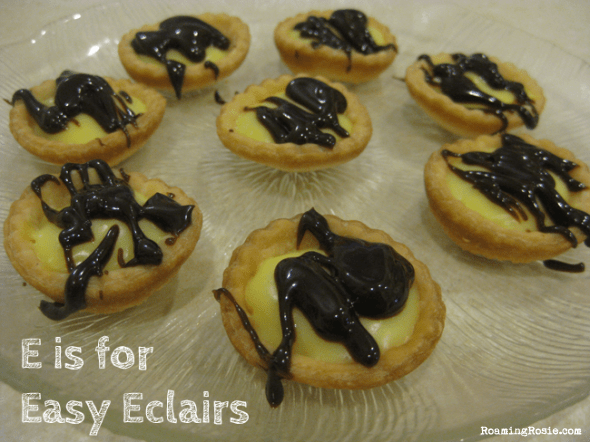
These were my take on eclairs.  I wanted to bake something, but something that would be really easy to make.

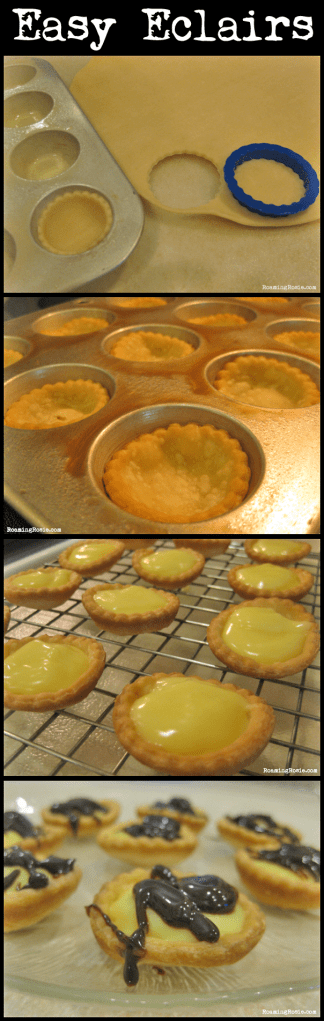
I didn’t post a printable recipe because I just combined a few things to make them.  I DID post a step-by-step photo below, though, to help explain it.

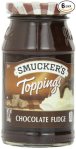
We started with some store-bought pie crust dough.  You can usually find this in the frozen or refrigerated section of the grocery store.  We cut out flower circles with a 2-inch cookie cutter and pressed the small circles of dough into greased mini cupcake pans.  After baking them according to the package directions and letting them fully cool, we spooned in some instant vanilla pudding.  Once that set, we drizzled chocolate fudge ice cream topping over them.

And to review, a list of the ingredients:  pie crust dough, vanilla pudding, fudge ice cream topping.

They might not exactly be eclairs in the traditional sense, but they still tasted pretty good.

E is for Easy Eclairs {Alphabet Activities at RoamingRosie.com}

And here are some of the supplies I’ve mentioned in this post, including glow-in-the-dark paint, googly eyes, plastic eggs, glow sticks for the electric eggs, the cookie cutter set that I used for the scrambled eggs Es and the easy eclairs, and the fudge topping for the eclairs:

Glow in the Dark Paint Plastic Eggs

Glow Stick Bracelets Cookie Cutters Fudge Ice Cream Topping

I’d love for you to share if you’ve done any of these projects with your little ones!

Follow me on Facebook and Pinterest to see my latest posts.

Have fun!

Roaming Rosie Signature

DIY Fine Motor Skills Craft for Toddlers with Pipe Cleaners

DIY Fine Motor Skills Craft for Toddlers with Pipe Cleaners at RoamingRosie.com

I like to make homemade activities for my girls by recycling things we have around the house.

We use pipe cleaners {or chenille sticks} fairly often, so we’ve always got those on hand.  I usually get them at the dollar store.

For this project, I used 4 pipe cleaners and cut them into inch-long pieces with a pair of strong scissors.

Then, the goal was simply to put them into an old spice container.

This is the type of spice container that holds dried herbs, like parsley or oregano.  You’ll notice the top has only 6 large holes.

It’s a great way to work on fine motor skills and helps with prewriting skills.

The only drawback to this is that the metal inside the pipe cleaners can be a little sharp.  There are a couple of ways around this.  One:  ignore it.  And two:  use pliers to curve over the very ends of the metal pieces, making sure that the sticks still fit through the holes in the spice container.

We chose option one.

Really, it’s not terribly sharp and you can insert them without pushing the ends anyway if you manipulate the pieces by holding them on the fuzzy part.  Or pushing gently, which is what I showed my girls.

Or, if you’re really worried about it, you could just use pieces of yarn instead.

My favorite part is that all the little pieces fit inside the container, and, thus, it is self-contained and easy to store.

For more kid activities using items around the house, check out:

Practice Measuring with Rice

Painting With Chalk

Our Colorful Backyard: Color Matching Activity for Kids

Blustery Day Water Play

Free Kid Activity: Developing Fine Motor Skills with Crayons

Pretend Play: Makeup

Free Kid Activity: Chalk on Construction Paper

Free Kid Activity: Painting Newspaper

Make Your Own Color Shadows

Dirt Soup: In Contact With Creation

Have fun!

Roaming Rosie Signature

Painting Birdhouses With The Kids

painting birdhouses

My kids were SO excited about this project.

I hadn’t realized that picking up a couple of $1 wooden birdhouses at the store could make a day so very eventful.

It was pretty awesome.

Anyway, the reason we even went looking for birdhouses was because of this book that was given to us by a neighbor:

Birds First Discovery Book

This First Discovery book about Birds was something I thought looked kind of fun, but I wasn’t sure how my kids would respond to it.

Surprisingly, it’s been requested over and over again at bedtime.

Even though it’s a learning book and not a story book, both my 4yo and 2yo enjoy reading it.

This is partially because they love all kinds of books where they get to discover things (the 4yo often requests a book that spells out the life cycle of butterflies) but also because of the fun way they allow kids to “discover” the facts about their subject matter.

This series of books includes transparent pages.

The transparent pages are printed with pictures on both sides and “hide” part of the page that’s underneath it.  When you turn the page it reveals the hidden image.

My daughter calls these the “puzzle pages.”

And, from looking at the pictures of others in the series on the back cover, she’s already ardently requested that we get the ladybug book.

Thus, a ladybug and a dinosaur book are in a box on the way to my house right now.  And I will be buying more in the future.

If you think your kids would love this kind of interactive learning, too, here are a few others in the series for you to view:

Do you own any of these books already? Which are your kids’ favorites? Your favorite?

Roaming Rosie Signature

Crackled and Marbled Easter Egg Decorating Tips

Easter is almost upon us!

So I wanted to post a couple of photos of some out-of-the-box egg decorating I did with my girls in the past:  Crackled Easter Eggs and Marbled Easter Eggs with Shaving Cream.

1. Crackled Easter Eggs

Crackled Easter Eggs

These looked pretty awesome.  And they’re super easy.

Here’s the process:  take some cooled hard boiled eggs and gently roll them on the counter to produce cracks all around while making sure the shell does not fall off of the egg.

Put the cracked egg in a little baggy and add a few drops of liquid food coloring.  Make sure the color covers the entire egg and let sit for a half hour.

Peel the egg and rinse it in a colander, splashing it with a bit of white vinegar to help the color set.

That’s it!

And they’re perfectly safe to eat, which is kind of fun, too.  My daughter really loved these; called them “dinosaur eggs.”

2. Marbled Easter Eggs with Shaving Cream

Marbled Easter Eggs with Shaving Cream

These are also a ton of fun for kids to make.

To create them, fill a pan with shaving cream and drop some liquid food color into the pan (I did red and blue in one pan and yellow and green in another).  Gently swirl the colors with a toothpick or skewer, then roll the eggs in the shaving cream until covered.

Let the eggs sit on a paper plate or paper towel for 15 or 20 minutes, then wipe off the shaving cream.

That’s it!

Both projects are simple but fun.  The only thing you have to watch out for is getting food coloring on your clothing, because it stains.  I suggest having your kids wear aprons.

Happy Crafting!

Roaming Rosie Signature

Shamrock Fun for Kids on St. Patrick’s Day

shamrock suncather

I just noticed that my pin of the above Shamrock Sun Catcher has been re-pinned over 2,000 times on Pinterest.  Reminded me that St. Patty’s Day is coming up.

I normally would have been much more aware of this, except that a massive sinus infection has recently melted my brain.

Anyway, the St. Patrick’s Day crafts I did with my kids last year are on one of my Squidoo lenses (St Patrick’s Day Crafts and Recipes for Kids), and include a few fun crafts that all resemble shamrocks.

Like our green dinner biscuits and chocolate shamrocks:

shamrock biscuits

chocolate shamrocks

You’ll find all of the instructions and step-by-step photos at St Patrick’s Day Crafts and Recipes for Kids.

Check it out and please share with me if you decide to make any of them!

Roaming Rosie Signature

Save

Heart-Shaped Salt Dough Fingerprint Magnets

Heart Shaped Salt Dough Fingerprint Magnets

For Grandma’s birthday this year we made little magnets from salt dough that had the impressions of the girls’ fingerprints.

Last year we made a large heart for both of their footprints, and it was a big hit, but this year I wanted to something a little different.

And, admittedly, the little fingerprints don’t really show their fingerprint texture; they’re really more like finger “indents.”  But the girls really liked making them for Grandma and hanging them on the fridge.

We put their initial on their heart so they’d know which was which, and they like that their fingers fit in the imprints.

Heart Shaped Salt Dough Fingerprint Magnets

Salt dough is a pretty standard recipe.  For this project I made half of the recipe, and what we didn’t use, I let the girls play with, since it’s like play dough.

To make the salt dough: 

Combine 1 cup flour and 1 cup salt in a bowl.  Mix in 1/2 cup water.  Knead. 

To make the hearts, I rolled out the dough and used a cookie cutter to cut out the hearts.  The girls pressed in their fingers and I drew in their initials with a toothpick.  Then we baked them at 200 degrees Fahrenheit for two hours, flipped them over and baked for an additional 30 minutes.  Once cool, we painted them.  Once the paint was dry, I attached button magnets to the back.

Heart Shaped Salt Dough Fingerprint Magnets

And, of course, we rolled out the dough on our Jake and the Neverland Pirates Placemat.  I think I love this thing more than my kids.  It’s soooooo easy to clean.  We use it for meals and crafts.  I’m a fan of multi-purposeing.

Oh – and we used the toy play dough rolling pin.  But you could roll it out with whatever you have:  a regular rolling pin, a drinking glass, etc.

Heart Shaped Salt Dough Fingerprint Magnets

I helped my girls press their fingers into the dough so that their two fingerprints would mimic the shape of the heart.

Heart Shaped Salt Dough Fingerprint Magnets

Then I took a toothpick and drew in their initials by pressing the end of the toothpick into the dough.

Heart Shaped Salt Dough Fingerprint Magnets

After baking the shapes (we made a few) and cooling them completely, we painted them.

We used sponge brushes and a metallic pink acrylic paint.  I like the sponge brushes because it’s easy to cover the shape and you can soak up excess paint from the letters with the sponge.

We didn’t seal them with anything, but you could.

I bought button magnets with adhesive so all we had to do was peel off the paper and stick them to the back of the hearts once the paint was dry.  But you could use any type of crafting magnet.

Heart Shaped Salt Dough Fingerprint Magnets

We had a lot of fun making these and the finished product made a great gift for Grandma’s birthday.

What have you used salt dough to make?

Roaming Rosie Signature

Letter M: Free Alphabet Worksheets for Kids

FREE Letter M Printables | Alphabet Activities for Kids

If you’re new here, please read the Introduction to the Alphabet Activities first!

Here are all of the free printable PDFs for the Letter M.  They are for home and classroom use, please don’t sell them.  Click on each title to print or download them:

M is for M and Ms Patterns

M is for M and Ms

M is for Marshmallows

M is for Matching Milk and Muffins

M is for Mermaid

M is for Mighty

M is for Monkey Maze

M is for Moose

M is for Motorcycle

M is for Mouse Mayhem

And be sure to follow me on Facebook and Pinterest to see our latest recipes and crafts!

Have fun!

Roaming Rosie Signature

Crystal Snowmen

Crystal Snowmen | Borax Christmas Ornament Craft

I love how these crystal snowmen catch the light of the low winter sun.

These snowmen are our version of the traditional borax Christmas ornaments.  I used white pipe cleaners (chenille sticks) to represent the snowmen:  one per ornament/sun catcher.

Crystal Snowmen

The above photo shows how we made them.  They were pretty easy for my 3-year-old to help with.

We took one stick and made it into a circle, twisting the ends around each other to seal the shape.  Then we twisted it a little over a third of the way up to create the bottom circle of the snowman, and again to create the torso and head.

Crystal Snowmen

I tied some thread to the top of the snowmen and wrapped that thread around the handle of a spoon that fit over a wide, 1 liter measuring cup.  You can do just one ornament in a smaller glass, but I wanted to do two at a time.

Make sure you have a enough room to hang the snowmen, then take them out of the glass.  Fill the glass with water and boil it in the microwave, or add boiling water from another source.  Mix in the borax and stir gently, then put the snowmen back in.  Let it sit overnight.  Done!

You’ll need:

pipe cleaners (chenille sticks)
thread
4 cups boiling water
1/2 cup borax

After sitting overnight, dump out the water.  If the crystals that formed on the snowmen attached to crystals on the bottom of the glass, simply chip them gently away with a fork.  Then, unravel the thread from the spoon and tie a loop to attach to suction cups for a window or a hook for a tree ornament.

What kind of borax ornaments have you made?

And don’t forget to check out these other Christmas crafts:

DIY Lifesize Cardboard Gingerbread House

Felt Fashion Christmas Tree

Easy Christmas Craft: Paper Cone Christmas Trees

Easy Christmas Craft: Toilet Paper Roll Ornament Painting

Roaming Rosie Signature

Felt Fashion Christmas Tree

Felt Fashion Christmas Tree

Our next Christmas craft this year was a felt Christmas tree that was bigger than my girls.

It’s a similar concept to our Halloween felt board, but much, much bigger.

And more fashionable.

I had actually intended on doing a more traditional-looking felt Christmas tree, kind of like this tree that I saw last year.

But then I came across these amazing felt sheets:

Felt Fashion Christmas Tree

Score!

With these printed felt pieces I could make a delightfully girly Christmas tree instead!  :)

Found them at Walmart, of all places.  And I bought a yard of dark green felt from their fabric department, for the tree.  I thought about getting some dark purple or a paisley patterned piece heavy with lime green (they sell precut pieces like these at Michaels), but I decided to stick with the green.  I liked how it looked.

And I was going to cut a star from one of the pieces I had, but then I came across those adorable pink felt star ornaments on sale at Michaels.  For forty cents, I couldn’t pass them up.  Especially since they matched the felt I already had.

Felt Fashion Christmas Tree

Because I didn’t want to screw up the tree while cutting, I folded my yard of fabric in half, lengthwise, and drew a tree pattern on it with chalk, instead of just cutting it out by hand, like I do most things.

Then I cut out the ornaments.  I cut rough squares and then cut circles out of them.  I cut a dozen ornaments from the two with zebra stripes, but only six from the other two patterns, to give them some variation of size.

Felt Fashion Christmas Tree

Then I had to decide where to hang it.  I tried using tape, even packing tape, but it was kind of heavy, so I didn’t consider the tape sturdy enough.

I tried sticking the felt directly to the stucco wall on the porch, thinking it would stick like felt does to brick, but the stucco was too smooth because of the paint.

I wound up going with Command Strips (pictured above).   The picture hanging ones come with a texture similar to Velcro, so, instead of using the 8 pieces as a set of 4 hangers, I stuck the rough side of the strips right on the felt tree.  Then I peeled off the sticky backing and stuck it on the wall.

The main reason I used the Strips is because I can adjust the tree.  With a gentle pull, the felt comes right off of the rough side of the strips.  And, when it’s time to pack up the Christmas decorations, I can gently pull the Strips off the wall.  (But always follow the directions – if you do, they won’t harm your wall, but if you don’t, they’ll take the paint right off.)

Although, if you prefer, you could just leave the tree on the floor and let your kids play with it that way.  But I think they have more fun with it if it’s hanging up.  Like this:

Felt Fashion Christmas Tree

I love the felt for playing.  It’s great for both my preschooler and my toddler.  They can put the ornaments on the tree, take them off, rearrange them, make patterns, and then do it all over again.

And I love that I found these fancy felt sheets.  I was prepared to do the tree in traditional colors, but I love this concept.  It’s so easy to change up the colors.  Like, you could do a white Christmas tree instead.  Or blue.  Or green, but with just gold ornaments.  Or whatever colors you’ve used to decorate your home for Christmas.  What a great way to personalize an interactive toy for your kids!

Felt Fashion Christmas Tree

Have fun with it!

And please share if you’ve made your own!  :)

And don’t forget to check out these other Christmas crafts:

DIY Lifesize Cardboard Gingerbread House

Easy Christmas Craft: Paper Cone Christmas Trees

Easy Christmas Craft: Toilet Paper Roll Ornament Painting

Crystal Snowmen

Roaming Rosie Signature