Glitter Dinosaur Ornaments

Glitter Dinosaur Ornaments 1

This has always been one of my favorite Christmas crafts.

I mean, who doesn’t love dinosaurs covered in glitter??

Seriously, though, hanging these Glitter Dinosaur Ornaments on my tree each year is always a joy!

Glitter Dinosaur Ornaments

Of course, I didn’t realize until afterwards that most of my photos were blurry, but you get the idea.

Essentially I picked up a tube of dinosaurs, my kids painted them, and we dumped glitter on top.

It was so much fun to do with them.

Mostly here, you’ll see the photos of the ones we painted all white – that was my preference for ultimate sparkle. But my kids did decide to paint a couple blue as well. You can really do whatever suits you.

Glitter Dinosaur Ornaments 3

Before you decorate them, you’ll want to attach tiny hooks.

I used eye hooks like these. The screw right into the toys with just a little elbow grease.

Then paint them with acrylic paint and sprinkle on glitter before the paint dries.

Last, attach any type of thin ribbon or string and you’re done!

Glitter Dinosaur Ornaments 4

I even decorated the lid of the tube.

It’s like a T-rex bust. Pretty fancy, if you ask me.

Glitter Dinosaur Ornaments

Let me know if you try it out! Or even if you grab a tube of unicorns or something else instead.

Happy Crafting :)

Roaming Rosie Signature

July 4th Fireworks Painting and Cookies

July 4th Fireworks Painting Activity and Iced Cookies with Roaming Rosie

Happy Fourth of July!

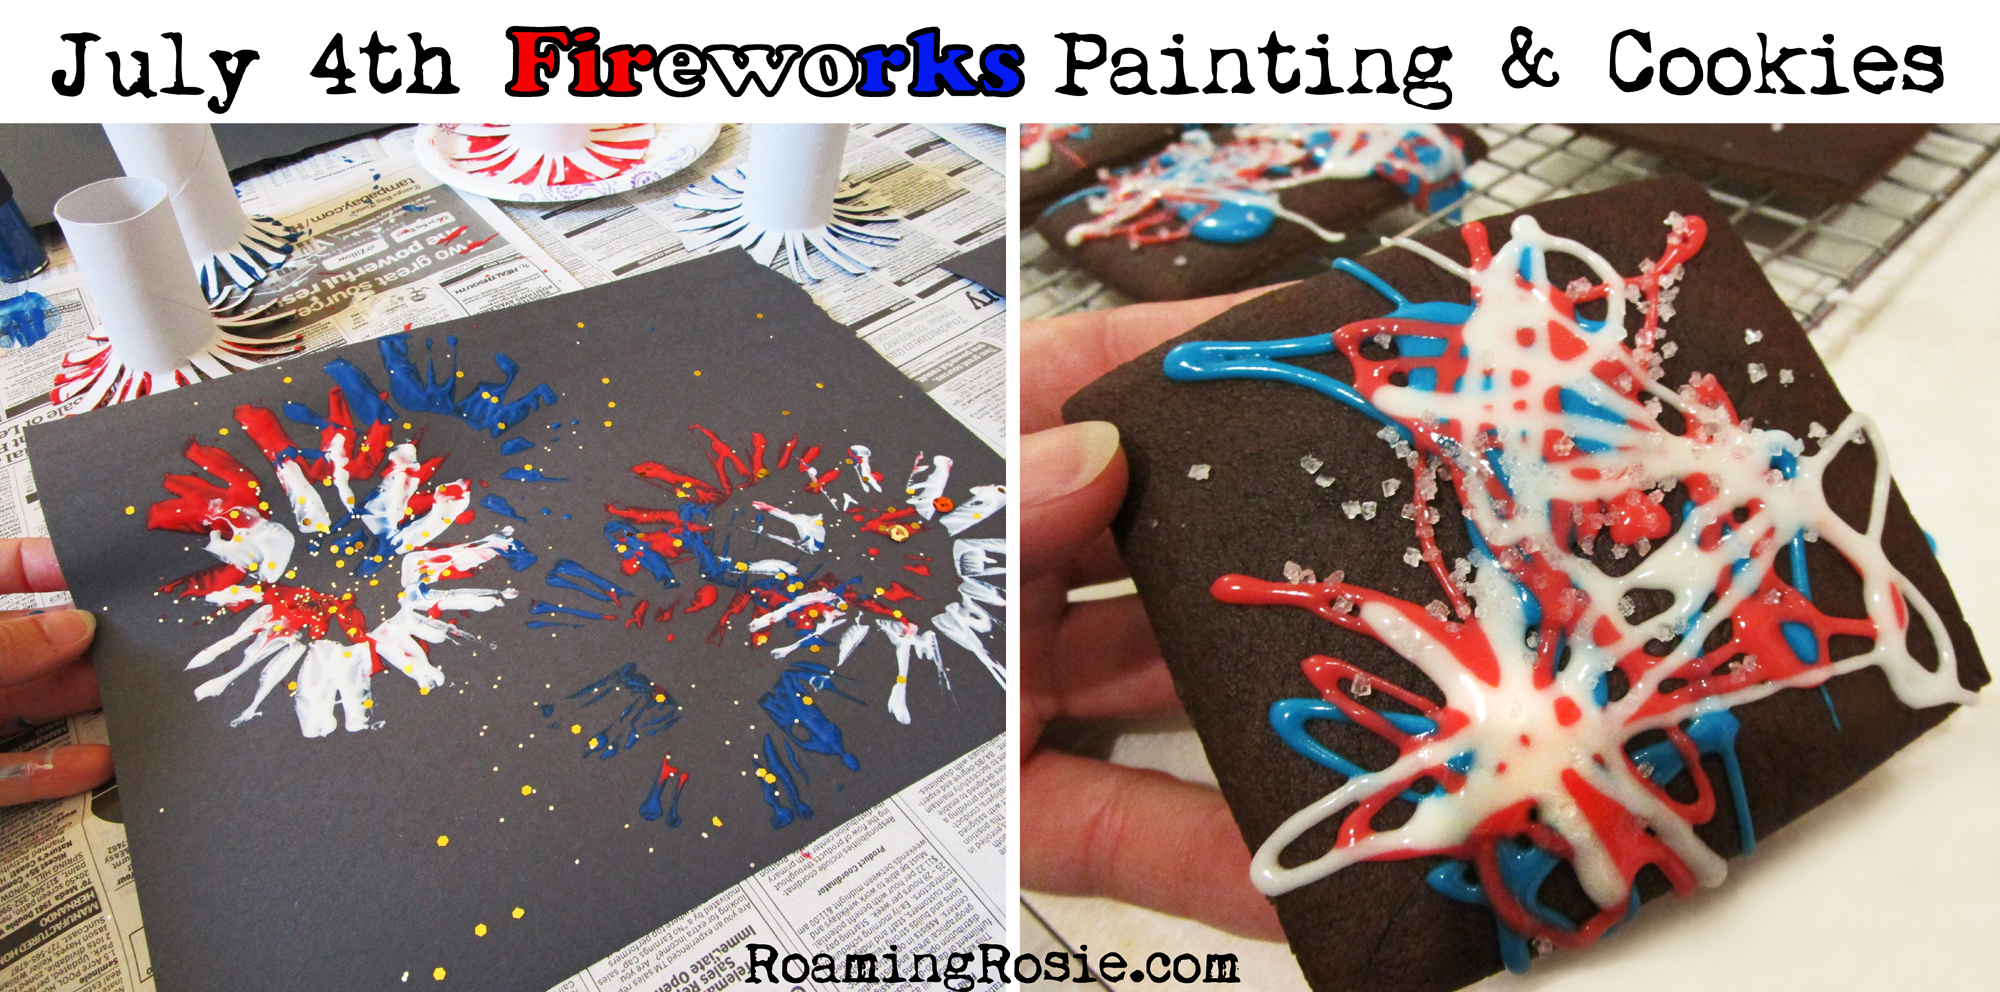
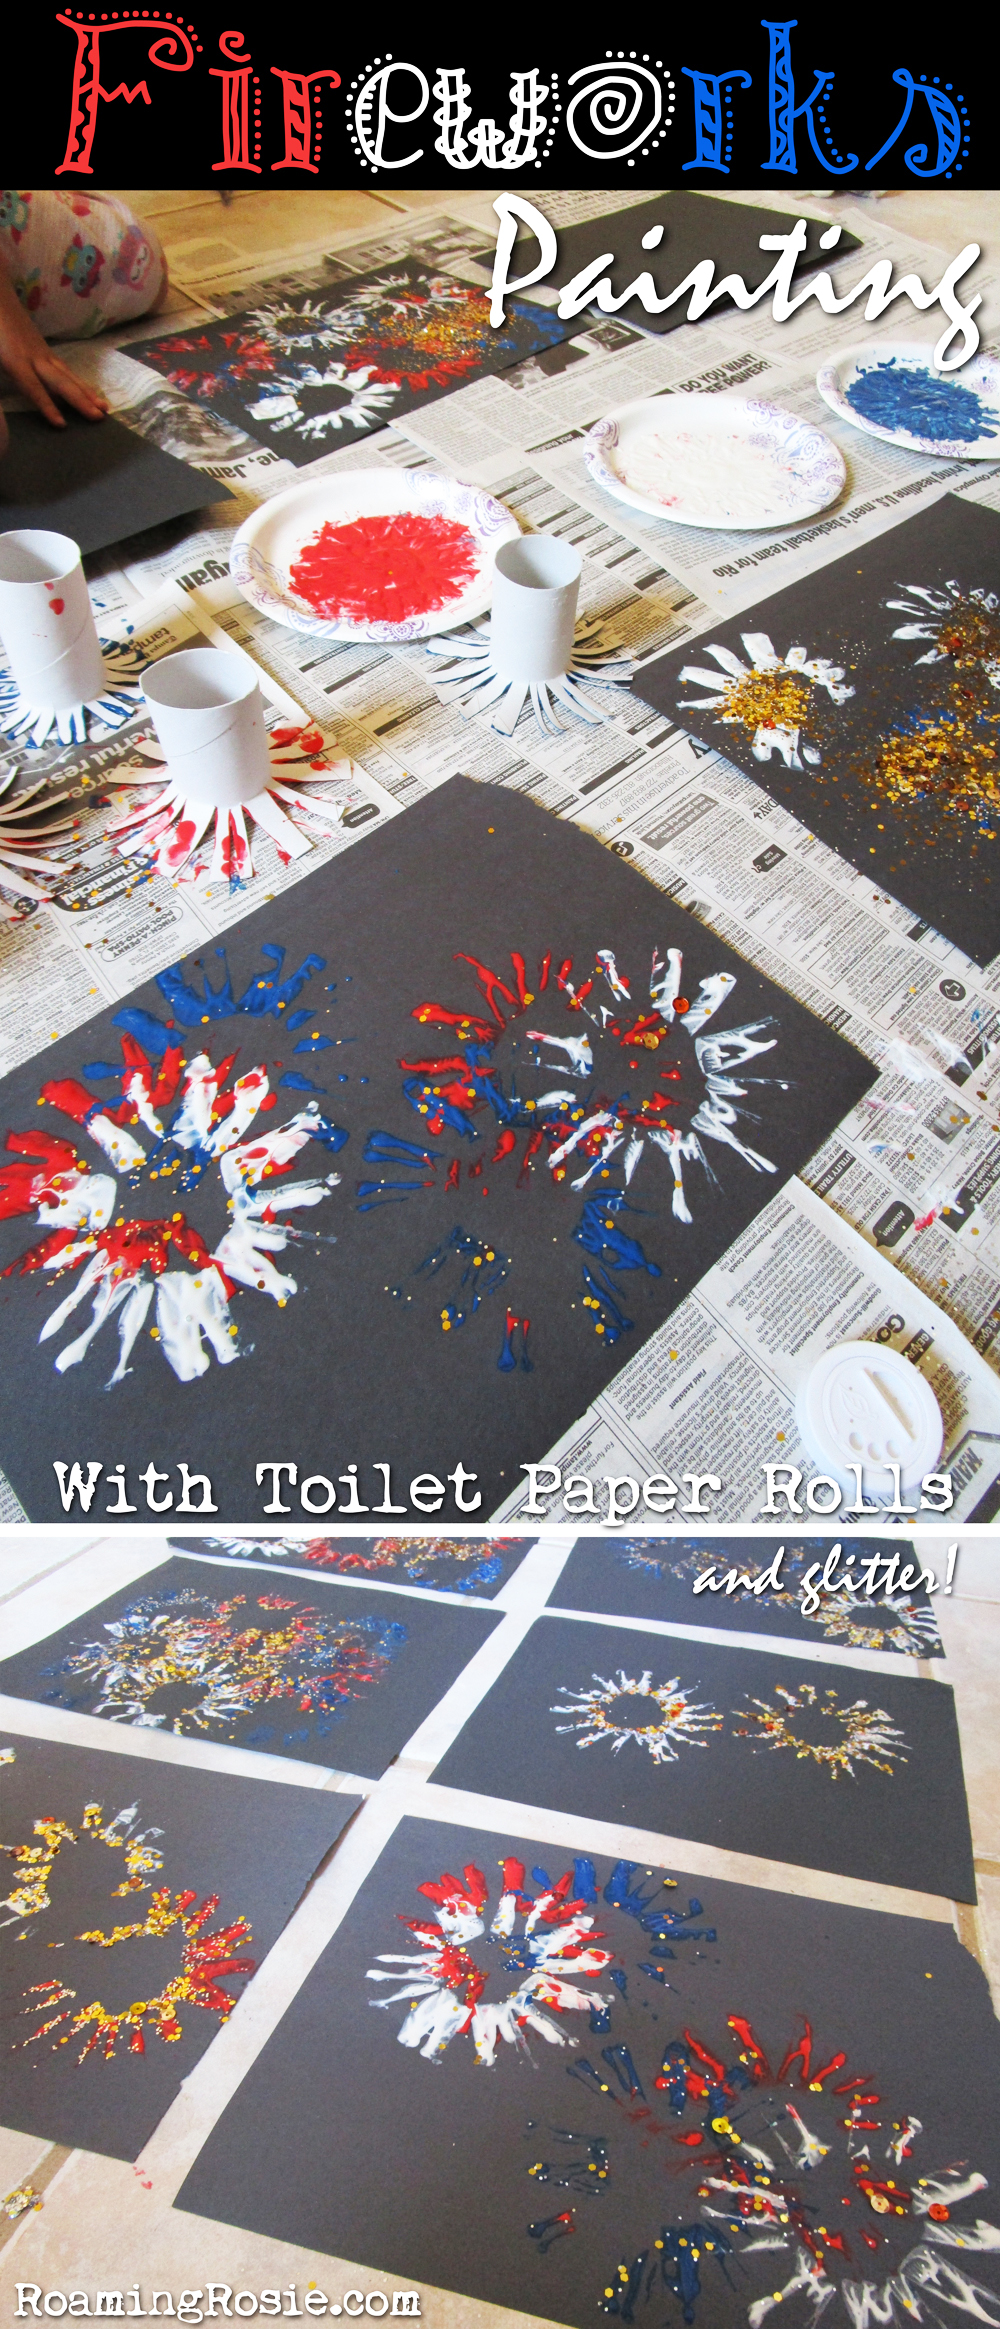
This year, my kids and I did a painting activity and a cookie project that mimicked fireworks.  First, we stamped fireworks with toilet paper rolls, and then we baked some chocolate cookies and iced them in patterns to represent bursts of color.

Both of these things were done on dark backgrounds to make it look like our paint and sugar fireworks were exploding against a nighttime sky.

Even threw in some glitter (edible and not-so-much) for a little extra spark!

Fireworks Painting with Toilet Paper Rolls and Glitter 1

First up:  the painting project.

We reused some toilet paper rolls by transforming them into stamps.

To make the firework-shaped stamps, cut slits around one side of the cardboard roll, making the incisions about a quarter-inch wide (my kids made a few slivers; don’t aim for uniformity here), and then bend back the strips against the palm of your hand to make the pieces stick out.

I put some red, white, and blue (washable) paint into three small paper plates, and we dipped the stamps into the plates and then pressed them into the paper to make our fireworks.

To get a neat effect, overlap your stamps.

Fireworks Painting with Toilet Paper Rolls and Glitter 2

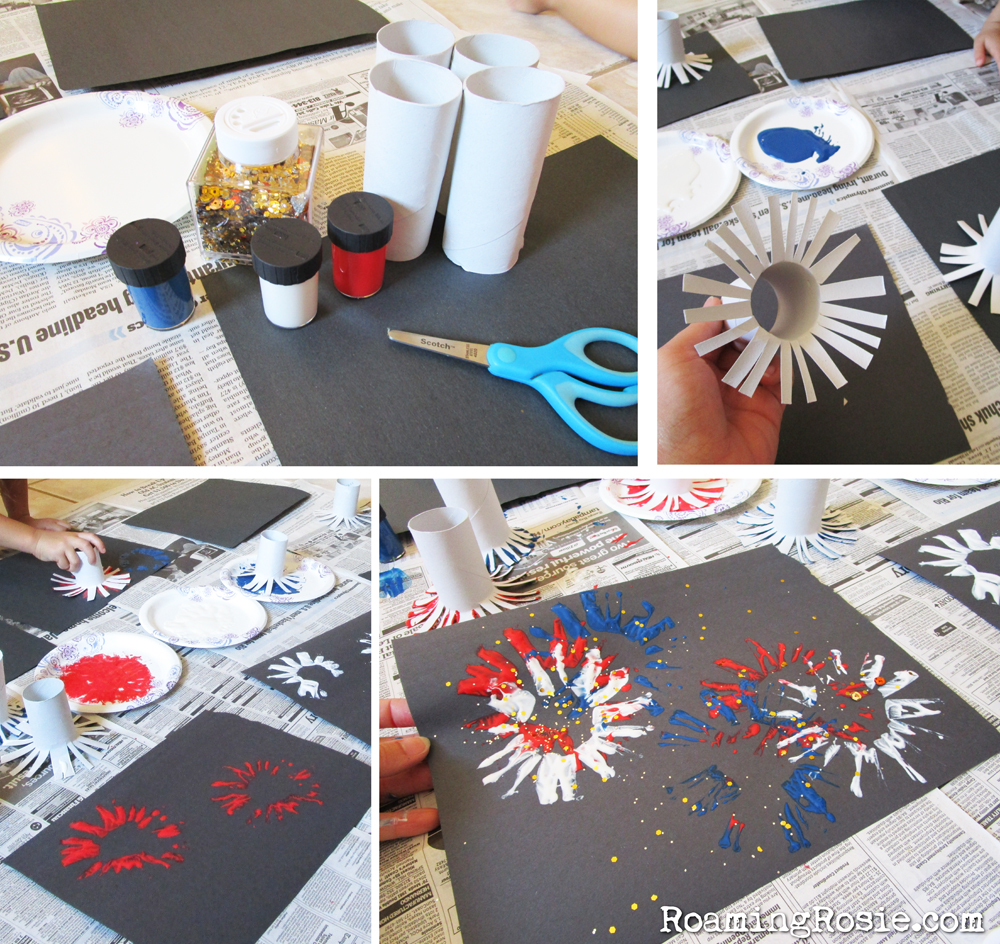
After you’ve covered your paper in fireworks, sprinkle with glitter for a fun sparkly touch!

Allow the paint to dry before shaking off the excess glitter and displaying your art.

Fireworks Chocolate Iced Cookies from Roaming Rosie 1

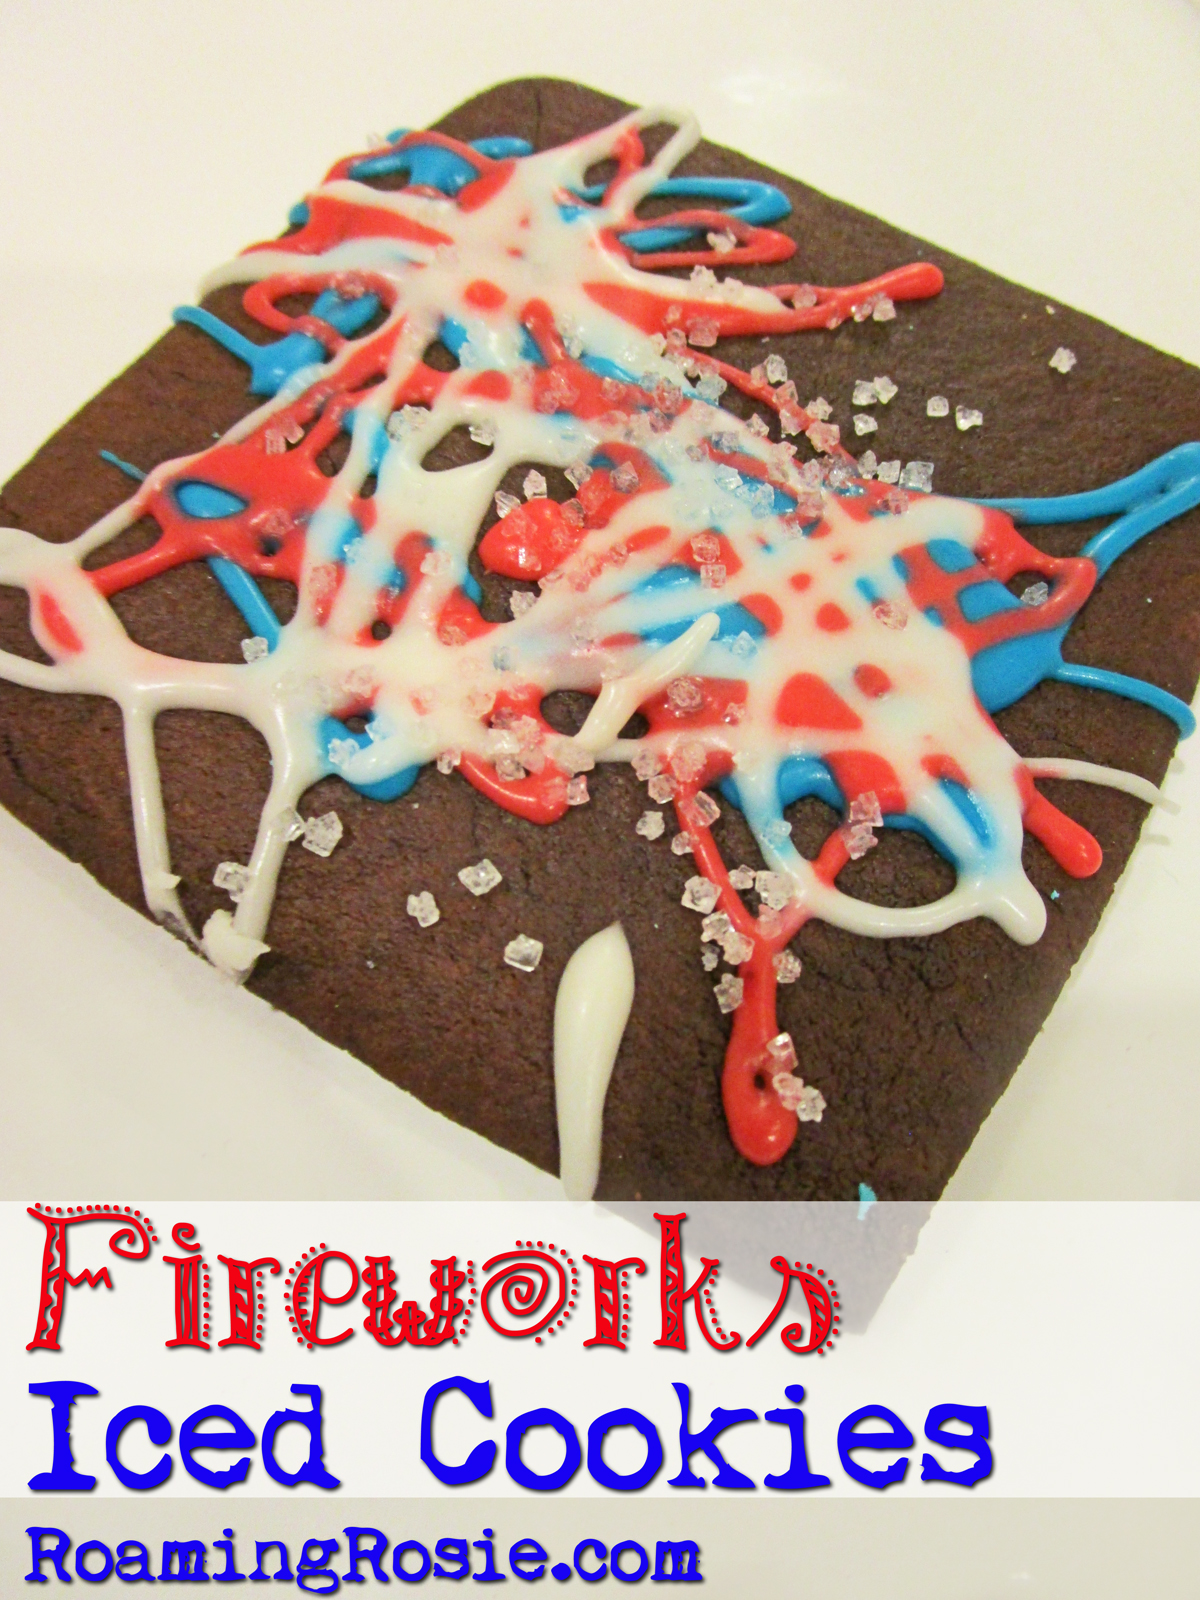
These cookies were not only fun to make – they were delicious too!

Just like the painting activity, we used the red, white, and blue colors against a dark background (in this case chocolate) to represent the fireworks bursting against a night sky.

We used the recipe that I made for my Chocolate Almond Mummy Cookies, but I made double the batch of icing.

You don’t actually NEED to double the icing – the recipe already makes plenty – but I wanted to make extra, double, totally sure that we’d still have enough icing if my girls ended up squirting most of it onto the counter instead of the cookies.

It turned out, one batch probably would have been more than enough . . . except that one of my containers burst and half of the blue icing spilled out onto a couple of cookies.

But that’s an anomaly.  (Hopefully.)

Fireworks Chocolate Iced Cookies from Roaming Rosie 2

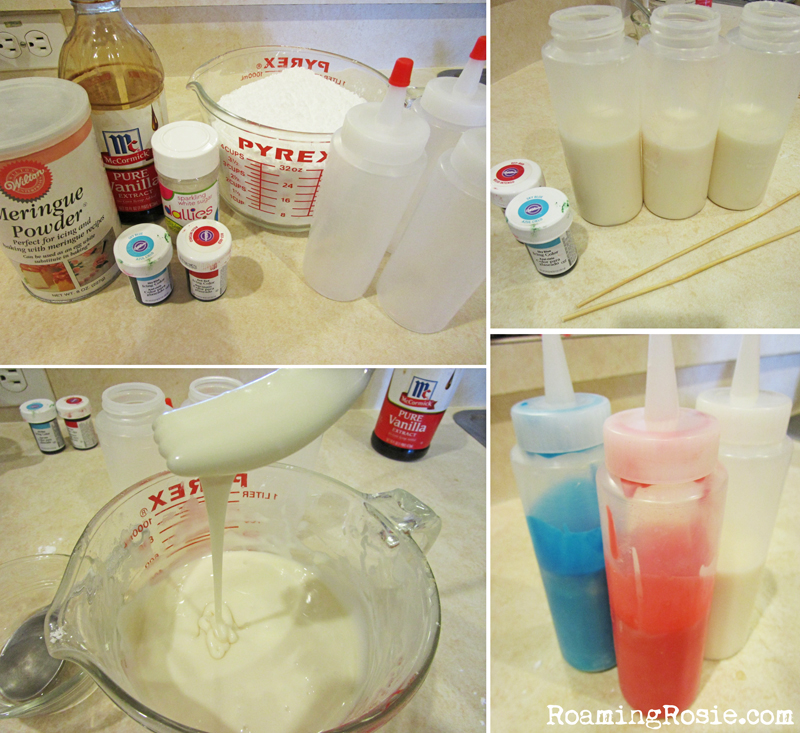
When you make the icing, be sure to stir it well until there are no lumps and it drips easily from the fork or spoon in thin ribbons.

Not watery – just thin.  If it’s too thick or clumpy it will clog your spout.

I used my Wilton Candy Making Decorating Bottles.  Mine are quite old but they usually work fine only sometimes explode.  (But seriously, this is the first time I’ve had a problem.)  I’ve been meaning to pick up some new ones anyway.  They’re pretty easy to clean and my girls just love using them.

But if you don’t have bottles like these, you could just as easily put the icing into three separate plastic baggies and snip off the ends to squeeze out the patterns.

If you’re using the bottles, I poured the white icing into them and then mixed in the food coloring with a wooden skewer, the kind used for making shish kabobs.  You could do the same with the baggies, or, if you’re not lazy like me, you could put the icing into three bowls and add the red and blue food coloring to two of them, and mix them before pouring them into the containers.

I made the icing while the cookies were in the oven.  You could make it much earlier in the day, but the longer it sits, the more likely to thicken and then you’ll have to worry about mixing in more water or stirring it to thin it again.

Fireworks Chocolate Iced Cookies from Roaming Rosie 3

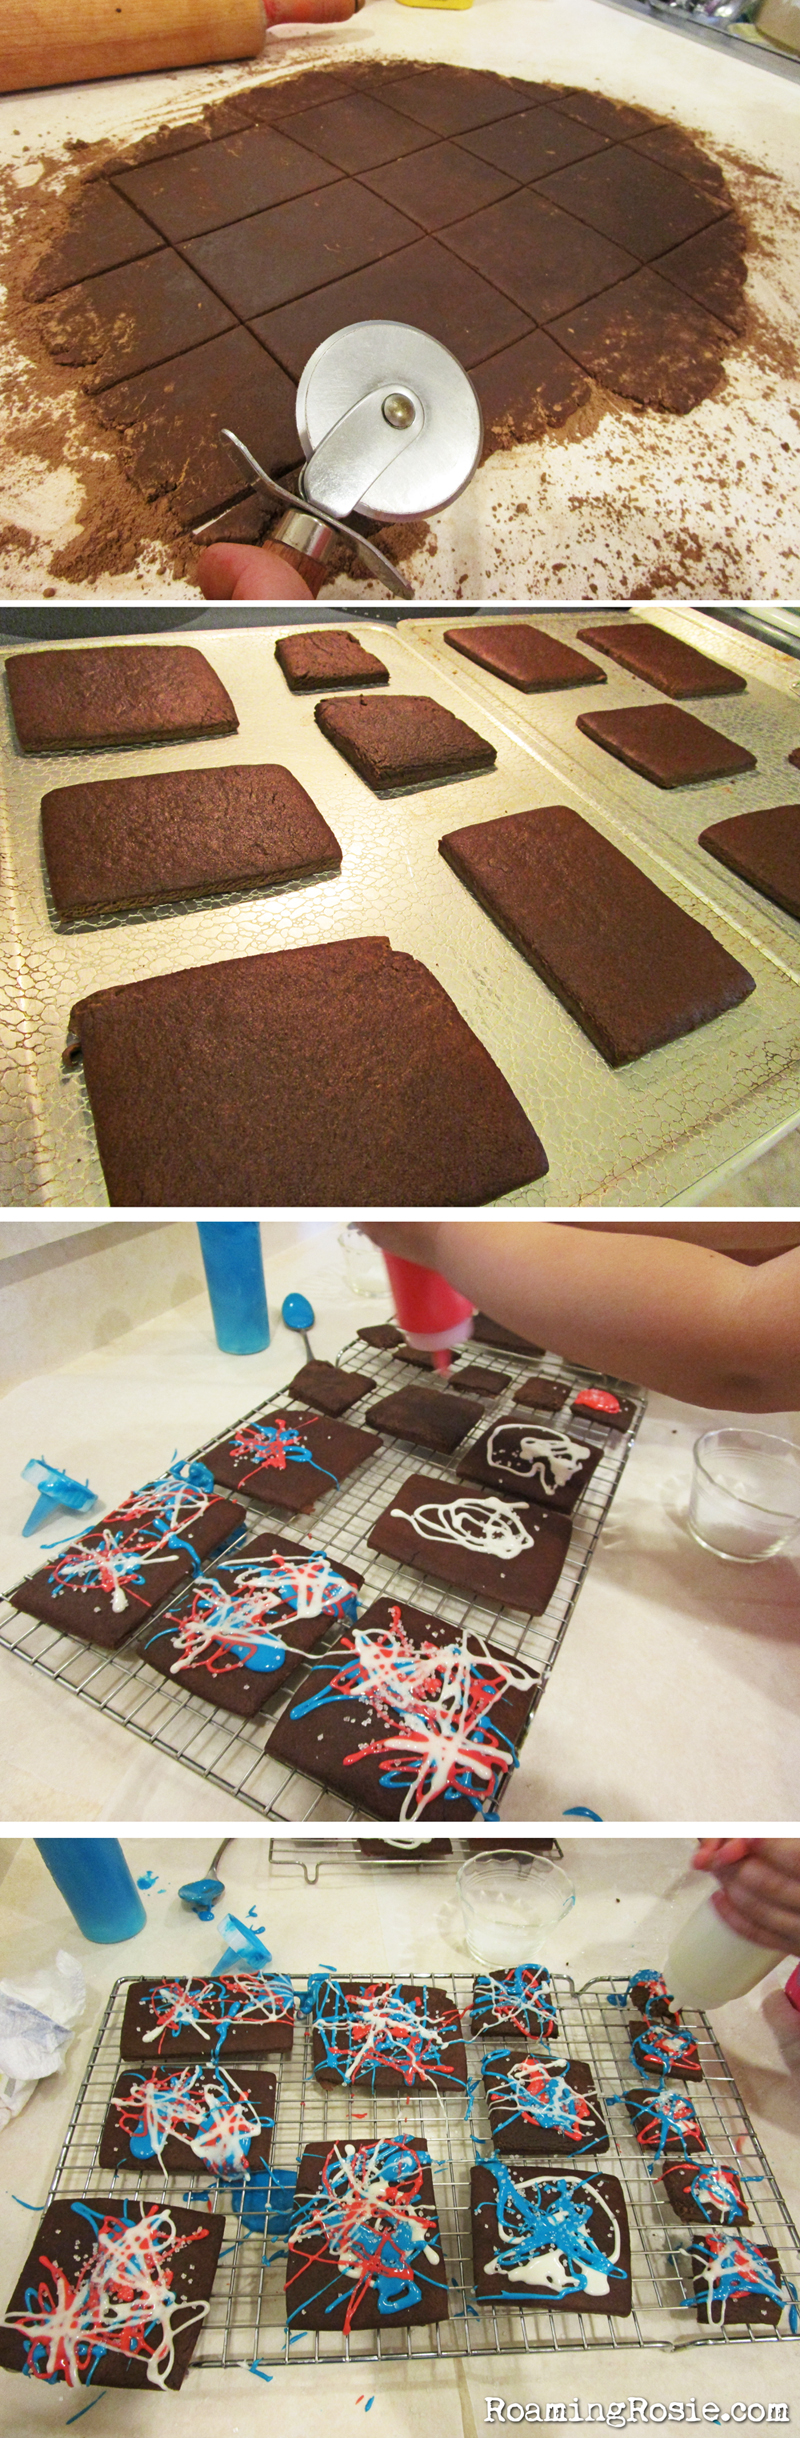
As you can see, we took the easy way out with these “cut out” cookies:  no cookie cutters.  We just sliced them up with a pizza cutter.  Easy Peasy.  Re-roll and slice again.

(If you’re wondering, that’s cocoa powder sprinkled over the counter to keep the dough from sticking, which you can use instead of flour when making chocolate cookies.)

We made the cookies into rectangles or large squares, all slightly different.  Once baked and fully cooled, I spread some waxed paper to catch the drippings and we all drizzled the icing onto the cookies, overlapping the colors, in a bit of a star burst pattern so that they would kind of look like fireworks exploding.

And, before the icing could harden, we added some white sparkling sugar to add a little extra spark to our cookies and to match the glitter on our paintings.

Again, you can find the cookie recipe on my post for Chocolate Almond Mummy Cookies.

Happy Fourth!

Roaming Rosie Signature

Glitter Glue Pumpkins

Glitter Glue Pumpkins 1

Last Fall, my daughters and I bought a variety of pumpkins and went at them armed with glue, glitter glue, and lots and lots of glitter!

(And one of these years, since it IS spring as I write this, I’ll maybe actually remember to try this with Easter eggs…)

The pumpkins in the background resemble some of our past pumpkin decorating efforts.

But this year I changed it up just a little and decorated a couple of the mini pumpkins with nothing but silver and gold glitter glue.

I started at the center of the top of the pumpkin, slowly pouring out the glitter glue in a tight circle around the stem.  I did a gold circle, then a silver one, then gold, et cetera, keeping the circles tight and touching each other until I had the entire top of the pumpkin covered in a thick layer of glitter glue and it was just barely starting to drip down the sides in the creases.

Glitter Glue Pumpkins 2

That’s it!  Just drew circles with the glue.

And look how pretty!

Please share your pumpkin photos with me on my Facebook page!

Happy Crafting!

Roaming Rosie Signature

How to Make “Snowy” Floridian Reindeer Footprints

How to Make Snowy Floridian Reindeer Footprints from RoamingRosie.com

These fun “Snowy” Floridian Reindeer Footprints were inspired by a conversation with a friend.

He was telling me about how they used to make reindeer footprints in the snow on Christmas Eve when they lived up north, which reminded me of when one of my other friends made Easter Bunny footprints with flour across her living room floor last year, and I realized………

Whoa.

I could totally make reindeer footprints with flour!

And glitter!!!

And my kids were even more excited then I was once they saw them.

You see, I’d had quite a few conversations with my 4yo about Santa.  One of her main concerns was how he was going to get into the house without a chimney.  Which was clumsily explained away with some mutterings about him climbing through windows or something.

That led to her insisting that we not only cover the lawn with the “reindeer food” that she got in school {a combination of oatmeal and green glitter meant to attract the attention of the flying reindeer}, but that we also leave open the window and glass door blinds to make sure that Santa could see inside.

And after all of her worrying, I thought it would be nice to leave some “proof” behind that Santa – and his reindeer – DID, in fact, make it to our house on Christmas Eve.

I used flour to represent the snow that stuck to the reindeer feet when they were up north where it’s cold, and the glitter was because the reindeer are magical.

How to Make Snowy Floridian Reindeer Footprints from RoamingRosie.com

What I did was mix together some flour and glitter, and then sprinkle it over the front walk with a small mesh colander.

To Make the Reindeer Footprints, you’ll need:

1 cup flour
1/2 cup fine silver glitter
small mesh colander
cardboard cutout of reindeer feet

And I would totally upload a reindeer foot template if I had one, but as you can see in the photos, I simply took a thin piece of cardboard, drew a couple of circles on them, drew a triangle in the tops of those circles, and used a box cutter to very carefully cut out the shapes.

Grandmas wasn’t fully convinced that that’s what reindeer footprints would actually look like, but I thought it was pretty spiffy.

Anyway, mix together the flour and glitter, and cut out your cardboard template ahead of time.  If it’s not going to rain, you could make the footprints late Christmas Eve – especially if you think your children will awake before you on Christmas morning.

To transfer the footprints to a sidewalk/patio/balcony/etc., scoop the flour mixture out of the bowl with the small colander and shake it gently over the template until the cutout hole is covered.  Lift template and there’s your footprint!

Ours lasted for about 4 days.  And there’s still a bit of glitter floating around.  :)

Roaming Rosie Signature

How To Make Cinnamon Christmas Ornaments … with Glitter!

Cinnamon Christmas Ornaments with Glitter

I wanted to make some homemade Christmas ornaments with my kids this year, and I LOVE cinnamon, so these were kind of a no-brainer.

But… something seemed missing from the traditional cinnamon ornament recipe… OH!  I know:  glitter!!

Yup.  Glitter makes everything better.

Cinnamon Christmas Ornaments with Glitter

I love the smell of these things.  And not all recipes use cloves, but it helps enhance the scent, so I totally used them.

I even used cinnamon applesauce instead of regular applesauce.  Don’t know if it made much difference, but, you know, they’re the same price and all, so why not?

Cinnamon Christmas Ornaments with Glitter

It’s great because you just mix everything together.  Super quick.

Cinnamon Christmas Ornaments with Glitter

Admittedly, they were a tad bit difficult to roll out.  I would suggest that this is a job for an adult and not a young child.  The dough is a bit stiff and you have to be careful not to roll it so quickly or roughly that you end up with too make cracks.

This isn’t like cookie dough where you can smooth it out easily.  If there are big ol’ cracks in your ornaments when you put them in the oven, there will be big ol’ cracks when you take them out.  Cracks that will probably make your ornament snap in half when you pick it up.

You’re only using the oven to dry these and not to bake them, so make sure that when you put them in they look how you’ll want them to look when they come out.

You could actually air dry them….. probably.  But I live in Florida.  Hello, humidity.

We used the oven.

Cinnamon Christmas Ornaments with Glitter
Also be sure to be GENTLE when removing the ornament dough from the cookie cutters.

Let your Little Ones cut out their shapes, but make sure either you or a kid with LOTS of patience slowly pushes the ornament out.  Or it will break before you even get it to the pan.

And – another warning – ovens + these guys = STEAM.

So when you open your oven door to check on the ornaments, please, please, please stand back so that you are not hit with a face full of cinnamon-and-clove-laden steam.  TRUST ME.

Cinnamon Christmas Ornaments with Glitter

You can decorate them before baking them, too.

I only did a couple:  you can see the star that I traced with a dotted pattern I made with a toothpick, and also in a couple of ornaments, I used the end of the wooden skewer to draw my daughters’ initials.

Cinnamon Christmas Ornaments with Glitter

Oh, and don’t forget to make a hole in the ornaments before you bake them.  So you’ll have somewhere to hang the string.

We used “metallic tinsel cord” but you could use kitchen twine or ribbon or a thin hemp cord.

Cinnamon Christmas Ornaments with Glitter

Aren’t they adorable?

They’re even better in person.  The glitter is much more prominent, and the aroma – ah, the cinnamon!

*sigh*

Christmas bliss.  :)

Cinnamon Christmas Ornaments with Glitter

Cinnamon Christmas Ornaments with Glitter

Ingredients:

1 1/4 cup ground cinnamon
1 tablespoon ground cloves
1 tablespoon glitter
1 cup cinnamon applesauce

Preheat your oven to 200°F.

Mix the cinnamon, cloves, and glitter in a bowl. Stir in the applesauce.

Knead gently to make sure everything is incorporated. Sprinkle some extra cinnamon on the counter (like you would flour before rolling out cookie dough) and roll out the cinnamon dough to about 1/2 inch thick.

Cut out desired shapes with cookie cutters and gently transfer ornaments to baking pans lined with parchment paper. Use a wooden skewer to very gently make a hole in the ornaments for hanging.

Gently reroll and knead scraps of dough. Roll out and cut more shapes, being careful there are no large cracks in the dough.

Bake for 2 hours, flip and bake for another hour. Allow to cool on pan.

Thread pieces of twine or ribbon through the holes to hang ornaments.

**********

And click here to print the PDF version:  Cinnamon Christmas Ornaments with Glitter


Roaming Rosie Signature

Easy Christmas Craft: Paper Cone Christmas Trees

Easy Christmas Craft:  Decorating Paper Cone Christmas Trees at RoamingRosie.com

Decorating these paper cone Christmas trees was a fun craft for my kids and easy for me to set up.

I simply took some green construction paper, rolled it into a cone, added some tape to keep it in shape, and snipped off the bottoms with scissors to make them stand.

Easy Christmas Craft:  Decorating Paper Cone Christmas Trees at RoamingRosie.com

I covered their art table with some scrap paper, set out the trees, some glitter glue and some sequins, and let them at it!

I actually had set out a bowl of gold and a bowl of red sequins, but my 4yo mixed them both together.  She thought it looked better.  :)

And I did help them a little with the glitter glue, just to make sure there was enough of it on the tree.

The sequins {our little ornaments} stick to the glitter glue, and when the glue dries, the glitter is still there, so it looks a little like a snowy garland.

Easy Christmas Craft:  Decorating Paper Cone Christmas Trees at RoamingRosie.com

Ours are by the big Christmas tree right now.  :)

And don’t forget to check out these other Christmas crafts:

DIY Lifesize Cardboard Gingerbread House

Felt Fashion Christmas Tree

Easy Christmas Craft: Toilet Paper Roll Ornament Painting

Crystal Snowmen

Roaming Rosie Signature

Halloween Mini Pumpkin {Easter Egg} Hunt & Decorating Glitter Pumpkins

Halloween Mini Pumpkin Easter Egg Hunt

This Mini Pumpkin Hunt is just about one of the easiest Halloween projects you can do, and your kids are just about guaranteed to completely freak out over how awesome it is.

Well, at least those kids who love Easter egg hunts will freak out over the awesomeness.  But I don’t know any kids who don’t love Easter egg hunts.

The setup is simple:  buy a bunch of mini pumpkins, hide aforementioned mini pumpkins in your yard or house, hand your kids a bucket or basket in which to collect them, and stand back while they stampede.

Halloween Mini Pumpkin Easter Egg Hunt

Unfortunately for us, on the day I told my girls we were going to go outside and search for mini pumpkins, it rained.

A lot.

So, we relegated the search mostly to areas of flora that could be easily accessed with feet still firmly planted on the sidewalk and out of the wet grass and mud.

It didn’t even matter to them that it only took a couple of minutes to find all 10 that I’d hidden.  They were so excited about it that they hid them again so I could find them.  And again.  And again…

Halloween Mini Pumpkin Easter Egg Hunt

Eventually we made it inside to decorate our mini pumpkins.

I’d pulled out some glitter glue and some glitter in silver and gold.  Neutral but shiny.

Halloween Glitter Pumpkin Decorating

I spread a disposable table cloth over the floor and some newspaper in the middle of it, opened up the containers of glue and glitter, and stood back.

Well, not very far back.  They insisted I help, and, really, it’s pretty fun to bury your hands in glitter sometimes.  :)

Halloween Glitter Pumpkin Decorating

And the end result looked rather pretty.

Some had designs, some were completely covered, but they all looked so fun and sparkly.

Halloween Glitter Pumpkin Decorating

It was much easier to clean up, by the way, than it looks.

Once you move the pumpkins and glue/glitter containers, simply fold the paper in half to make it into a partial funnel, and let the glitter slide back into the container again to be reused for another project.

Halloween Glitter Pumpkin Decorating

Roaming Rosie Signature