Cookie Butter Fudge

Cookie Butter Fudge Recipe

So I decided to create a recipe for Cookie Butter Fudge.

And … oh … this is quite possibly both the best and worst thing I have ever done.

This fudge, people, is RIDICULOUS.

If you’ve read my other fudge recipes, you know that I abhor the types of fudge that don’t set and require refrigeration.  So, in that vein, this fudge has no condensed milk, or even marshmallow creme or anything like that.  It’s just good old fashioned homemade fudge.

With cookie butter.

*drools*

If you are here, I’m assuming you’re familiar with cookie butter.  If not, you should seriously consider acquainting yourself immediately.

I used the Trader Joe’s Speculoos Cookie Butter which I often sometimes eat by the spoonful straight from the jar because, you know, it’s awesome. So that’s what I recommend.

But if it’s not available in your area (or you don’t want to order it from Amazon), I’ve seen similar products at Publix (European cookie spread) and Target (Biscoff creamy spread).

Cookie Butter Fudge 3

So, here we go…

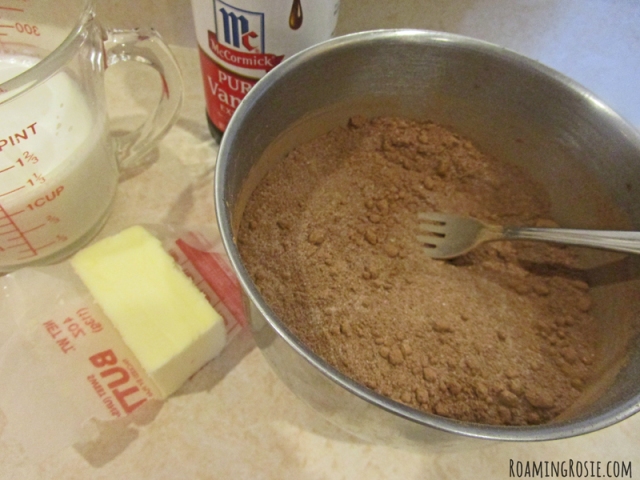
Simple ingredients.  Just milk, cream, butter, and sugar for the base, and cookie butter and vanilla for the extra flavor.

Cookie Butter Fudge 4

Dump the first ingredients in the pot and whisk together.

If you’ve forgotten to set out your butter ahead of time, just slice it and throw it in cold.  Bring up the pan to a boil slowly, making sure the butter melts and gets combined.

But once it gets to a boil, do NOT stir it again.  (It will get all grainy and weird.)

Cookie Butter Fudge Recipe

As it comes to a rolling boil, it’s going to expand.  A LOT.

So use a very large pot.

Cookie Butter Fudge Recipe

As it cooks, it will reduce back down.

Cookie Butter Fudge 7

Once it gets to soft ball stage, it will be much thicker with larger bubbles.

This takes about 15 minutes.

Unless I’ve forgotten to leave it at a rolling simmer.  If the temperature is too low, it can take a lot longer than 15 minutes to get to soft ball stage.  Just make sure you get there, or the fudge won’t set.

Cookie Butter Fudge 8

Take it of the heat and quickly stir in the vanilla and cookie butter.

Cookie Butter Fudge 9

You’re going to beat it over a bowl of ice to help it cool down and set.

Stir it well, but as soon as it is thick enough to pull away from the sides and bottom of the pot while you stir it, go ahead and dump it in your prepared pan.

Cookie Butter Fudge 10

You’ll need to let it sit for awhile to finish setting up.

Once it’s hardened (this should take between 30 minutes and an hour), pull it out by the foil.  You can let it sit longer, on a cooling rack, if it feels wobbly and soft.

Then place a large platter over the fudge and use that platter to flip it over:

Cookie Butter Fudge 11

You’ll want it to rest upside down for a bit to make sure the bottom dries out.

Then place a cutting board over it and flip it back to right side up.

Cookie Butter Fudge 12

Cut the fudge with a long sharp knife, wiping the blade on a towel between slices.

Cookie Butter Fudge Recipe

Let the fudge rest for awhile (at least two hours but I’ve left it out as long as overnight) so that it hardens all the way around.

You want it fully set not only so that you can stack the pieces on a plate or in a container, but also for the wonderful texture balance of the sugary, buttery flakiness of the exterior that contrasts with the utter softness of the interior that will melt in your mouth like a liquid drop of cookie joy.

Cookie Butter Fudge Recipe from Roaming Rosie

Cookie Butter Fudge

Ingredients:

1 cup whole milk
1 cup heavy whipping cream
3 cups sugar
1/2 cup (1 stick) butter, softened
1/2 cup Speculoos Cookie Butter
1 teaspoon vanilla extract

Prepare an 8×8-inch baking dish with tin foil and a light coating of butter or cooking spray.

Whisk together the milk, cream, sugar, and butter in a large saucepan.  Bring it to a rolling boil.

Reduce the heat and simmer it without stirring.  This is important:  do NOT stir the mixture!  After 15 minutes, test the temperature with a thermometer.  Once it reaches 235°F or soft ball stage, remove from heat.  Do NOT stop simmering until it reaches this temperature, or it will not set.  This may take more than 15 minutes.  It will be noticeably thicker when it’s done.

Remove from heat and stir in the cookie butter and vanilla extract.

Fill a large bowl with ice and place the saucepan into the bowl on top of the ice.  Stir the fudge over the ice until it is very thick.  Then (making sure not to let any of the melted ice get into your fudge) pour it into the prepared baking dish, spreading it smooth.

Place baking dish on a wire rack and allow to set.  This may take a half hour or longer, depending on the temperature and humidity of your home.  Carefully remove the fudge from the dish by pulling out the foil.  Place a large plate over the fudge and flip it over so that the fudge can rest upside down for a few minutes, to let the bottom to dry.  Follow the same procedure to flip it right side up on a cutting board.

Cut into squares or rectangles with a sharp knife, wiping the blade on a towel between slices.  Allow the pieces to sit without touching for at least a 2 hours or overnight to make sure each piece is fully set and has a nice solidity all the way around the smooth interior.  Then store covered.

Makes about 3 dozen 1-inch pieces.

[Note:  I used Trader Joe’s Speculoos Cookie Butter, but you can substitute any European cookie spread.]

**********

And to print the free PDF of the recipe, click here:

Cookie Butter Fudge

Happy Baking!

Roaming Rosie Signature

Chocolate Fudge with Chocolate Chip Topping

Chocolate Fudge with Chocolate Chip Topping

Did I REALLY just publish THREE fudge recipes in a row??

Yes.  Yes, I did.

And I may do it again one day…. I AM working on some new recipes… ;)

But for today, let’s just stick with this chocolate fudge with its INCREDIBLE chocolate chip topping.

Because, really, the awesomeness here deserves a massive amount of attention.

Chocolate Fudge with Chocolate Chip Topping

It starts out like any normal fudge (well – the kind WITHOUT condensed milk, which are the only ones I’ll cook now).

And go right ahead and ignore those mini chocolate chips in the photo…. I’d put them out before I realized they weren’t the ones I wanted to use.  Don’t ask.  Crazy Mom Brain, I guess.

What you SHOULD use are milk chocolate chips.  Why?  Because they’re softer and it’s a slightly contrasting flavor to the main body of the fudge.  In other words, it compliments the fudge while still standing on it’s own.

Chocolate Fudge with Chocolate Chip Topping

First things first:  whisk together the milk, cream, butter, sugar, and cocoa in a pot.

BUT in a bigger pot than what I photographed above.  Don’t ask.  Probably due to Crazy Mom Brain operating on no sleep.  Either way, this pot overflowed and you just really don’t want to waste any chocolate like that.

So use a bigger pot.

Like this one:

Chocolate Fudge with Chocolate Chip Topping

Bring the mixture to a boil without stirring it.

Then reduce to a rolling simmer.

Chocolate Fudge with Chocolate Chip Topping

After 15 minutes, check the temperature.  Remember:  no stirring.

It NEEDS to hit 235 degrees Fahrenheit.  If it doesn’t hit that temperature (also known as soft ball stage), it won’t set.

But you may need to keep simmering it until it hits 235.  Don’t worry if it takes longer – just keep checking until you get where you need to be.

It’s totally worth the wait.

Chocolate Fudge with Chocolate Chip Topping

Once you get to 235, you can take it off the stove and mix in the vanilla.

To really, really make sure that the fudge sets like it should, you should put the pan over a bowl of ice and stir it for a few minutes until it gets thicker.

Chocolate Fudge with Chocolate Chip Topping

Pour the fudge into a pan prepared with butter or cooking spray (foil really helps, too), and immediately sprinkle the chocolate chips over the top.

Spread out the chips so that they cover the entire top evenly and press down gently to make sure that they adhere.

The fudge shouldn’t be hot enough to melt them at this point if you stirred it over the ice for a couple of minutes, but just warm enough to let the chips slightly melt just enough so that they stick.

Chocolate Fudge with Chocolate Chip Topping

There you go.

Isn’t that beautiful??

Let it sit, preferably on a wire rack to cool the bottom faster, then remove it from the pan.

Flip it over – gently! – for a few minutes to allow the bottom to dry, then – gently! – flip it back and cut it into pieces.

Chocolate Fudge with Chocolate Chip Topping

The inside will still be a little moist, which is why I suggest allowing the cut pieces to sit out, not touching each other, for at least an hour, if not overnight.

That way, the outside is completely dry.  But the inside stays nice and smooth and melt-in-your-mouth amazing.

Seriously.  If you love chocolate, you’re gonna be in heaven with these little bits of bliss.

Don’t be surprised if you take a tray to work or a pot luck and they’re gone before you can blink.

Chocolate Fudge with Chocolate Chip Topping

Chocolate Fudge with Chocolate Topping

Ingredients:

1 cup whole milk
1 cup heavy whipping cream
3 cups sugar
2/3 cup unsweetened cocoa powder
1/2 cup (1 stick) butter, softened
2 teaspoons vanilla extract
1 cup milk chocolate chips

Prepare an 8×8-inch baking dish with foil and a light coating of butter or cooking spray.

Whisk together the milk, cream, sugar, cocoa, and butter in a large saucepan. Bring it to a boil.

Reduce the heat and simmer it without stirring. This is important: do NOT stir the mixture! After 15 minutes, test the temperature with a thermometer. Once it reaches 235°F or soft ball stage, remove from heat. Do NOT stop simmering until it reaches this temperature, or it will not set. This may take a few more minutes. It will be noticeably thicker at this point, but still slightly runny. Remove from heat and stir in the vanilla extract.

Fill a large bowl with ice and place the saucepan into the bowl on top of the ice. Stir the fudge for a few minutes until it is very thick. Then (making sure not to let any of the melted ice get into your fudge) pour it into the prepared baking dish, spreading it smooth. Immediately sprinkle the chocolate chips over the top. Spread them evenly, covering the entire surface, and gently press them down to make sure they adhere to the top of the fudge.

Place baking dish on a wire rack and allow to completely set. This may take a half hour or a little longer, depending on the temperature and humidity of your home. Carefully remove the fudge from the dish by pulling out the foil. Place fudge on a wire baking rack for a few minutes to allow the bottom to dry.

Cut into squares or rectangles with a sharp knife and allow the pieces to sit for a while without touching. I usually leave them out overnight to make sure each piece is fully set and has a nice solidity all the way around the smooth interior. Makes about 3 dozen 1-inch pieces.

[Note: you can also use semi-sweet or dark chocolate chips instead of the milk chocolate.]

********

Click here to print the free PDF version of the recipe:

Chocolate Fudge with Chocolate Chip Topping

And if you like fudge, check out my Vanilla Fairy Fudge and my mini pieces of traditional Chocolate Fudge:

Vanilla Fairy Fudge Recipe Chocolate Fudge Recipe

Happy Baking!

Roaming Rosie Signature

Chocolate Fudge Recipe (with no condensed milk!)

Chocolate Fudge Recipe

As I recently mentioned in my post about Vanilla Fairy Fudge, I really, really, really don’t like fudge that’s made with condensed milk.

So I’ve been experimenting with fudge recipes lately (ones withOUT condensed milk), and today I wanted to share my Chocolate Fudge.

This stuff is AH-may-zing!!!

Just supremely smooth and decadent and perfectly chocolatey!

I think I’m in love.

Chocolate Fudge Recipe

Just look at that pile of perfection.

Sigh……

This is the stuff dreams are made of.

Chocolate Fudge Recipe

Anyway – back to the recipe.

Basic fudge stuff, plus a cocoa powder that you like.

Chocolate Fudge Recipe

Mix together the sugar and cocoa….

Chocolate Fudge Recipe

Then mix all of it (except the vanilla) in a sauce pot.

Then whisk it to make sure it’s all mixed.

Chocolate Fudge Recipe

Bring it up to a boil…..

Chocolate Fudge Recipe

Then simmer until it hits 235 degrees Fahrenheit.

Which is important.  You gotta wait until it gets to 235 (soft ball stage) before you take it off the stove.  Otherwise it won’t set properly.

Chocolate Fudge Recipe

Stir in the vanilla and then put the whole pot on top of a bunch of ice cubes in a big bowl.

Stir, stir, stir.

After a couple of minutes, it will be much thicker.  Time to transfer to your prepared pan!

Chocolate Fudge Recipe

I recommend lining your pan with tin foil and then greasing it with a very light layer of butter or a nonstick cooking spray.  I like coconut oil spray.

BUT – I need to stress that the pan pictured here is NOT a big 9 by 13 inch baking pan!  I didn’t realize that it would look like that in the photos.  I usually use an 8 by 8 inch baking dish for this, but just happened to grab this little guy when I was photographing this batch.

The dish pictured here is actually 1.5 quarts or approximately 6 by 10 inches.

Chocolate Fudge Recipe

After a short time, you’ll be able to pick the fudge up out of the pan with the foil and turn it over to allow the bottom to set.

Then you can (carefully) flip it over again and cut it into pieces.

Let those pieces sit out for a while to fully set all around.  I will usually leave them out overnight or for at least a few hours, just to make extra sure they’ve hit the texture I’m looking for before I pack them away.

Chocolate Fudge Recipe

The pieces of fudge you will get from this recipe are pretty small, by design.

If you want really thick giant chunks, you’ll have to either double (triple??) the recipe, or just pour it into a smaller pan to set.

But just take a look at that gorgeous pile of deliciousness…… you’ll be wanting to try this.  About right now.

Chocolate Fudge Recipe

Chocolate Fudge

Ingredients:

1/2 cup whole milk
1/2 cup heavy whipping cream
1 ½ cups sugar
1/2 cup unsweetened cocoa powder
6 tablespoons butter, softened
1 teaspoon vanilla extract

Prepare an 8×8-inch baking dish with foil and a light coating of butter or cooking spray.

Whisk together the milk, cream, sugar, cocoa, and butter in a saucepan. Bring the mixture to a boil.

Reduce the heat and simmer it without stirring. This is important: do NOT stir the mixture! After 15 minutes, test the temperature with a thermometer. Once it reaches 235°F or soft ball stage, remove from heat. Do NOT stop simmering until it reaches this temperature, or it will not set. It will be noticeably thicker at this point, but still slightly runny.

Let it sit for a minute and then stir in the vanilla extract.

Fill a large bowl with ice and place the saucepan into the bowl on top of the ice. Stir the fudge for a few minutes until it is very thick. Then (making sure not to let any of the melted ice get into your fudge) pour it into the prepared baking dish, spreading it smooth.

Place baking dish on a wire rack and allow to completely set. This may take a half hour or a little longer, depending on the temperature and humidity of your home. Then carefully remove the fudge from the dish by pulling out the foil. Carefully invert it on a flat plate or platter and allow the bottom to dry. Again, this may only take a few minutes.

Cut into squares or rectangles with a sharp knife and allow the pieces to sit for a while without touching. I usually leave them out overnight to make sure each piece is fully set and has a nice solidity all the way around the smooth interior. Makes about 4 dozen very small pieces, depending on how you cut it.

[Note: the recipe can be doubled or put in a smaller pan if you like thicker pieces.]

**********

Click below for the free printable PDF version of this recipe:

Chocolate Fudge

And if you like this, be sure to check out my Vanilla Fairy Fudge:

Vanilla Fairy Fudge Recipe

Or if you’d prefer cookies……..

Chocolate Chip Peanut Butter Cookies Mini M M Chocolate Chip Cookies Soft Iced Sugar Cutout Cookie Leaves Strawberry Cream Cheese Sandwich Cookies

Happy Baking!

Roaming Rosie Signature

Vanilla Fairy Fudge

Vanilla Fairy Fudge

I am a BIG fan of fudge.

But I stopped making fudge for a long time.  I got tired of trying out recipe after recipe and never having an end result that resembled what you’d find in candy stores or ice cream shops.

This was mostly because every recipe that I tried called for condensed milk.  And each and every one of those recipes left me with a fudge that was mushy and half-melted at room temperature.  Which – to me – isn’t really fudge.

Recently I decided to tackle this particular dessert again.  I tried some different combinations of ingredients and some different methods of cooking.  There were successes.  And there were failures.  What I’m posting today was not only a success but a hit.

And I’ll be sharing more fudge recipes soon, but today, let’s just start with this Vanilla Fairy Fudge.

Why “fairy?”

Well, when I was doing Letter F Day with my girls, I wanted to make a snack that started with the letter F.  I was enchanted by the pictures of Fairy Bread that I found on the internet (it’s an Australian treat – not something we see over here in the U.S.), but I decided to go one step further and add another “F” to make it better fit my alphabet theme.  Thus, Fairy Fudge.

The fudge I made that day, however, was a bit of a failure.  Not completely – I mean, we did eat it…..

But it was yet another condensed milk recipe.

Turns out you can use regular milk (and some cream, too) and come up with something even better.  Which is what we have here.  And it’s surprisingly easy, too, once you know the steps to take.

Originally this was just Vanilla Fudge, which was – don’t get me wrong – great, but I just couldn’t stop thinking about my Letter F recipe.  So I added some sprinkles to the next batch.  Great became awesome.

Because sprinkles just make life better.

Vanilla Fairy Fudge

The ingredients are pretty basic:  butter, milk, sugar, etc.

Heavy whipping cream is pretty much the only think here that I’d have to remember to actually pick up at the store ahead of time.

Vanilla Fairy Fudge

Everything except the vanilla and sprinkles gets mixed together and brought to a boil.

Once you reach a boil, you turn it down and simmer it for 15 minutes or so.

There is NO stirring.  You just watch to make sure it’s still bubbling, but that it never boils over.  Especially on stoves like mine.  My stove seems to change its temperature when it feels like it.

Vanilla Fairy Fudge

The important thing is that your fudge reach a temperature of 235 degrees Fahrenheit.

Even if it takes more that 15 minutes.  This step is important.

Vanilla Fairy Fudge

Then you mix in the vanilla and stir it over a bowl of ice to cool it down quickly.

Vanilla Fairy Fudge

When stirring it over the ice, it’ll thicken noticeably.

Then it’s ready to go into your prepared pan.  I like to coat the pan with foil first, to make it easier to remove the fudge once it’s set, but you also need something to grease it with.

Butter works well as long as you don’t overdo it.  I sometimes use nonstick cooking spray.  My favorite is coconut oil spray.

Vanilla Fairy Fudge

Cover the top with sprinkles (all the way to the edges) right away.

It’s better to put too much than too little.  After it’s set, just tilt it to allow the extras to fall away.

The fudge should set quickly.  I might let it sit for an hour just to be extra certain, but it usually sets in just a few minutes.

Vanilla Fairy Fudge

Then you take it out of the pan and turn it over VERY gently onto a large plate (retro plate optional).

But even if you’re like me and you sometimes stop paying attention to what you’re doing and you manage to break the fudge into two or three chunks, that’s okay.  You can always cut the pieces diagonally.

And this recipe is meant to produce small pieces.  Not gigantic thick hunks of candy.  If you want it thicker, though, it’s easy enough to double the recipe or just put it in a smaller pan to set.  Your choice.

I then leave those little pieces out overnight, or for a few hours, to make extra, extra certain that they’re fully set all the way around.  I don’t like mushy edges.

Because the best part is biting into the crisp edges of the fudge piece and discovering the smooth, soft melt-in-your mouth center.

Mmmmmmm…… I think I need to go make some more fudge…….

Vanilla Fairy Fudge

Above is a photo of what the fudge looks like without the sprinkles.

Still delicious.  Just not as colorful.

And, honestly, I love the texture that the sprinkles add to it.  But it’s a choice that’s up to you.  I promise I won’t judge your fudge.  (As long as you don’t judge my rhymes.)

Vanilla Fairy Fudge

Vanilla Fairy Fudge

Ingredients:

1/2 cup whole milk
1/2 cup heavy whipping cream
1 ½ cups sugar
6 tablespoons butter, softened
1 tablespoon vanilla extract
Nonpareil sprinkles

Prepare an 8×8-inch baking dish with foil and a light coating of butter or cooking spray.

Whisk together the milk, cream, butter, and sugar in a saucepan. Bring the mixture to a boil.

Reduce the heat and simmer it without stirring. This is important: do NOT stir the mixture! After 15 minutes, test the temperature with a thermometer. Once it reaches 235°F or soft ball stage, remove from heat. Do NOT stop simmering until it reaches this temperature, or it will not set. It will be noticeably thicker at this point, but still slightly runny.

Let it sit for a minute and then stir in the vanilla extract.

Fill a large bowl with ice and place the saucepan into the bowl on top of the ice. Stir the fudge for a few minutes until it is very thick. Then (making sure not to let any of the melted ice get into your fudge) pour it into the prepared baking dish, spreading it smooth. Immediately cover the top with nonpareil sprinkles. This is an optional step, but it adds a nice texture.

Place baking dish on a wire rack and allow to completely set. This may take a half hour or a little longer, depending on the temperature and humidity of your home. Then carefully remove the fudge from the dish by pulling out the foil. Carefully invert it on a flat plate or platter and allow the bottom to dry. Again, this may only take a few minutes.

Cut into squares or rectangles with a sharp knife and allow the pieces to sit for a while without touching. I usually leave them out overnight to make sure each piece is fully set and has a nice solidity all the way around the smooth interior. Makes about 4 dozen very small pieces, depending on how you cut it.

[Note: the recipe can be doubled or put in a smaller pan if you like thicker pieces.]

**********

Click for the free printable PDF of the recipe:

Vanilla Fairy Fudge

And if you love fudge, then you absolutely HAVE to check out my Chocolate Fudge recipe:

Chocolate Fudge Recipe

Happy Baking!

Roaming Rosie Signature